
How to create video and audio clips using the Clipping Tool
Overview
This article explains how to use the Clipping Tool in the Media Cloud to create shorter video or audio clips from existing on-demand media items.
You will learn how to select a specific portion of a media item, configure the clip settings, and create a new, separate media item without modifying the original video or audio file.
When to use the Clipping Tool
Use the Clipping Tool when you want to:
Create highlights from a longer on-demand video or audio file.
Prepare shorter clips for publishing, sharing, or promotion.
Reuse a specific portion of an existing media file without uploading it again.
Create a separate media item with its own title, description, and Channel assignment.
The Clipping Tool is available for existing video and audio files in the Media Cloud.
Prerequisites
Before using the Clipping Tool, make sure that:
You have access to the Media Cloud.
The video or audio file you want to clip has already been uploaded to the Video Archive or Audio Archive and has completed encoding.
You have sufficient Transcoding and Storage resources available to create the new clip.
If you have reached your Transcoding limit, you can purchase additional Transcoding from the USAGE box on your Media Cloud Dashboard.
If you want to assign the clip to a Channel, apply a Workflow Preset, or add a Watermark, make sure the applicable Channel, Workflow Preset, or Watermark has already been created in your Media Cloud account.
How it works
The Clipping Tool allows you to select a start time and end time within an existing video or audio file. The Media Cloud then generates a new media file containing only the selected portion.
The original media file remains unchanged.
Each clip is created as a separate media item in the Video Archive or Audio Archive, depending on the type of media file.
When creating a clip, you can configure its title, description, and additional settings. You can also assign the clip to a Channel, select a Workflow Preset, or apply a Watermark for supported video workflows.
Clipping versus video editing
The Clipping Tool is designed to create a shorter video or audio clip from one continuous portion of an existing on-demand media item without using dedicated editing software.
For example, you can create a highlight from a longer video or create a new version of a media item that excludes unwanted content at the beginning or end of the original file.
The original media item remains unchanged.
The Clipping Tool is not intended for advanced editing tasks, such as combining multiple media segments, adding transitions, inserting graphics, or applying visual effects.
For more advanced editing, use dedicated video or audio editing software to prepare your media file before uploading it to the Media Cloud.
Transcoding and storage
Creating a clip uses additional transcoding and storage resources because the Media Cloud generates and encodes a new media file.
Transcoding and storage usage for the new clip are based on the length of the selected portion, not the entire length of the original media file.
For example, if you create a 5-minute clip from a 60-minute video:
Transcoding usage for the new clip is based on the 5-minute clip.
The new 5-minute clip uses additional storage resources.
The original 60-minute video remains unchanged and continues to use its existing storage resources.
Creating a clip does not reduce the storage usage of the original media item.
Clip processing and availability
After you submit a clip, the Media Cloud processes and encodes the selected portion as a new media item.
Once encoding is complete, the clip becomes available as an ACTIVE media item in the Video Archive or Audio Archive.
If you assigned the clip to a Channel during creation, it will automatically be published once encoding is complete and can become available in the apps and other publishing destinations connected to that Channel, depending on the applicable publishing settings.
If no Channel was assigned, the clip remains available in the Video Archive or Audio Archive for future use.
You can also schedule a clip to publish at a specific date and time. To do this, create the clip without assigning it to a Channel, wait until encoding is complete, and then assign it to the desired Channel and configure its publishing schedule.
For detailed instructions, see How to schedule media to publish or unpublish in the Media Cloud.
Instructions
Open the Clipping Tool
Step 1
Log in to your Media Cloud account.
Step 2
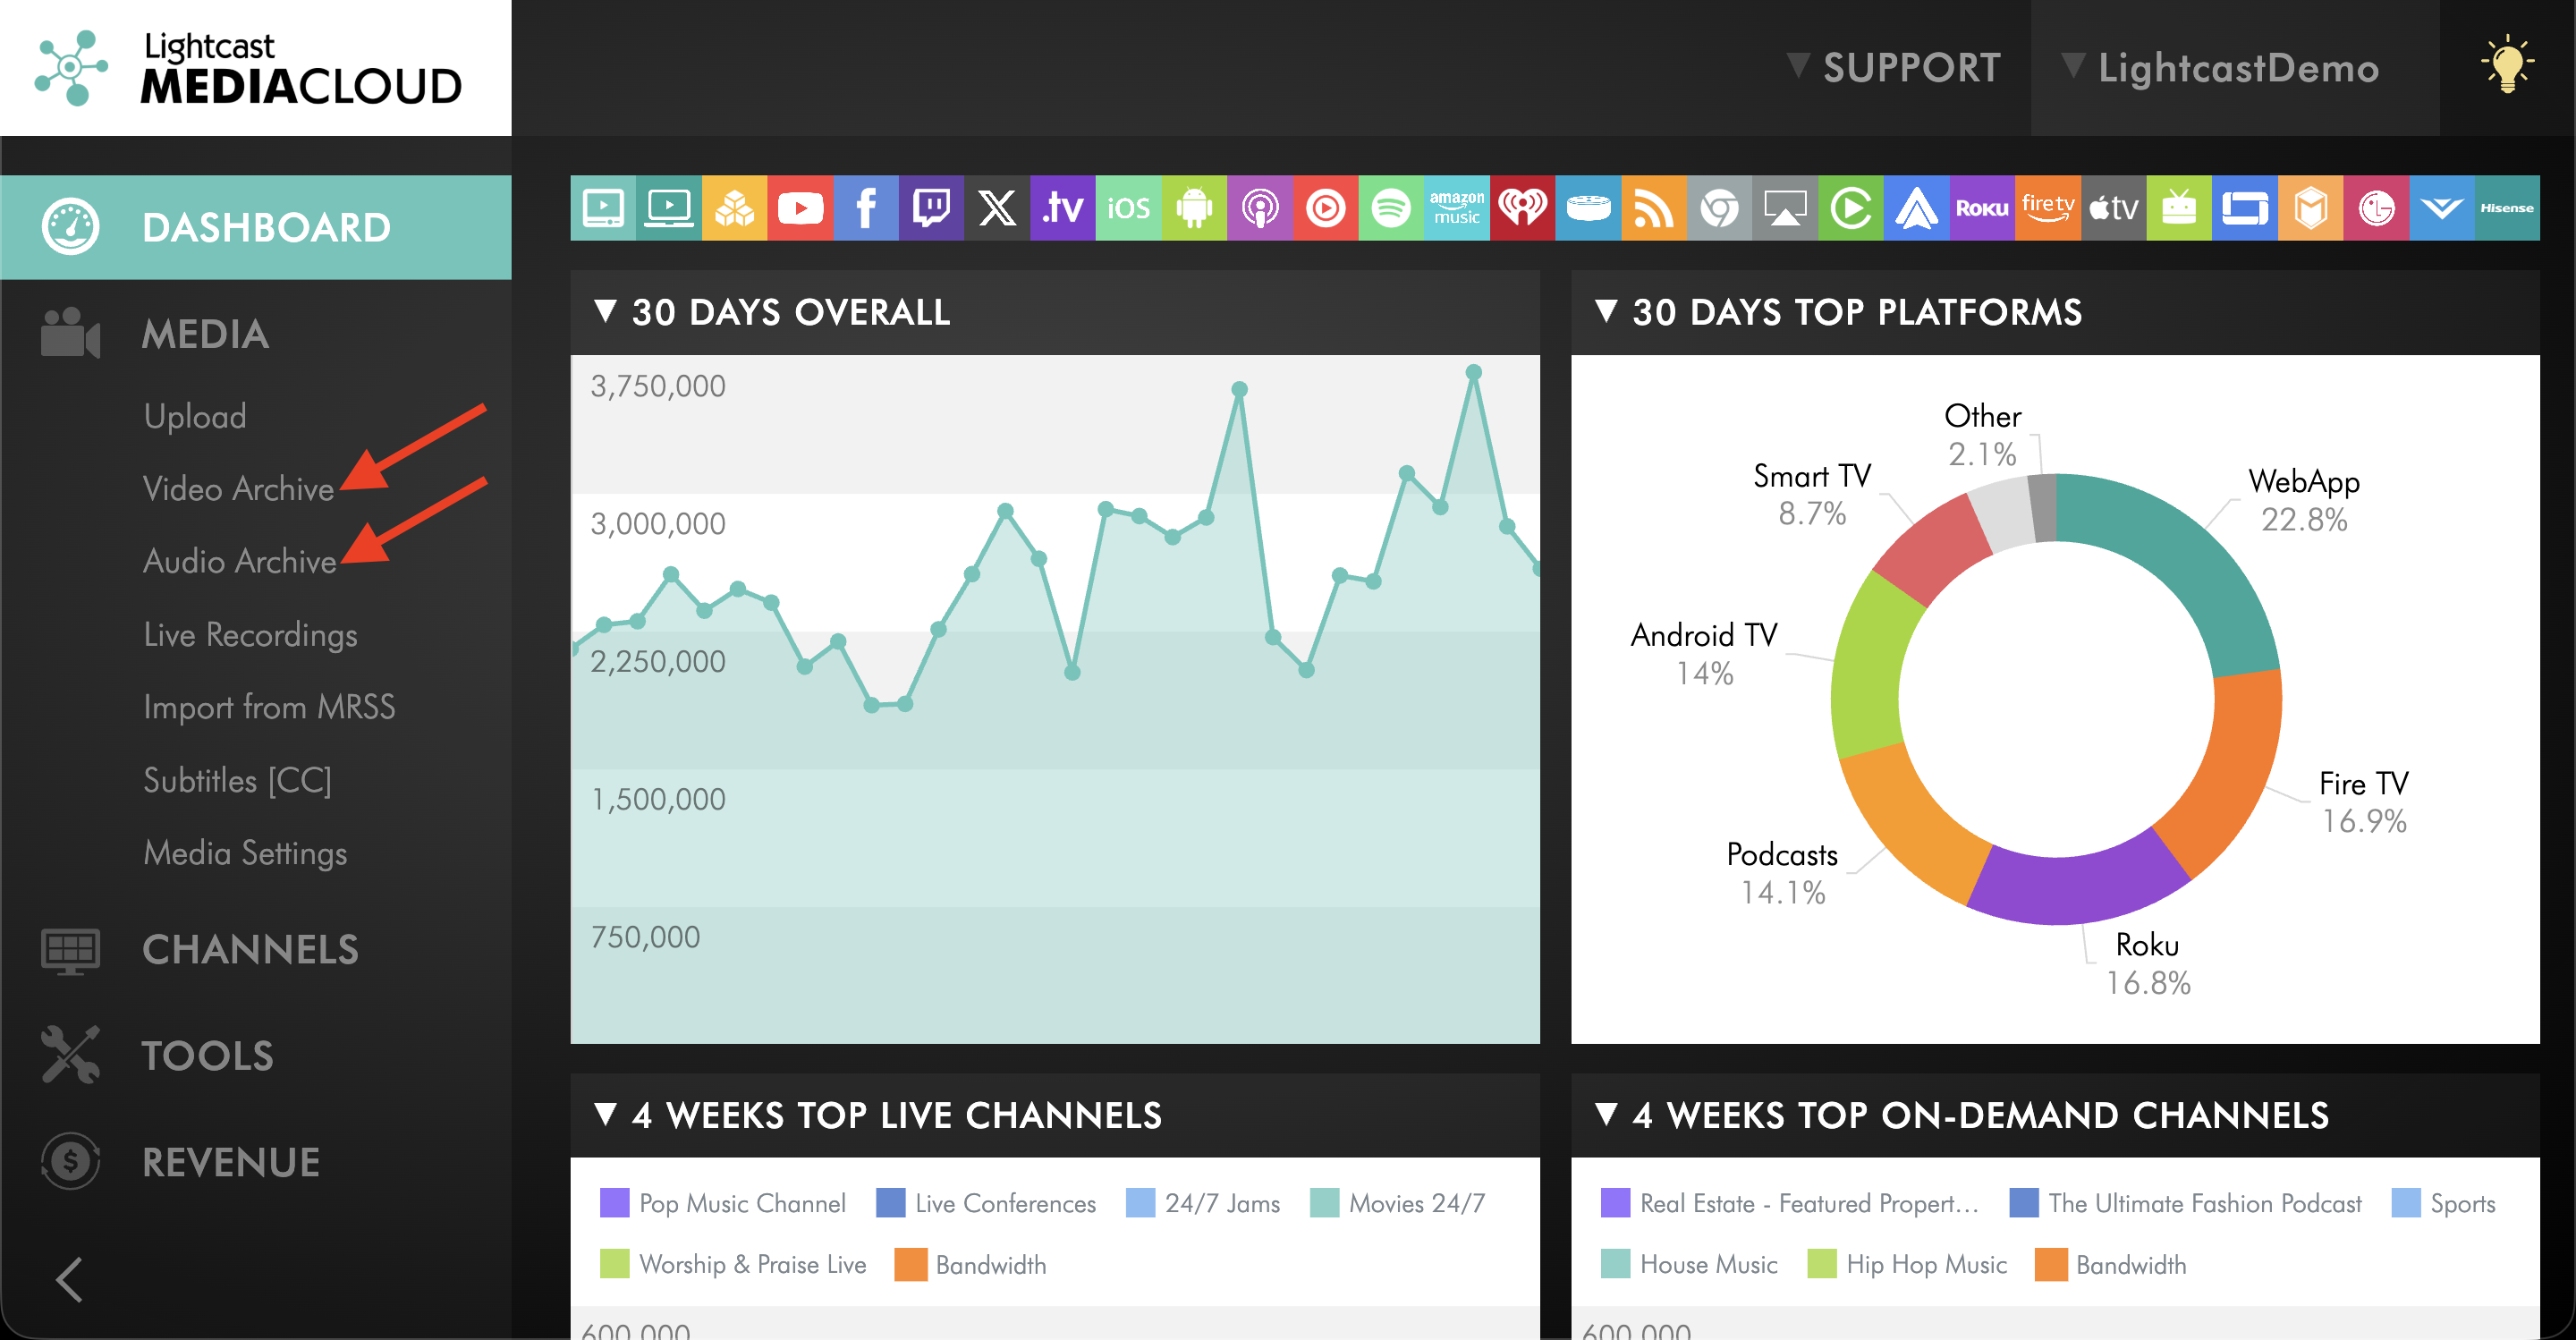
Go to MEDIA and select Video Archive or Audio Archive, depending on the type of media file you want to clip.
Step 3
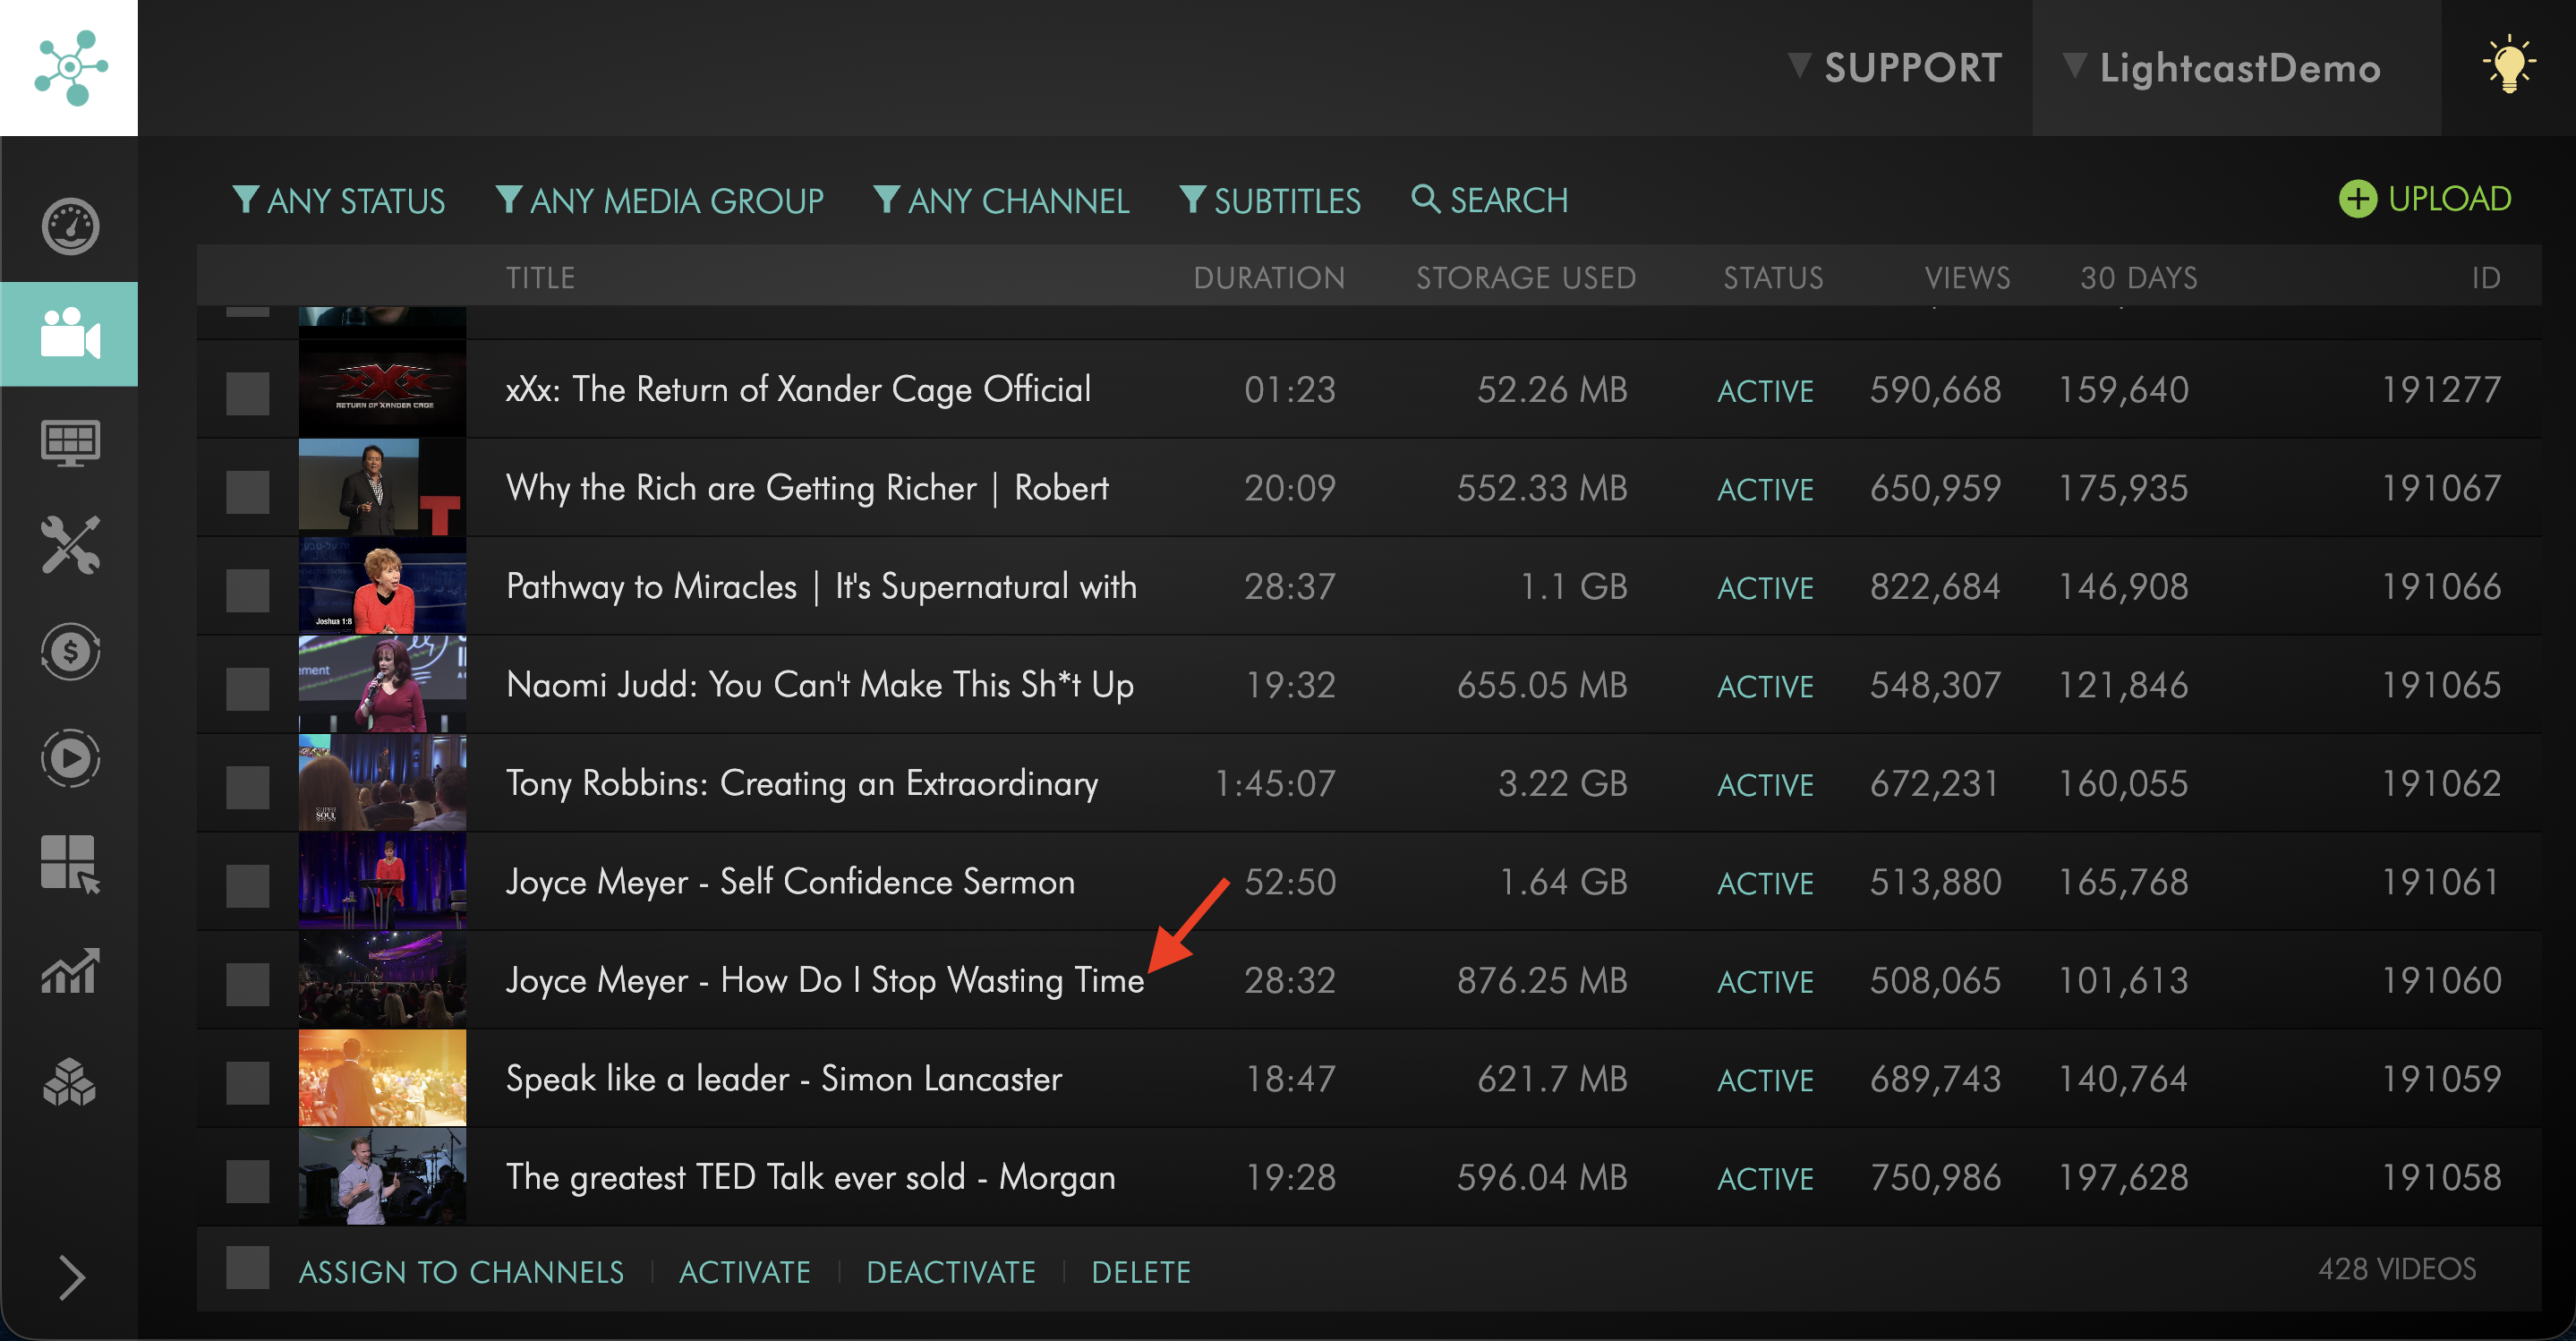
Open the media item you want to clip.
Step 4
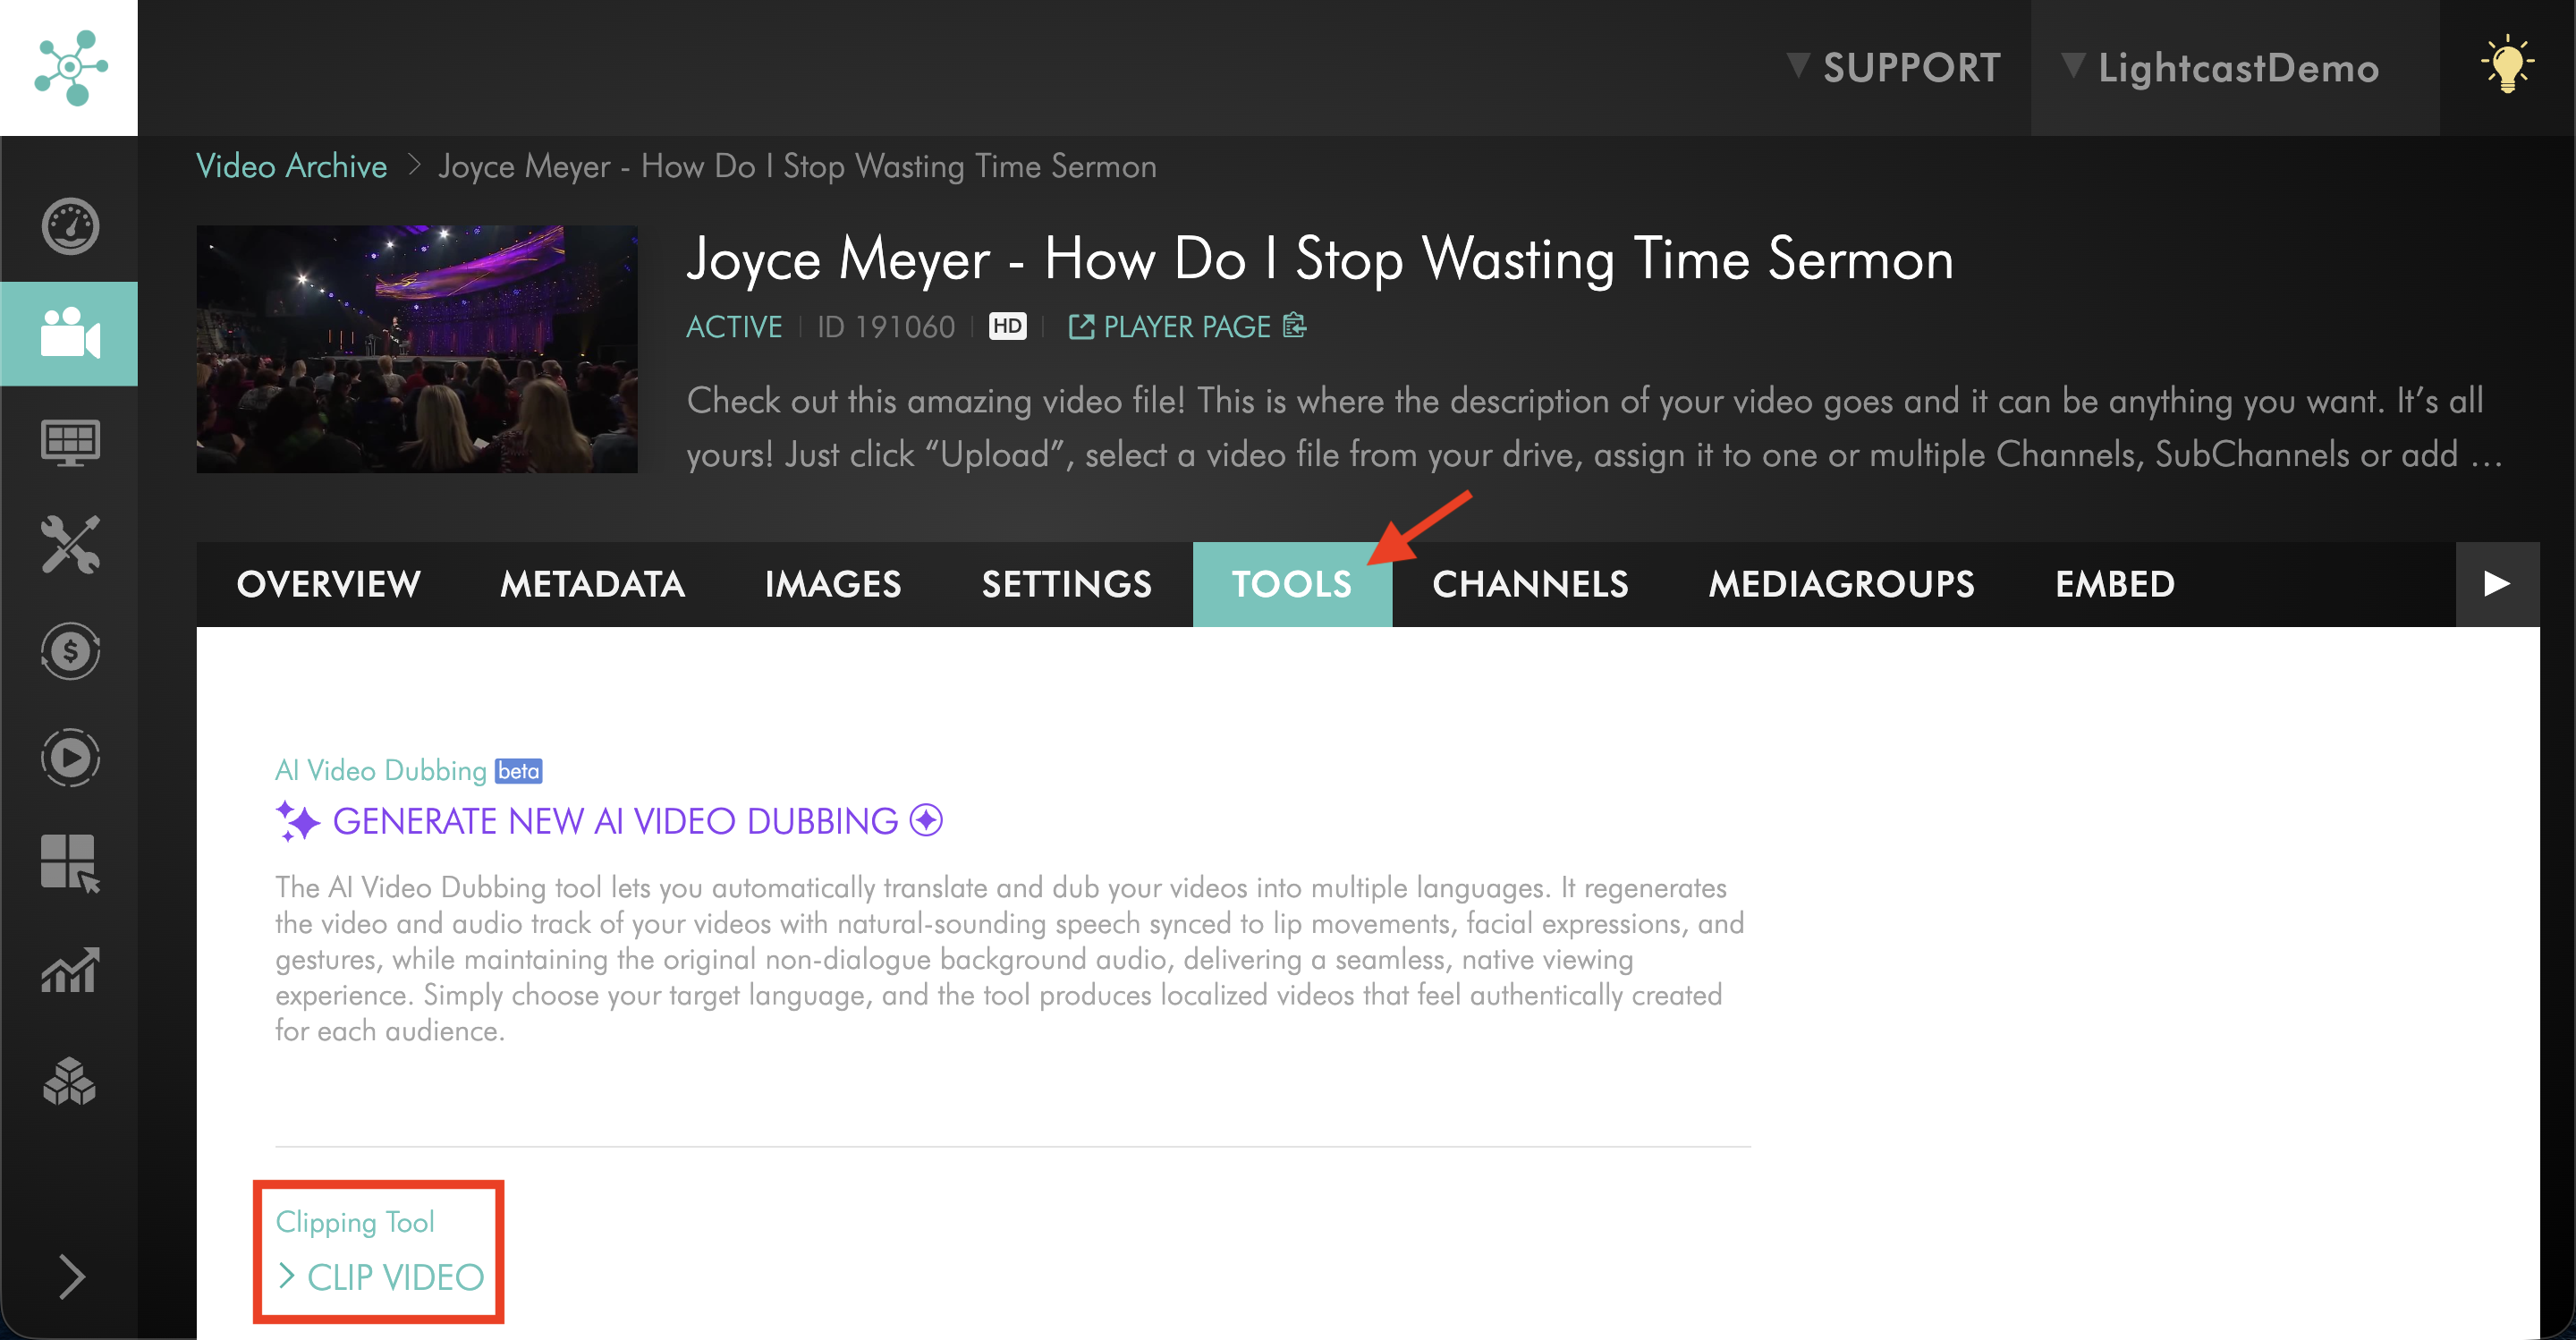
Switch to the TOOLS tab and locate the Clipping Tool section.
Step 5
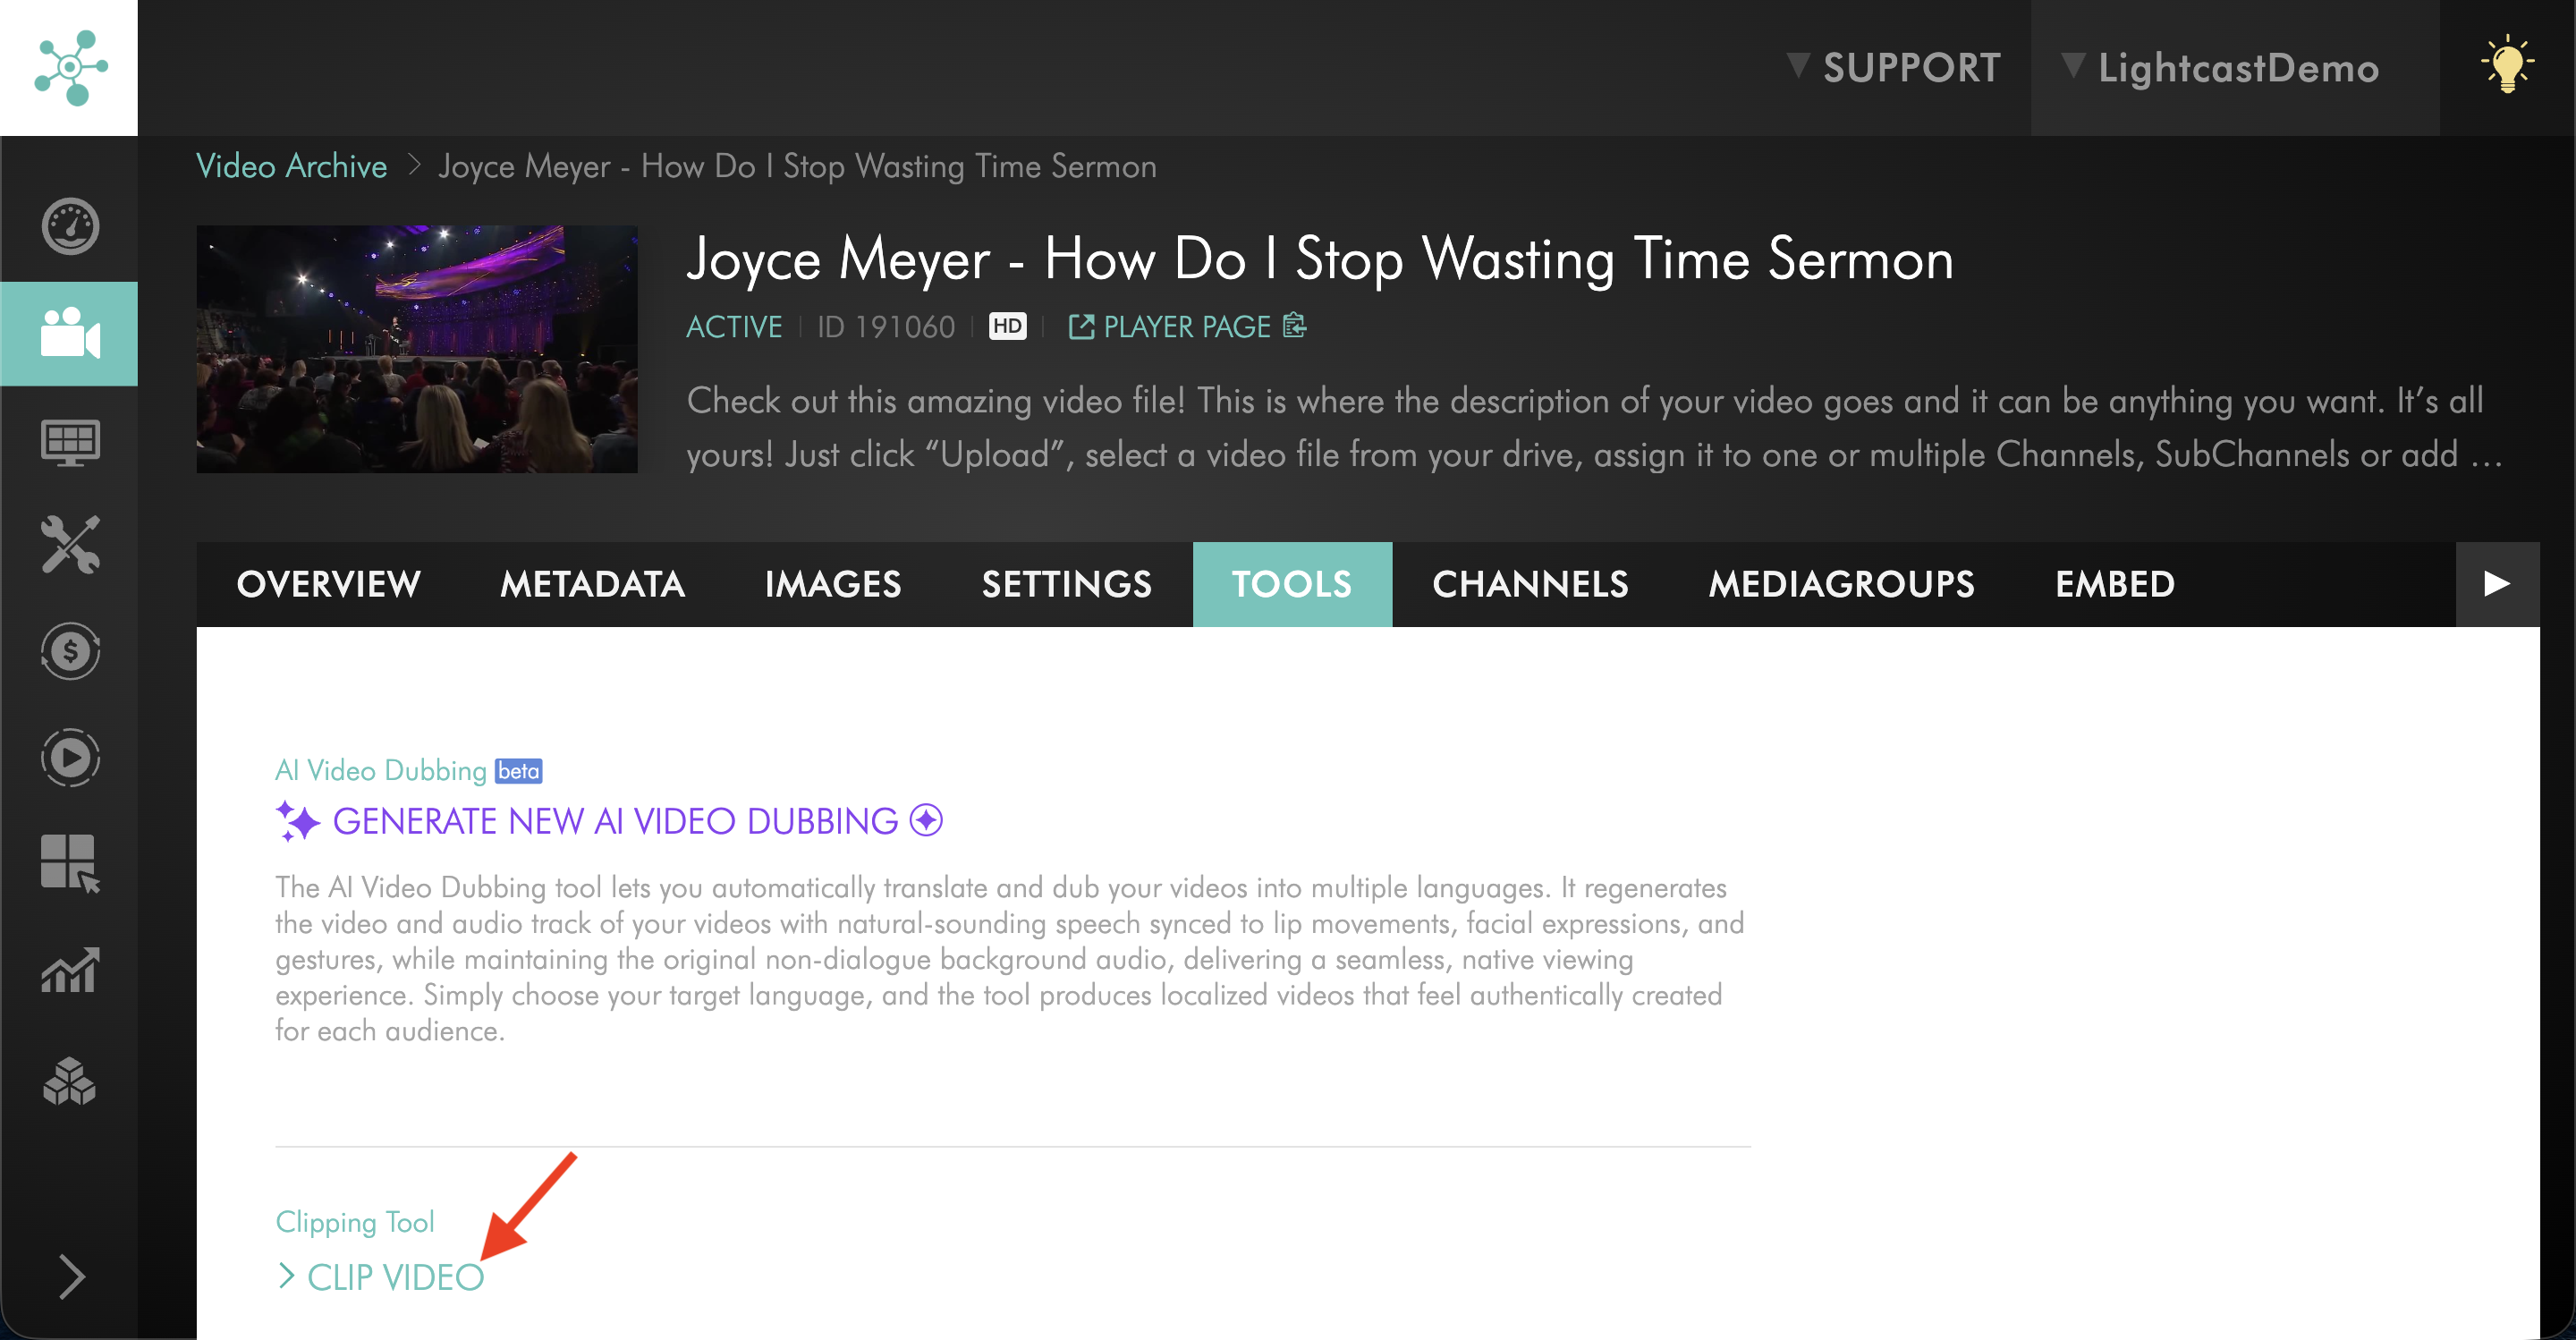
Click CLIP VIDEO or CLIP AUDIO, depending on the type of media file.
This opens the clipping window, where you can select the portion of the media file you want to clip.
Select the portion you want to clip
Step 1
Use the playback timeline to navigate to the point where you want your clip to begin.
You can use the available controls to find the desired position:
Drag the playback progress bar to navigate through the media file.
Use the forward and backward controls to adjust the position in increments of 1 second, 30 seconds, 1 minute, or 5 minutes.
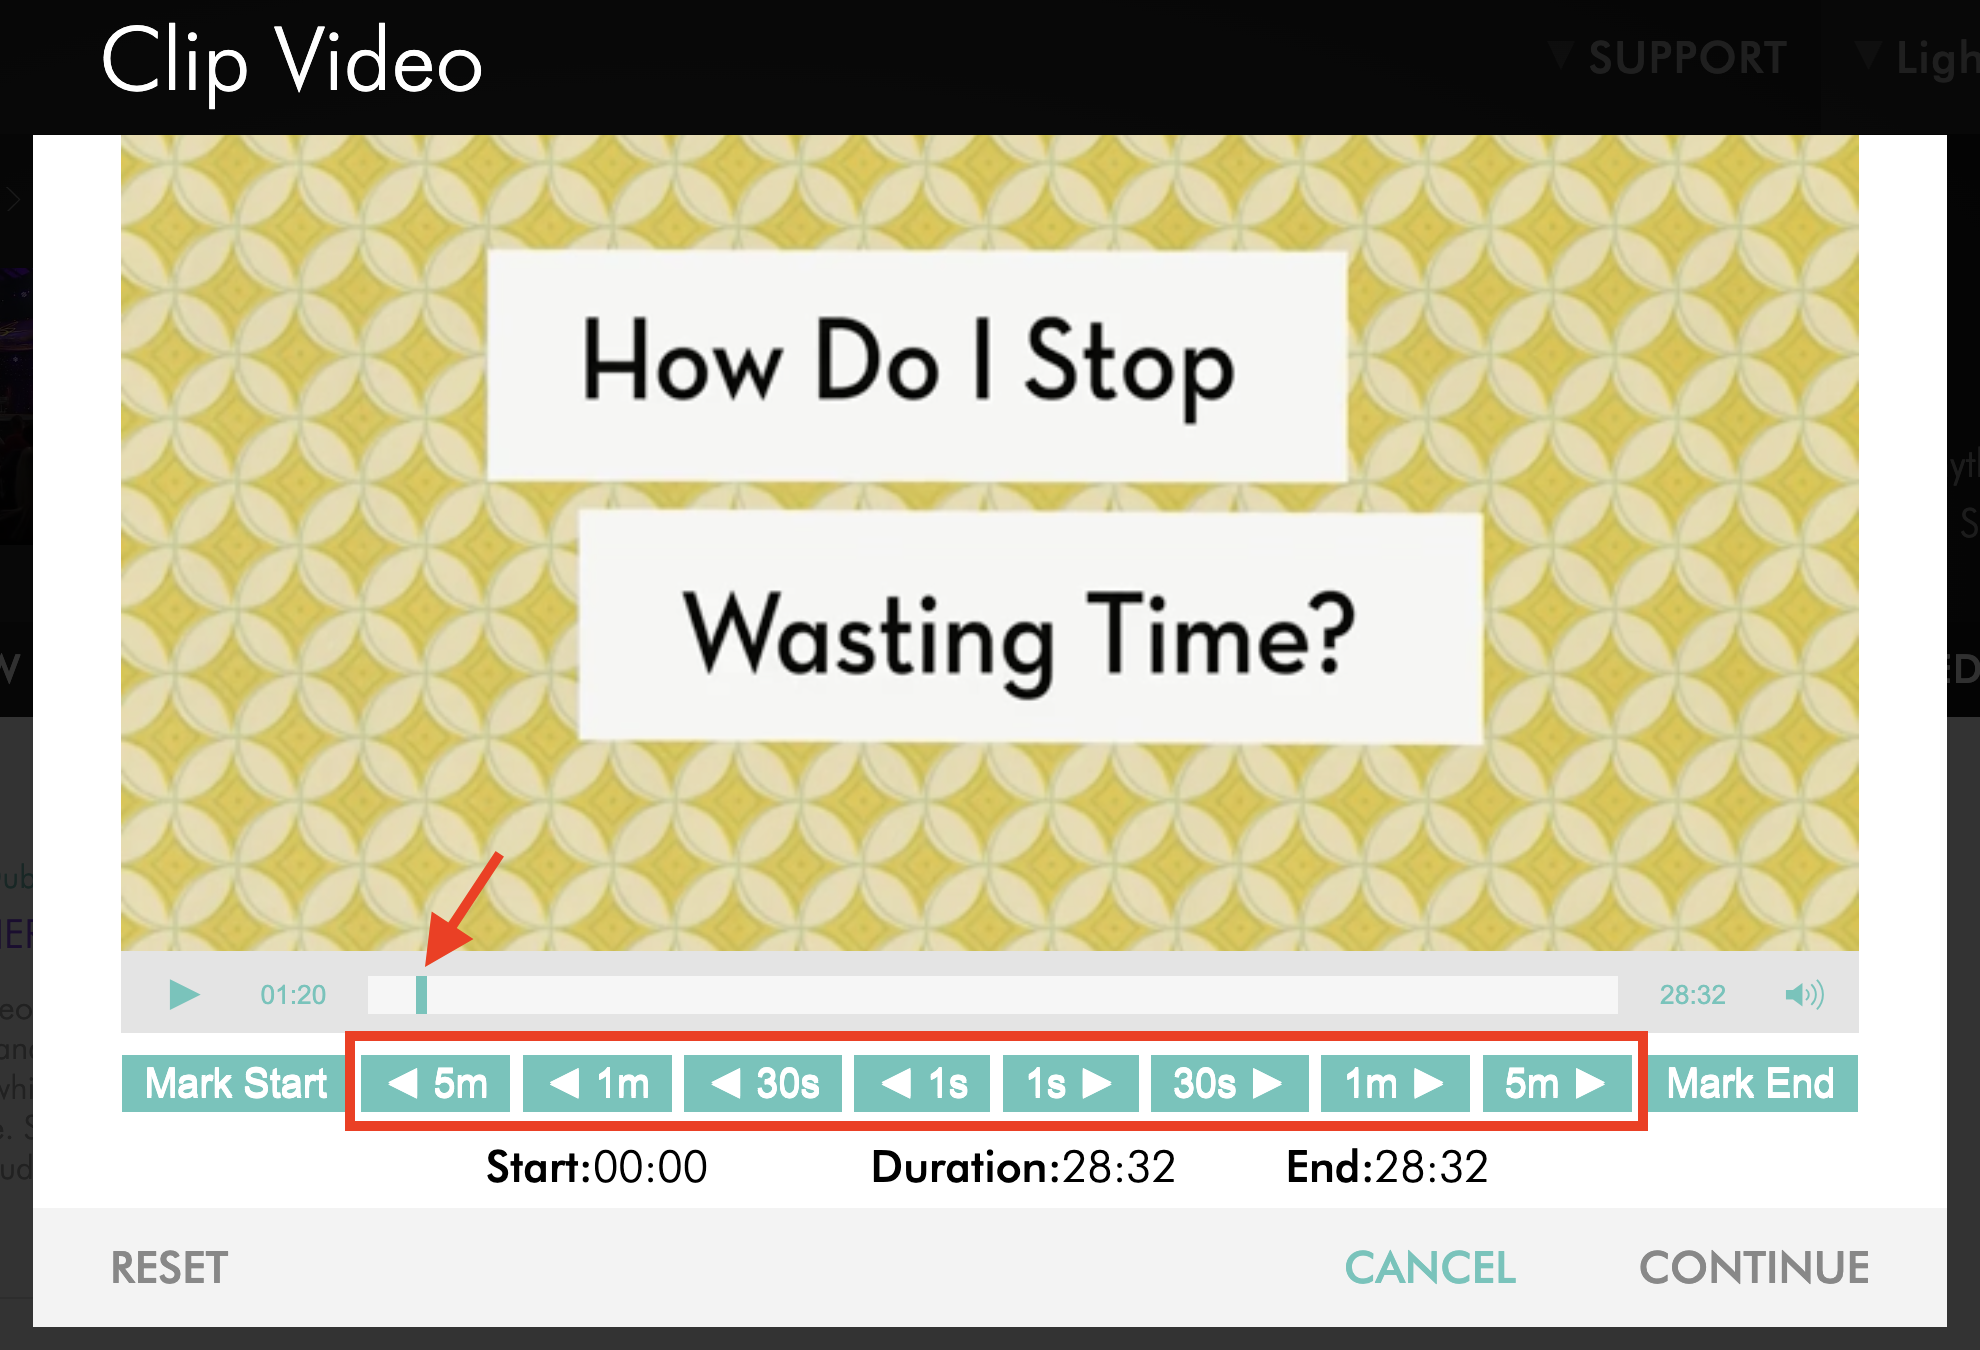
Step 2
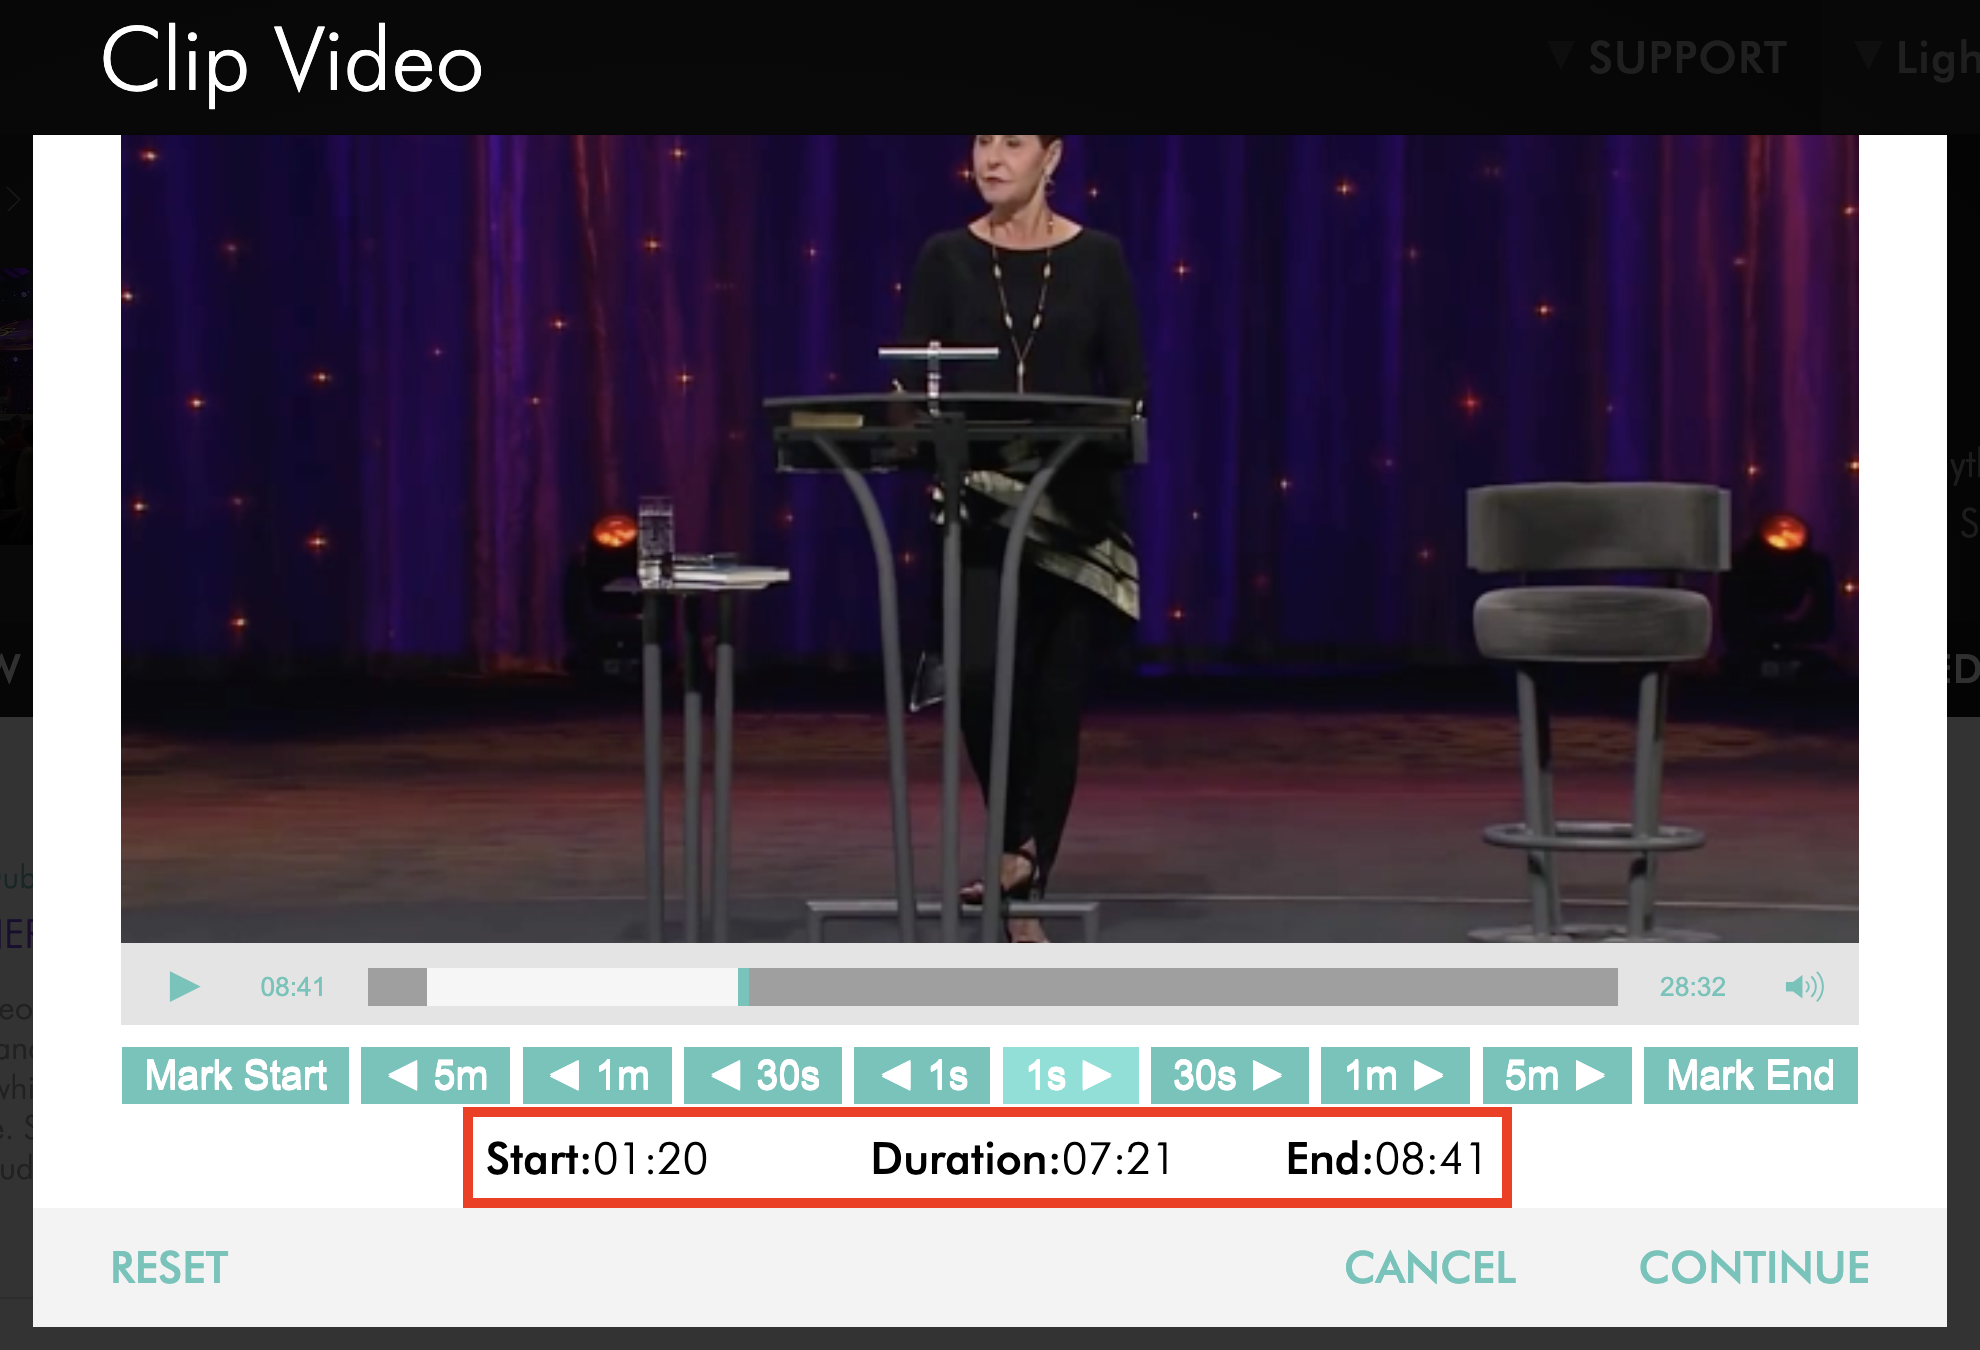
Click Mark Start to set the beginning of your clip.
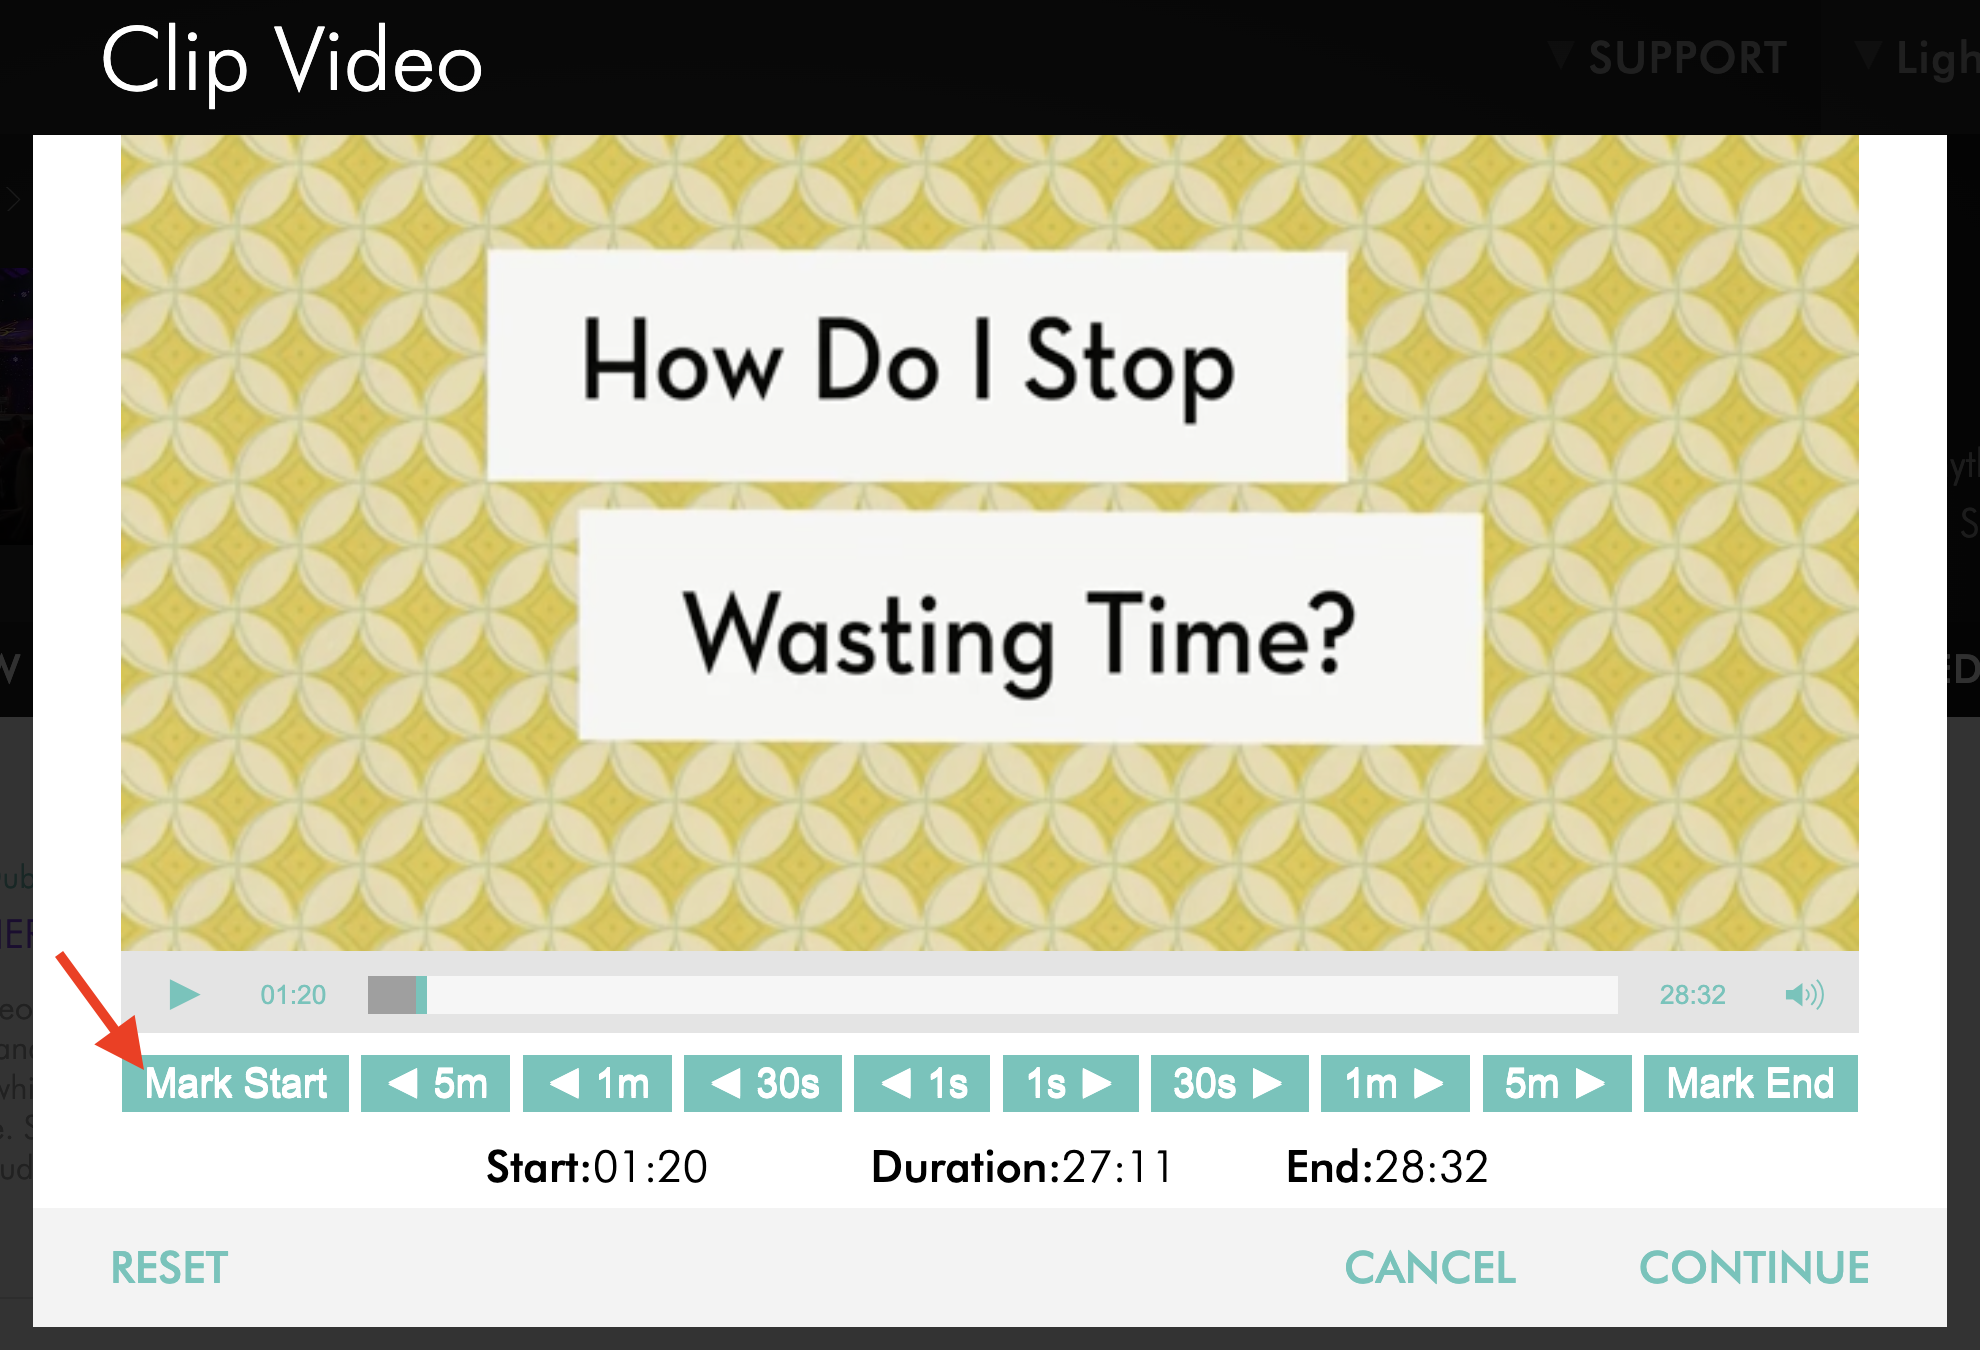
Step 3
Navigate to the point where you want your clip to end using the playback timeline or forward and backward controls.
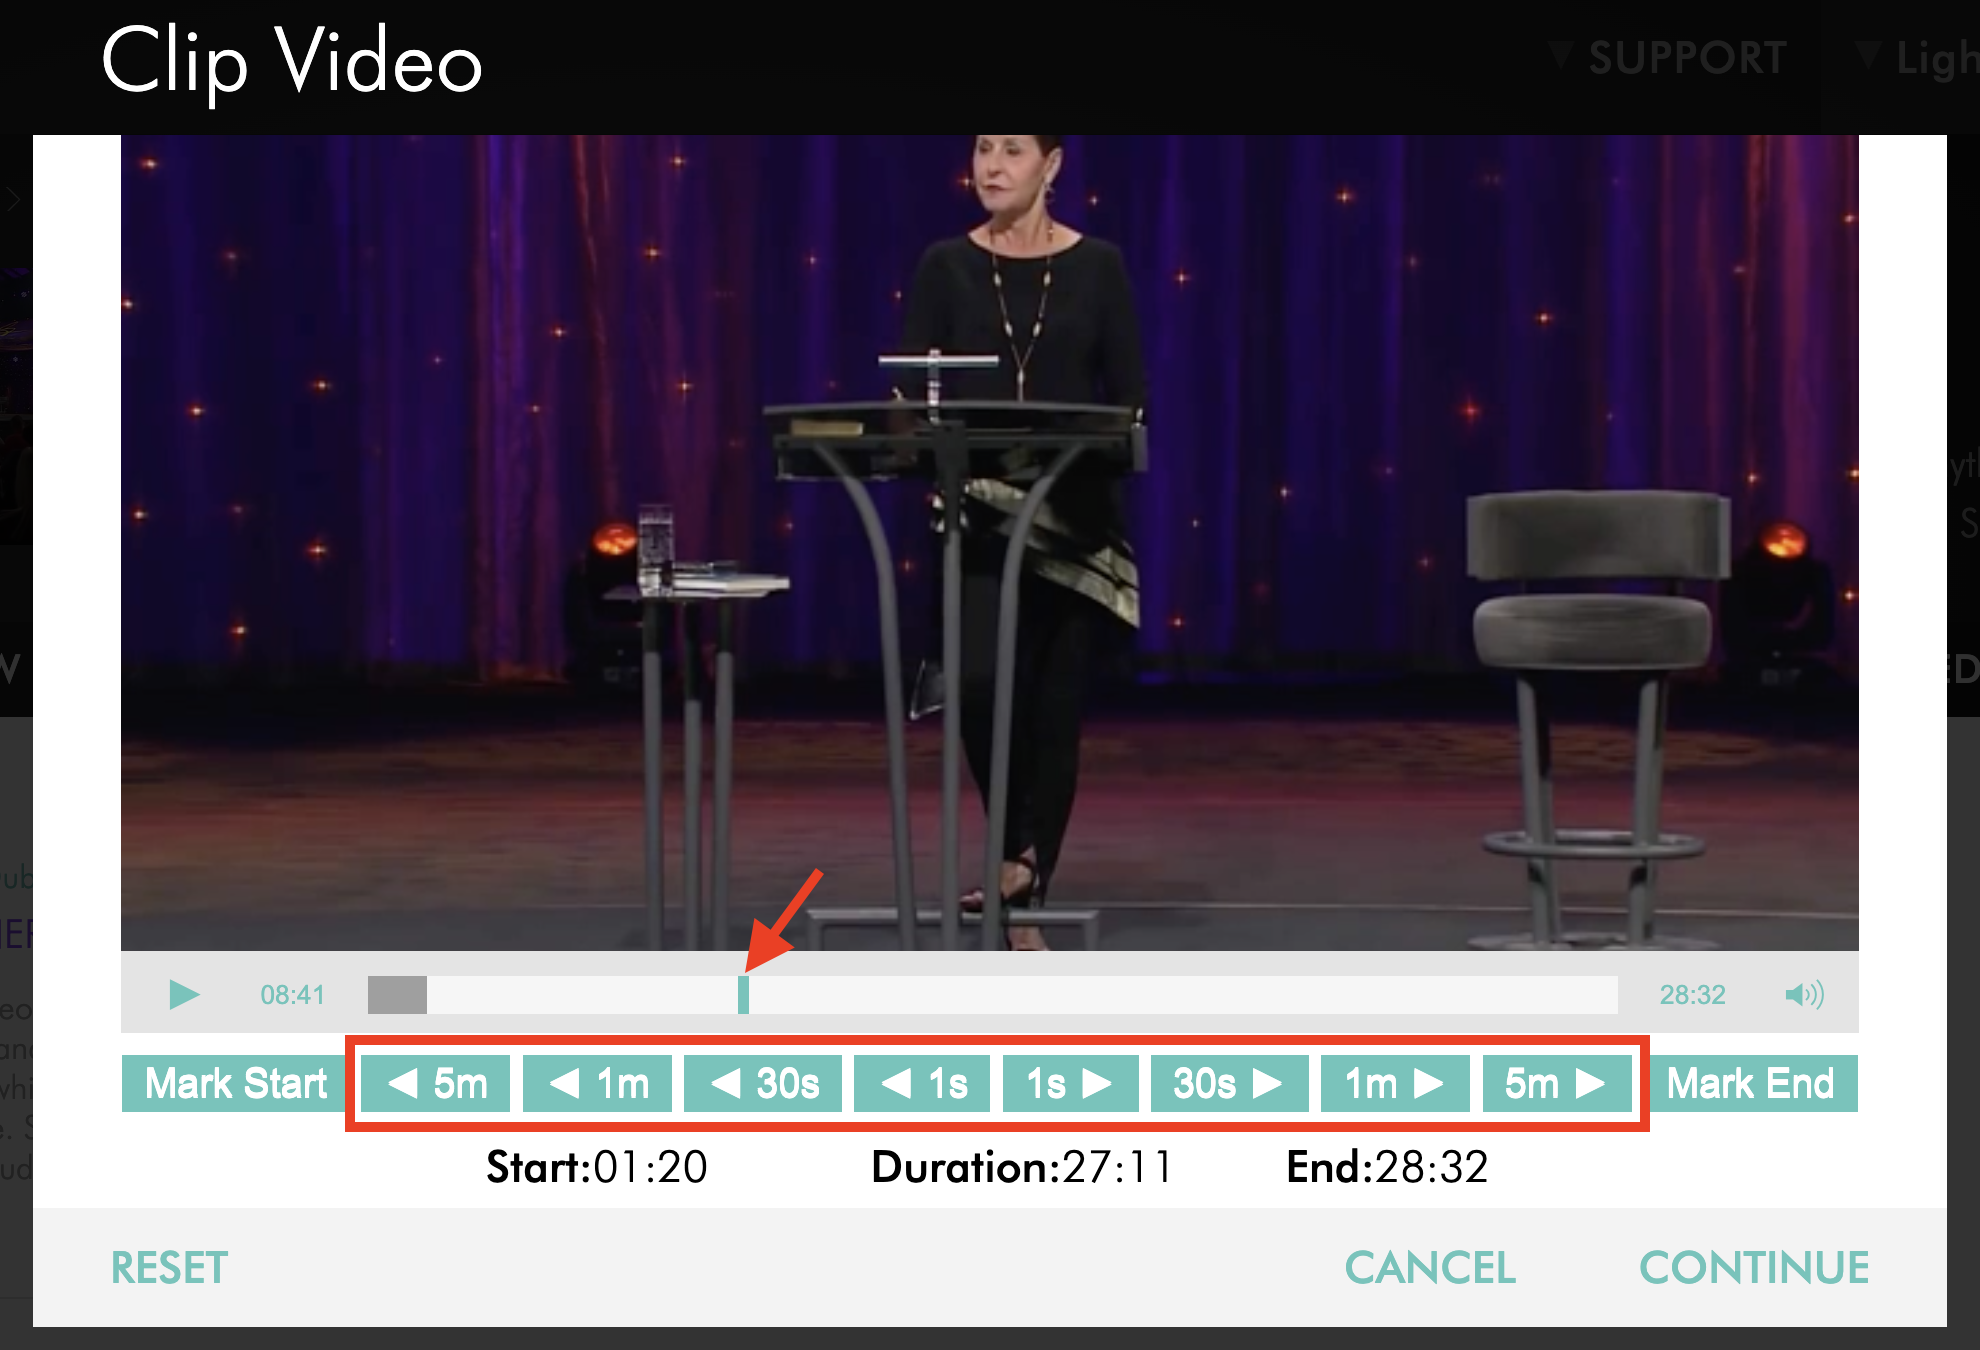
Step 4
Click Mark End to set the ending of your clip.
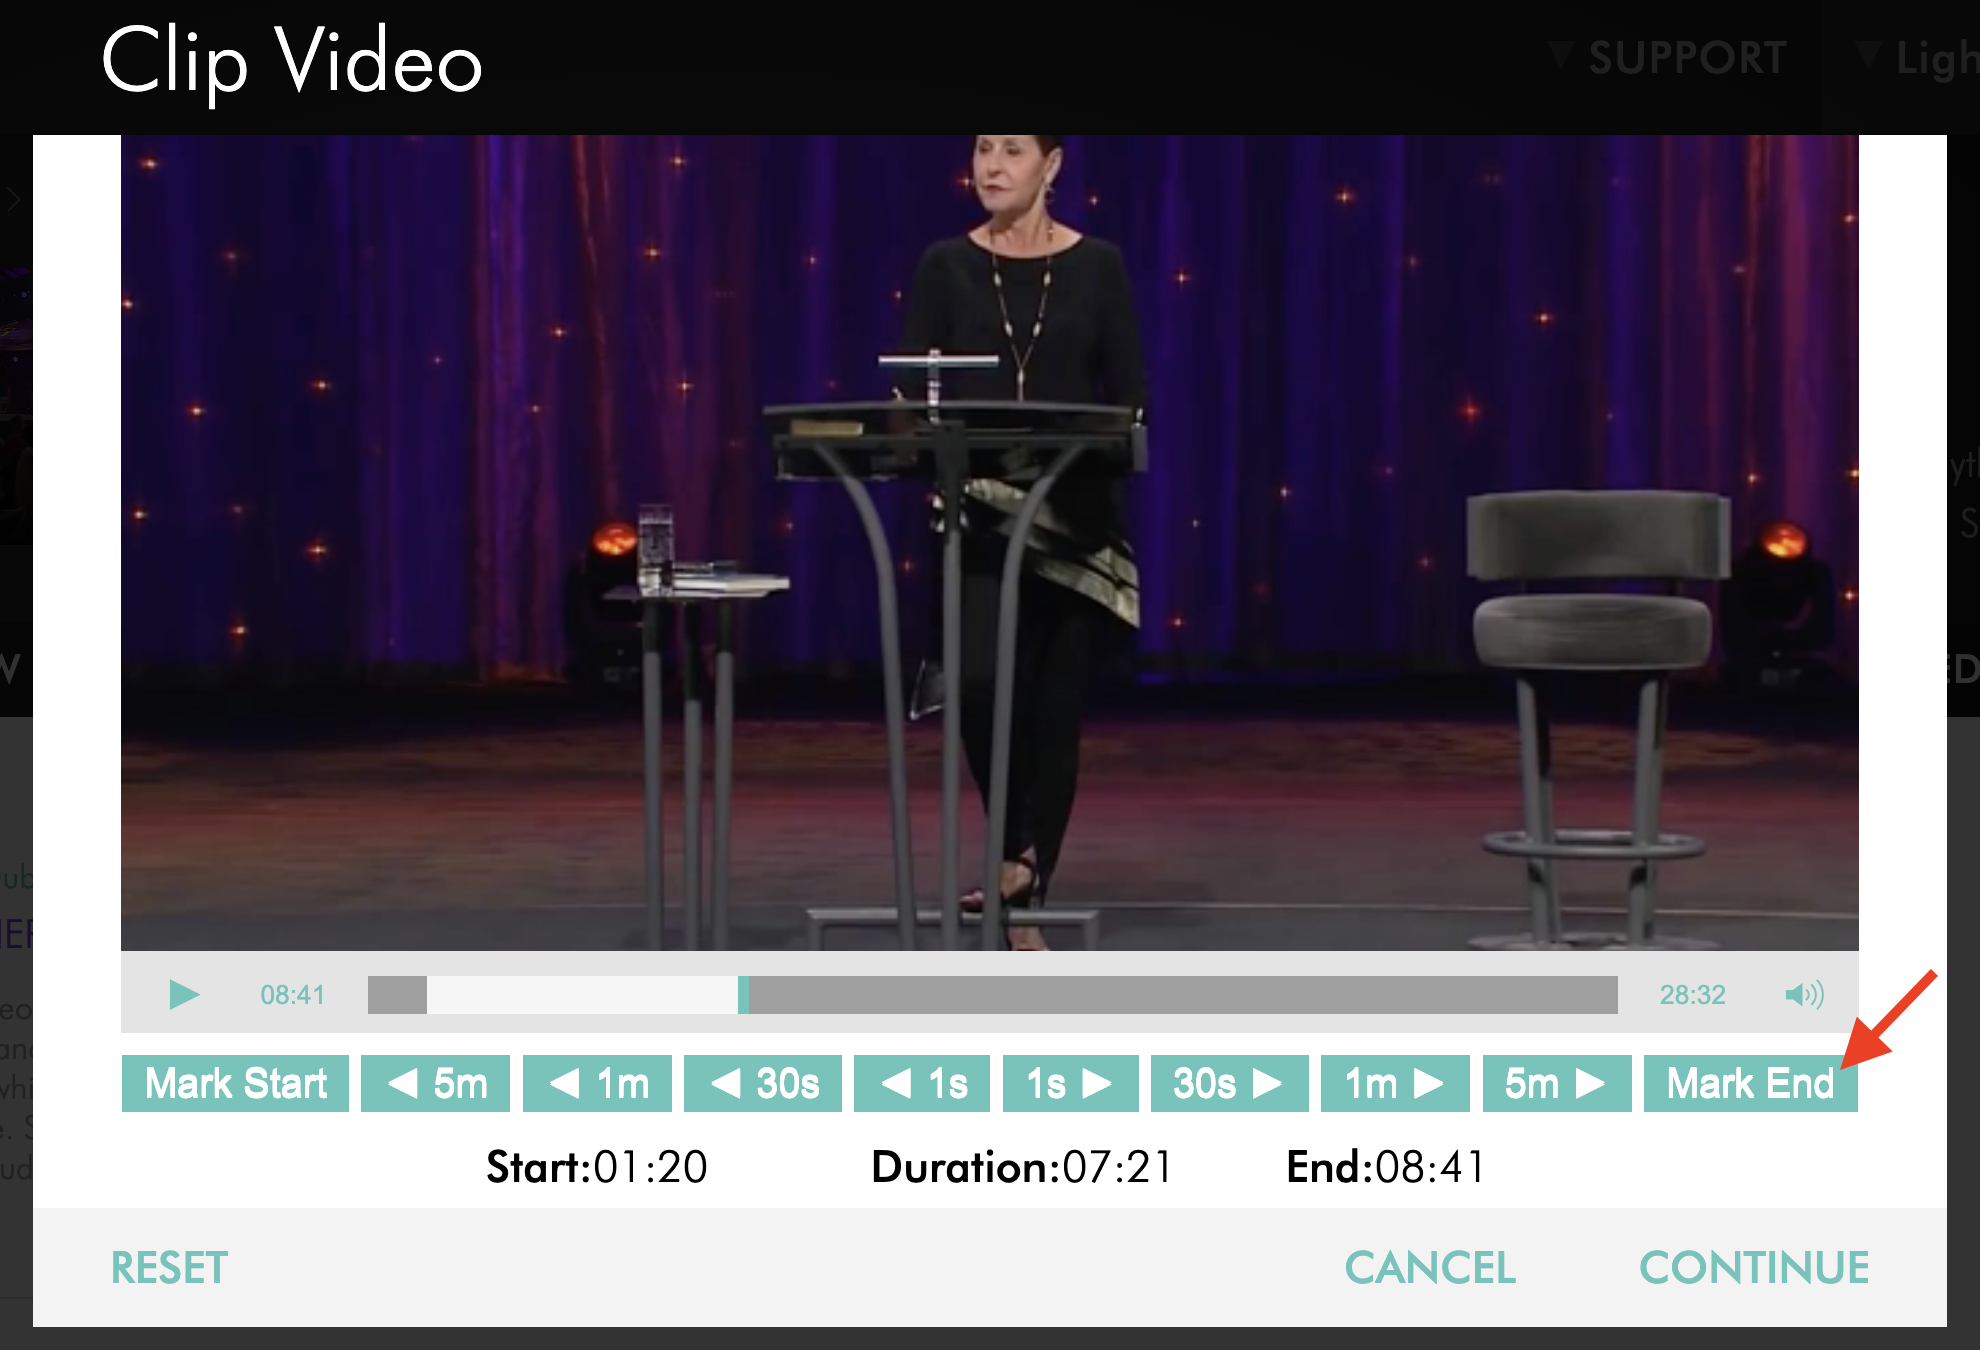
Step 5
Review the displayed Start, End, and Duration values to confirm that the selected portion matches the clip you want to create.
If needed, adjust the start and end points before proceeding.
Step 6
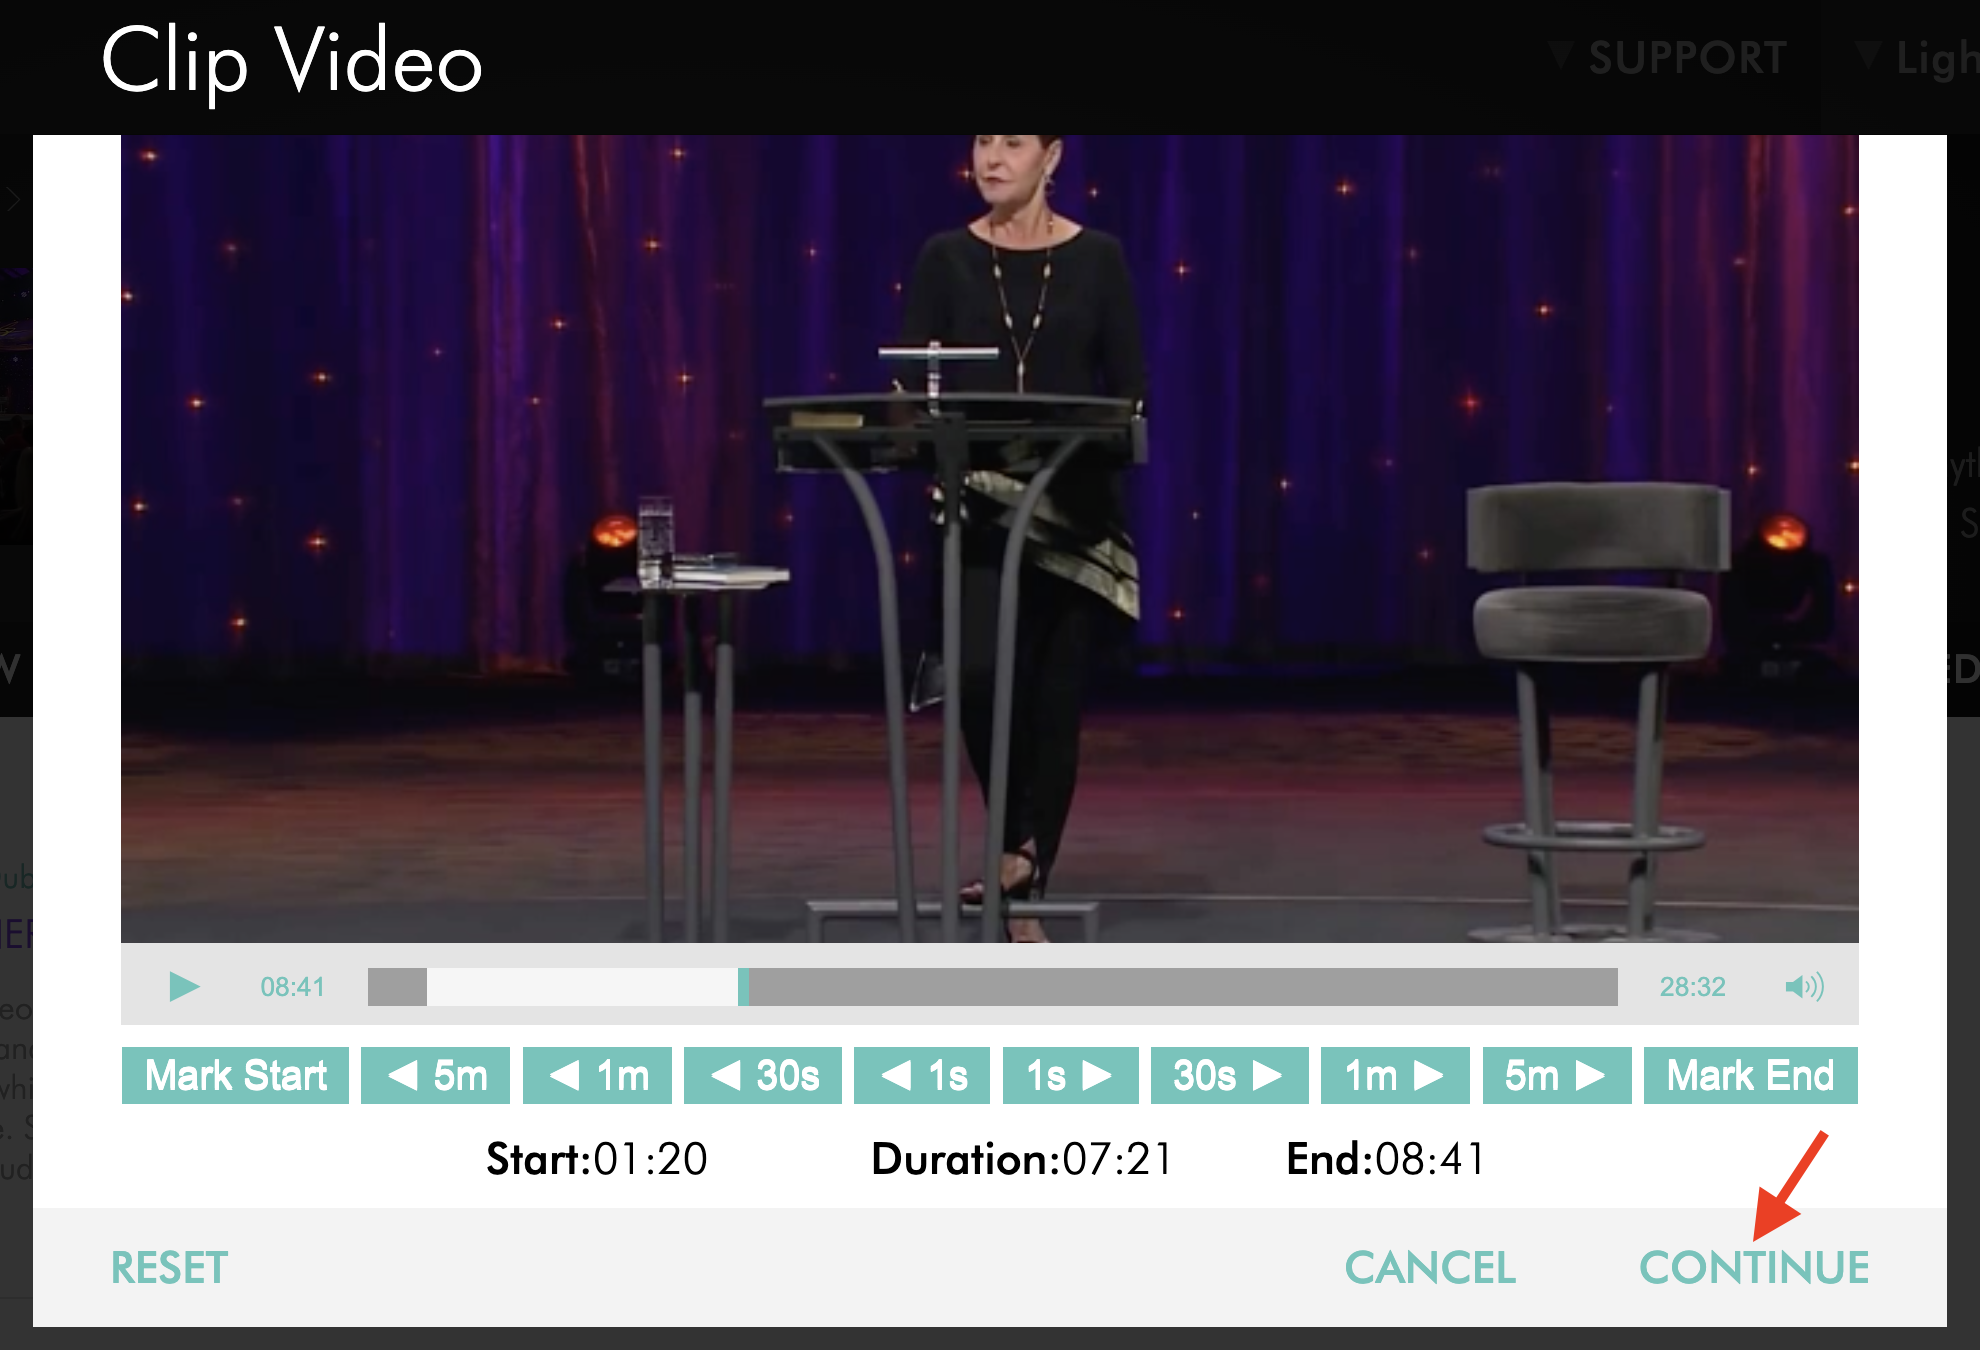
Click CONTINUE to proceed to the clip settings.
Configure and create your clip
Step 1
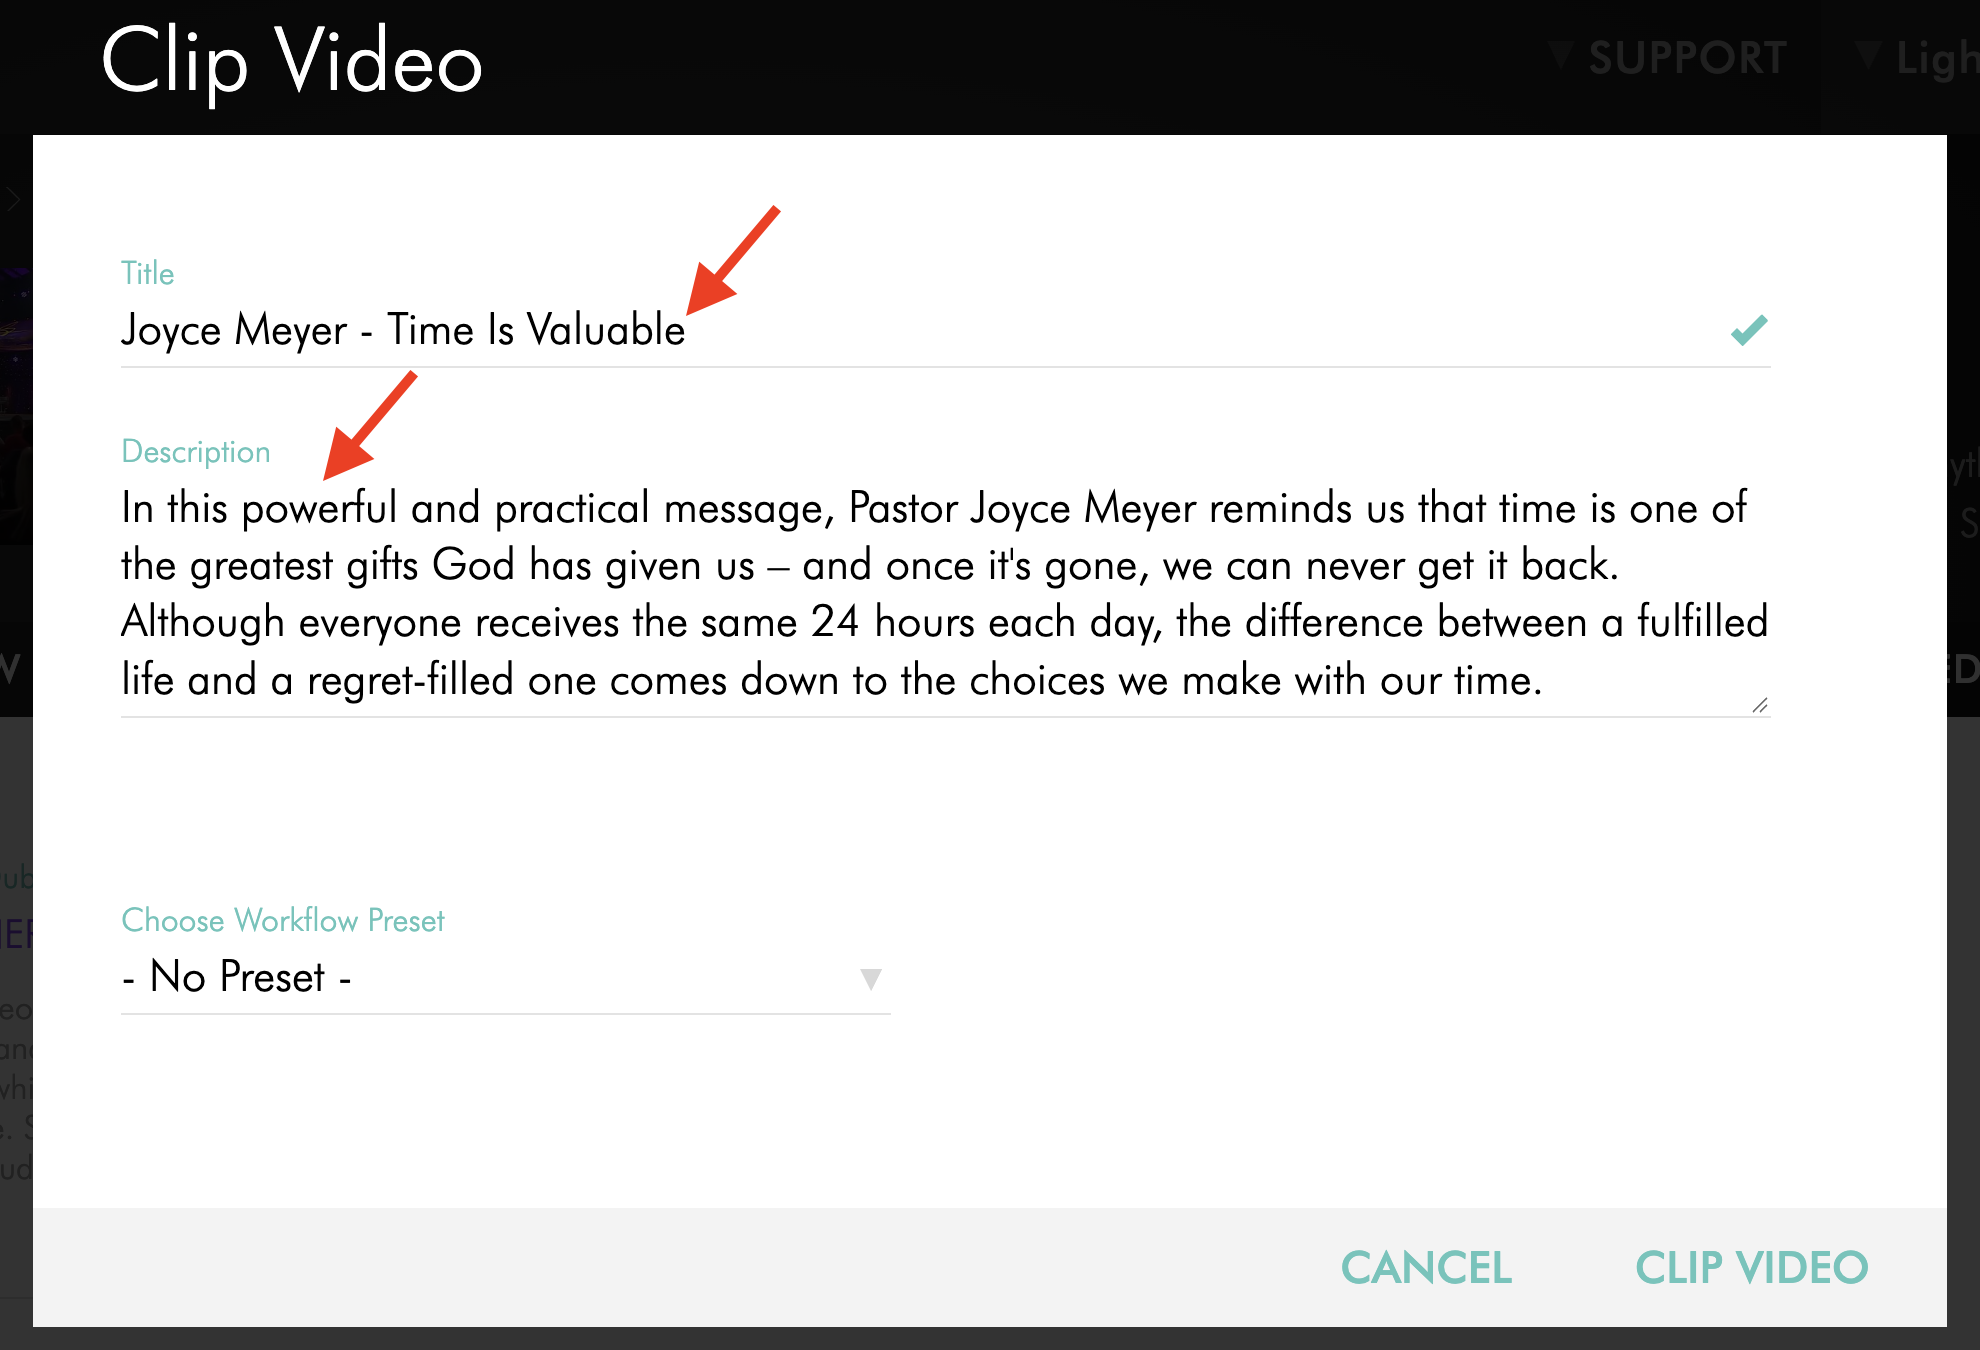
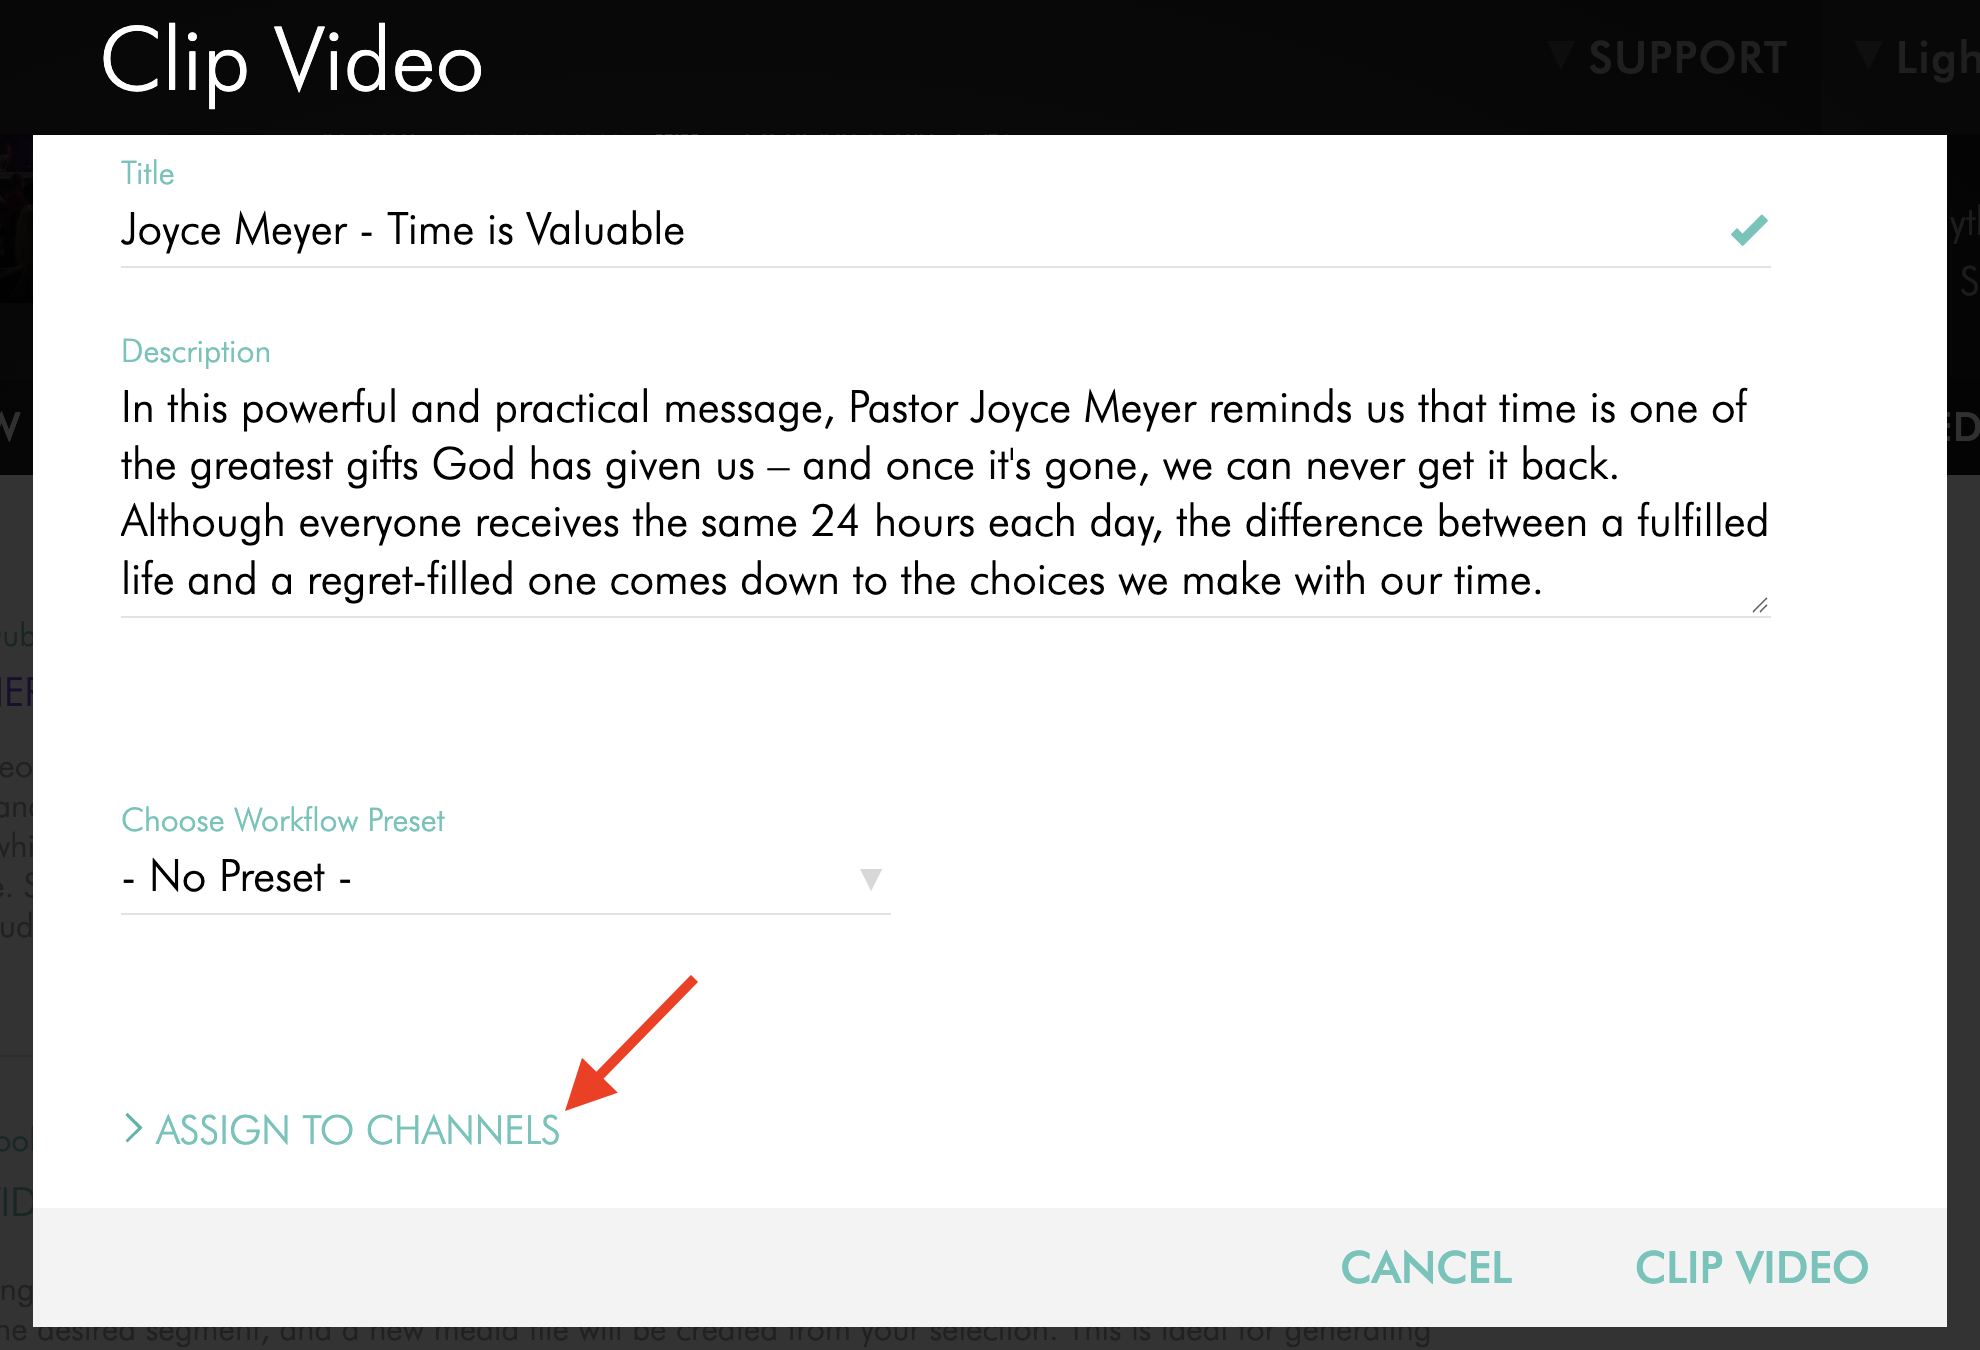
Enter or update the clip's Title and Description.
Step 2
If needed, configure additional settings:
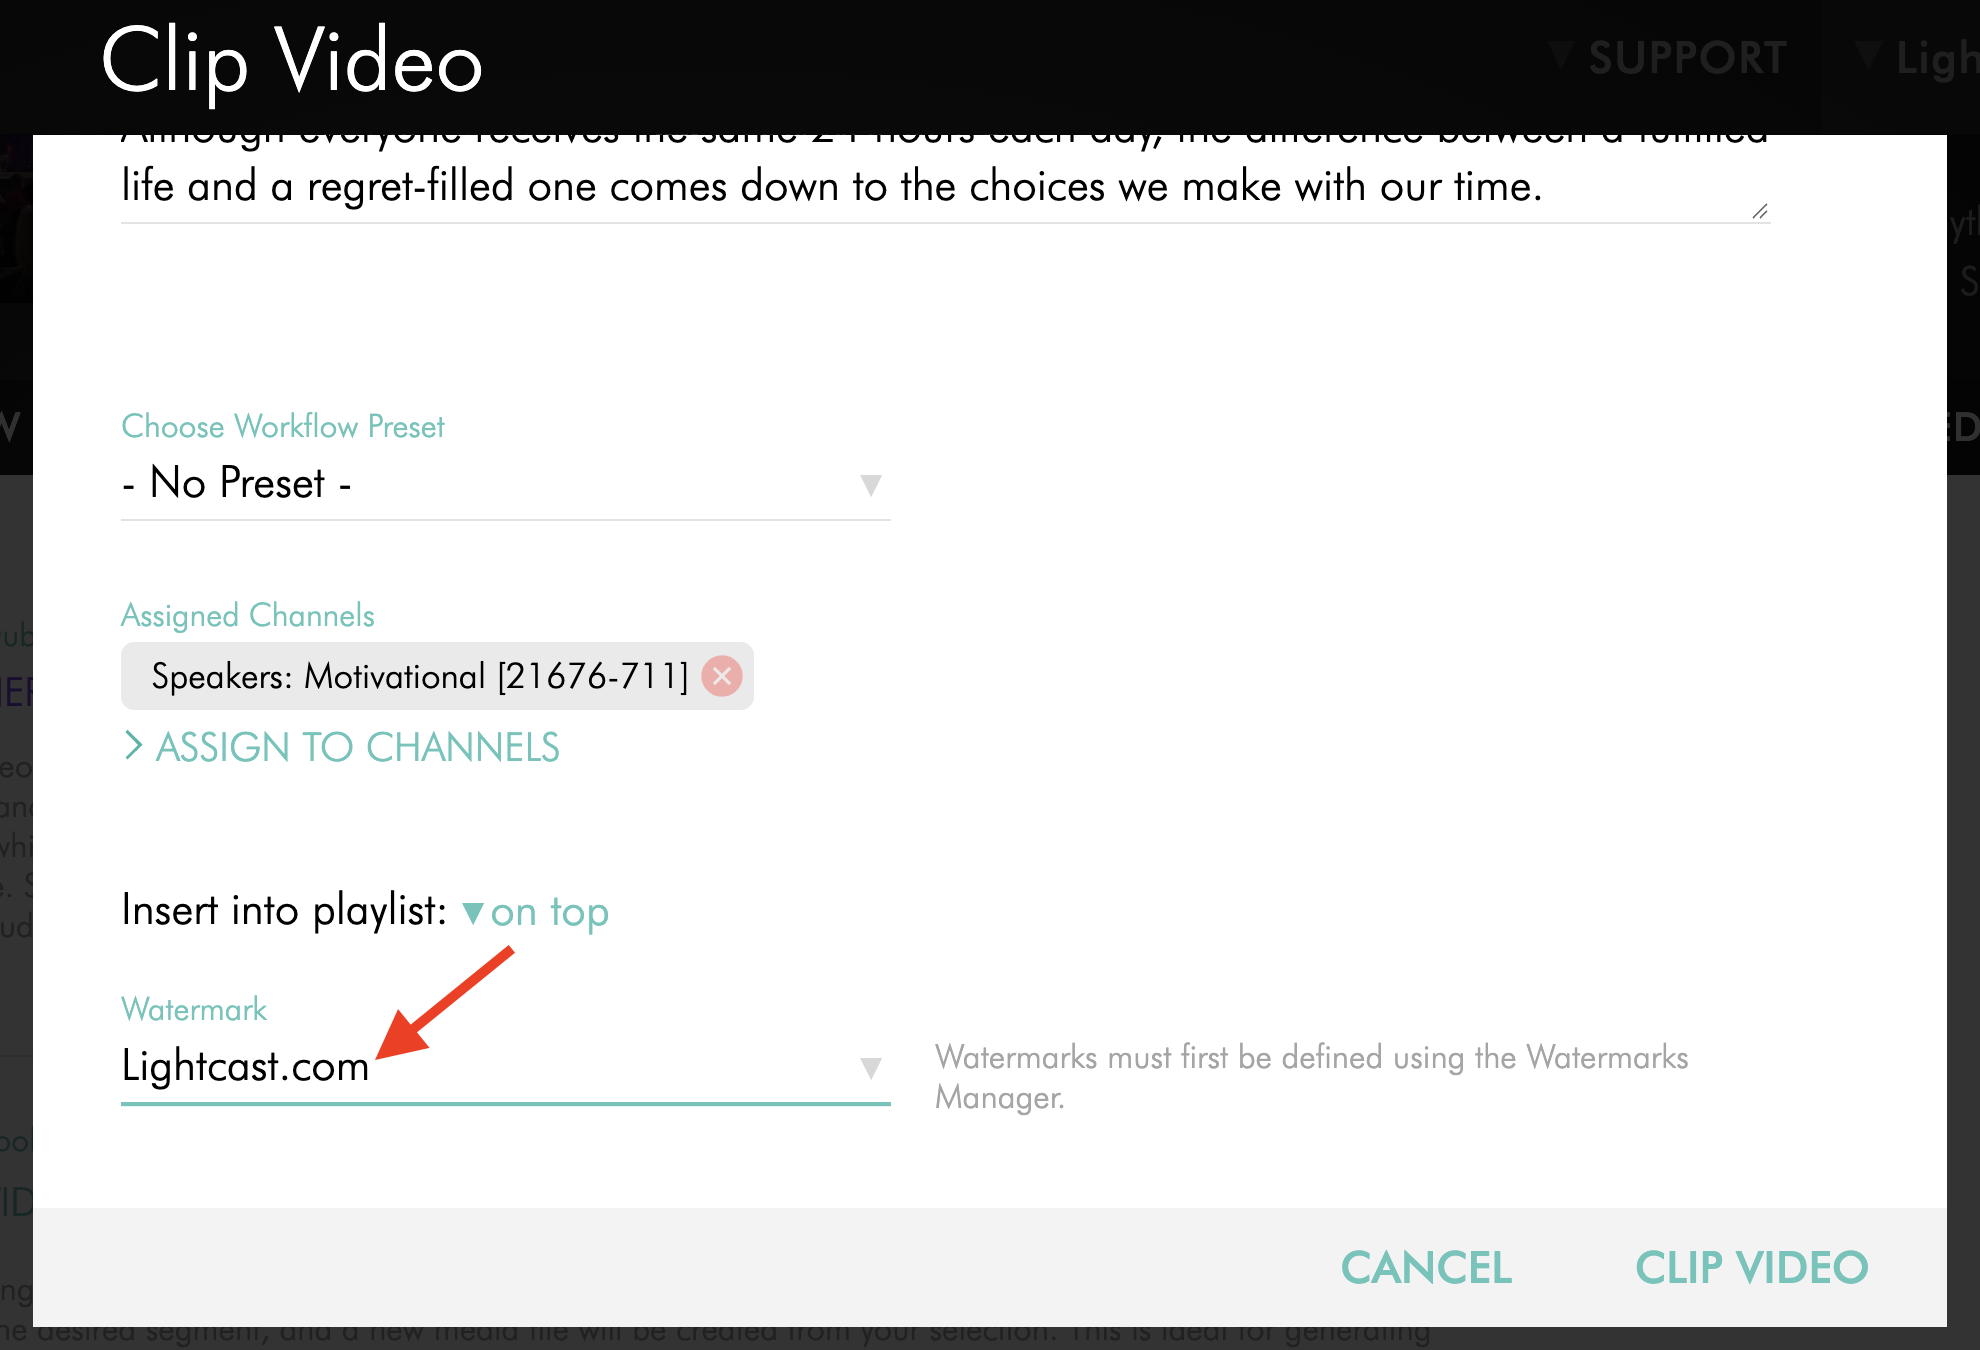
Workflow Preset: Select an existing Workflow Preset to apply predefined settings to the new media item.
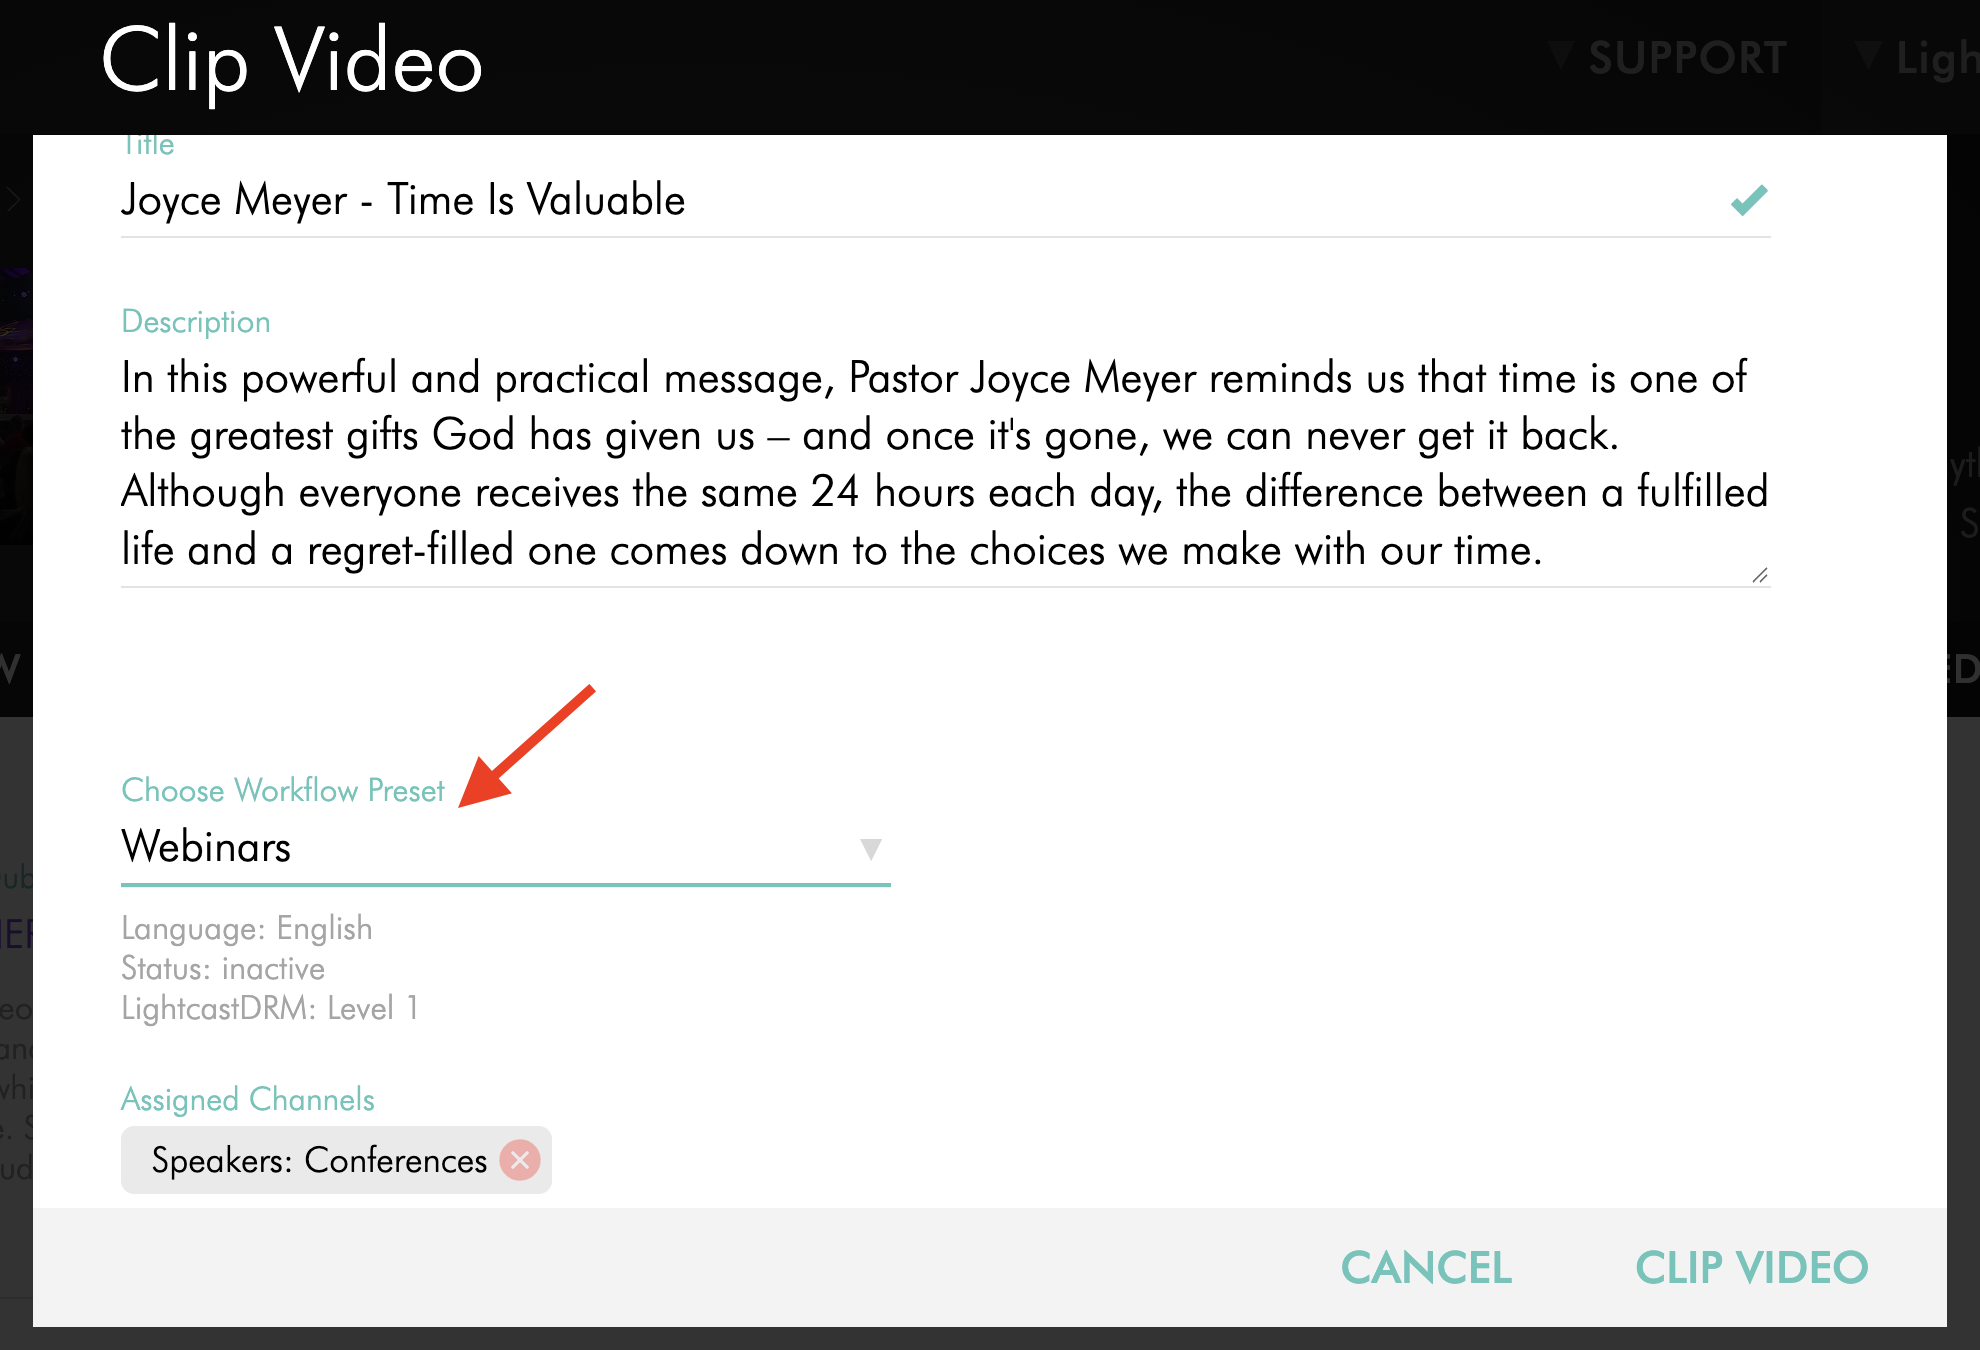
Channel assignment: Assign the clip to the VOD or AOD Channel where you want it to appear.
Important: If you assign the clip to a Channel during creation, it will automatically be published once encoding is complete.
If you want to save the clip for future use or schedule it to publish at a later date, leave the Channel assignment empty. After the new clip has finished encoding, you can assign it to a Channel and configure its publishing schedule.
Watermark: Apply an existing Watermark when creating a supported video clip.
Step 3
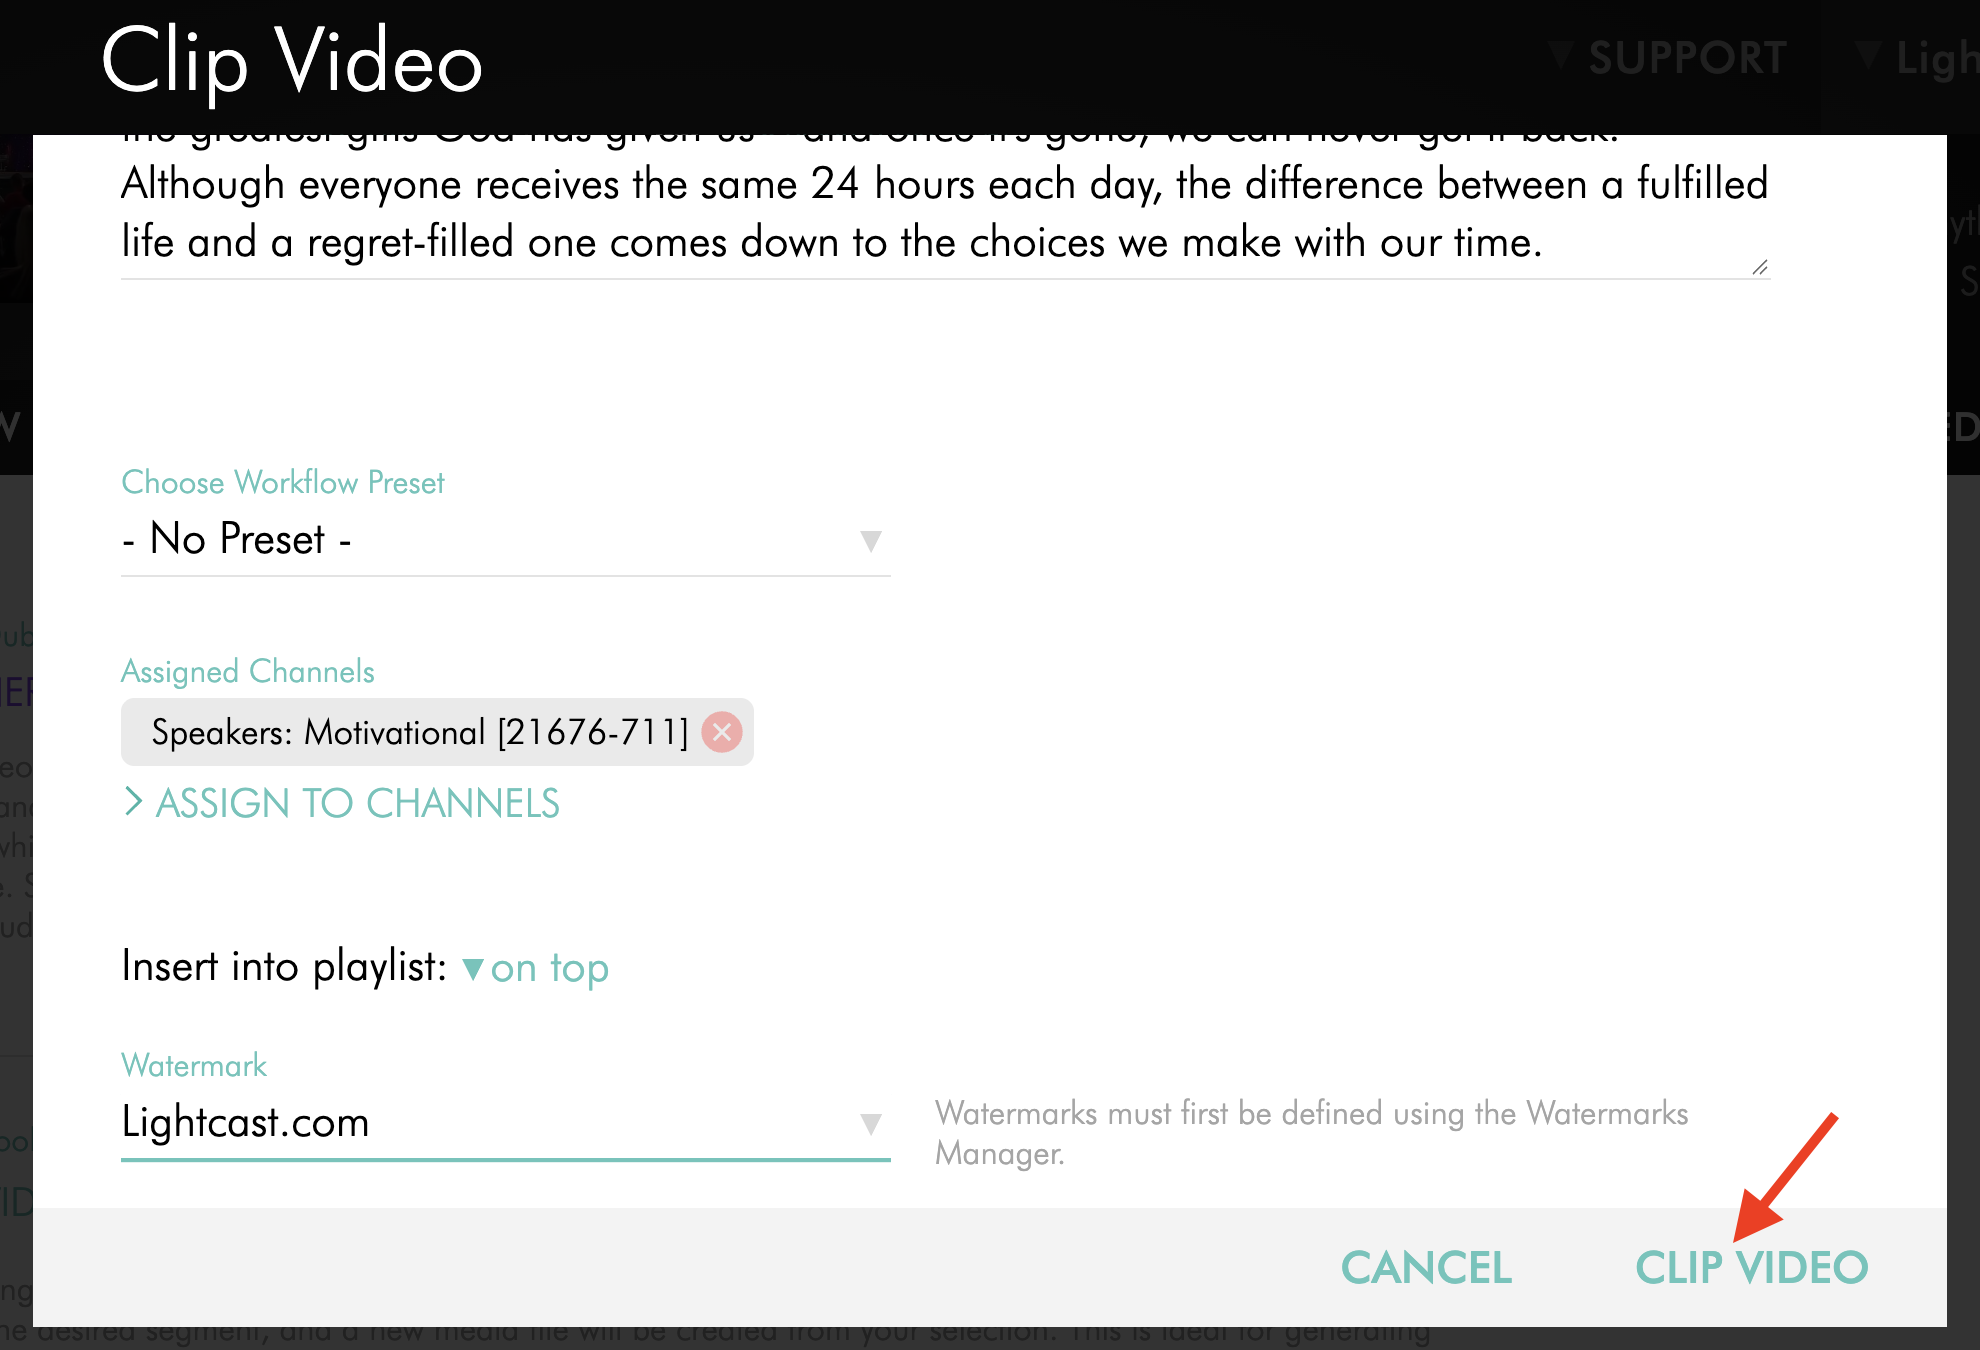
Click Clip Video or Clip Audio, depending on the type of media file, to submit the clip for processing.
Locate your newly created clip
Step 1
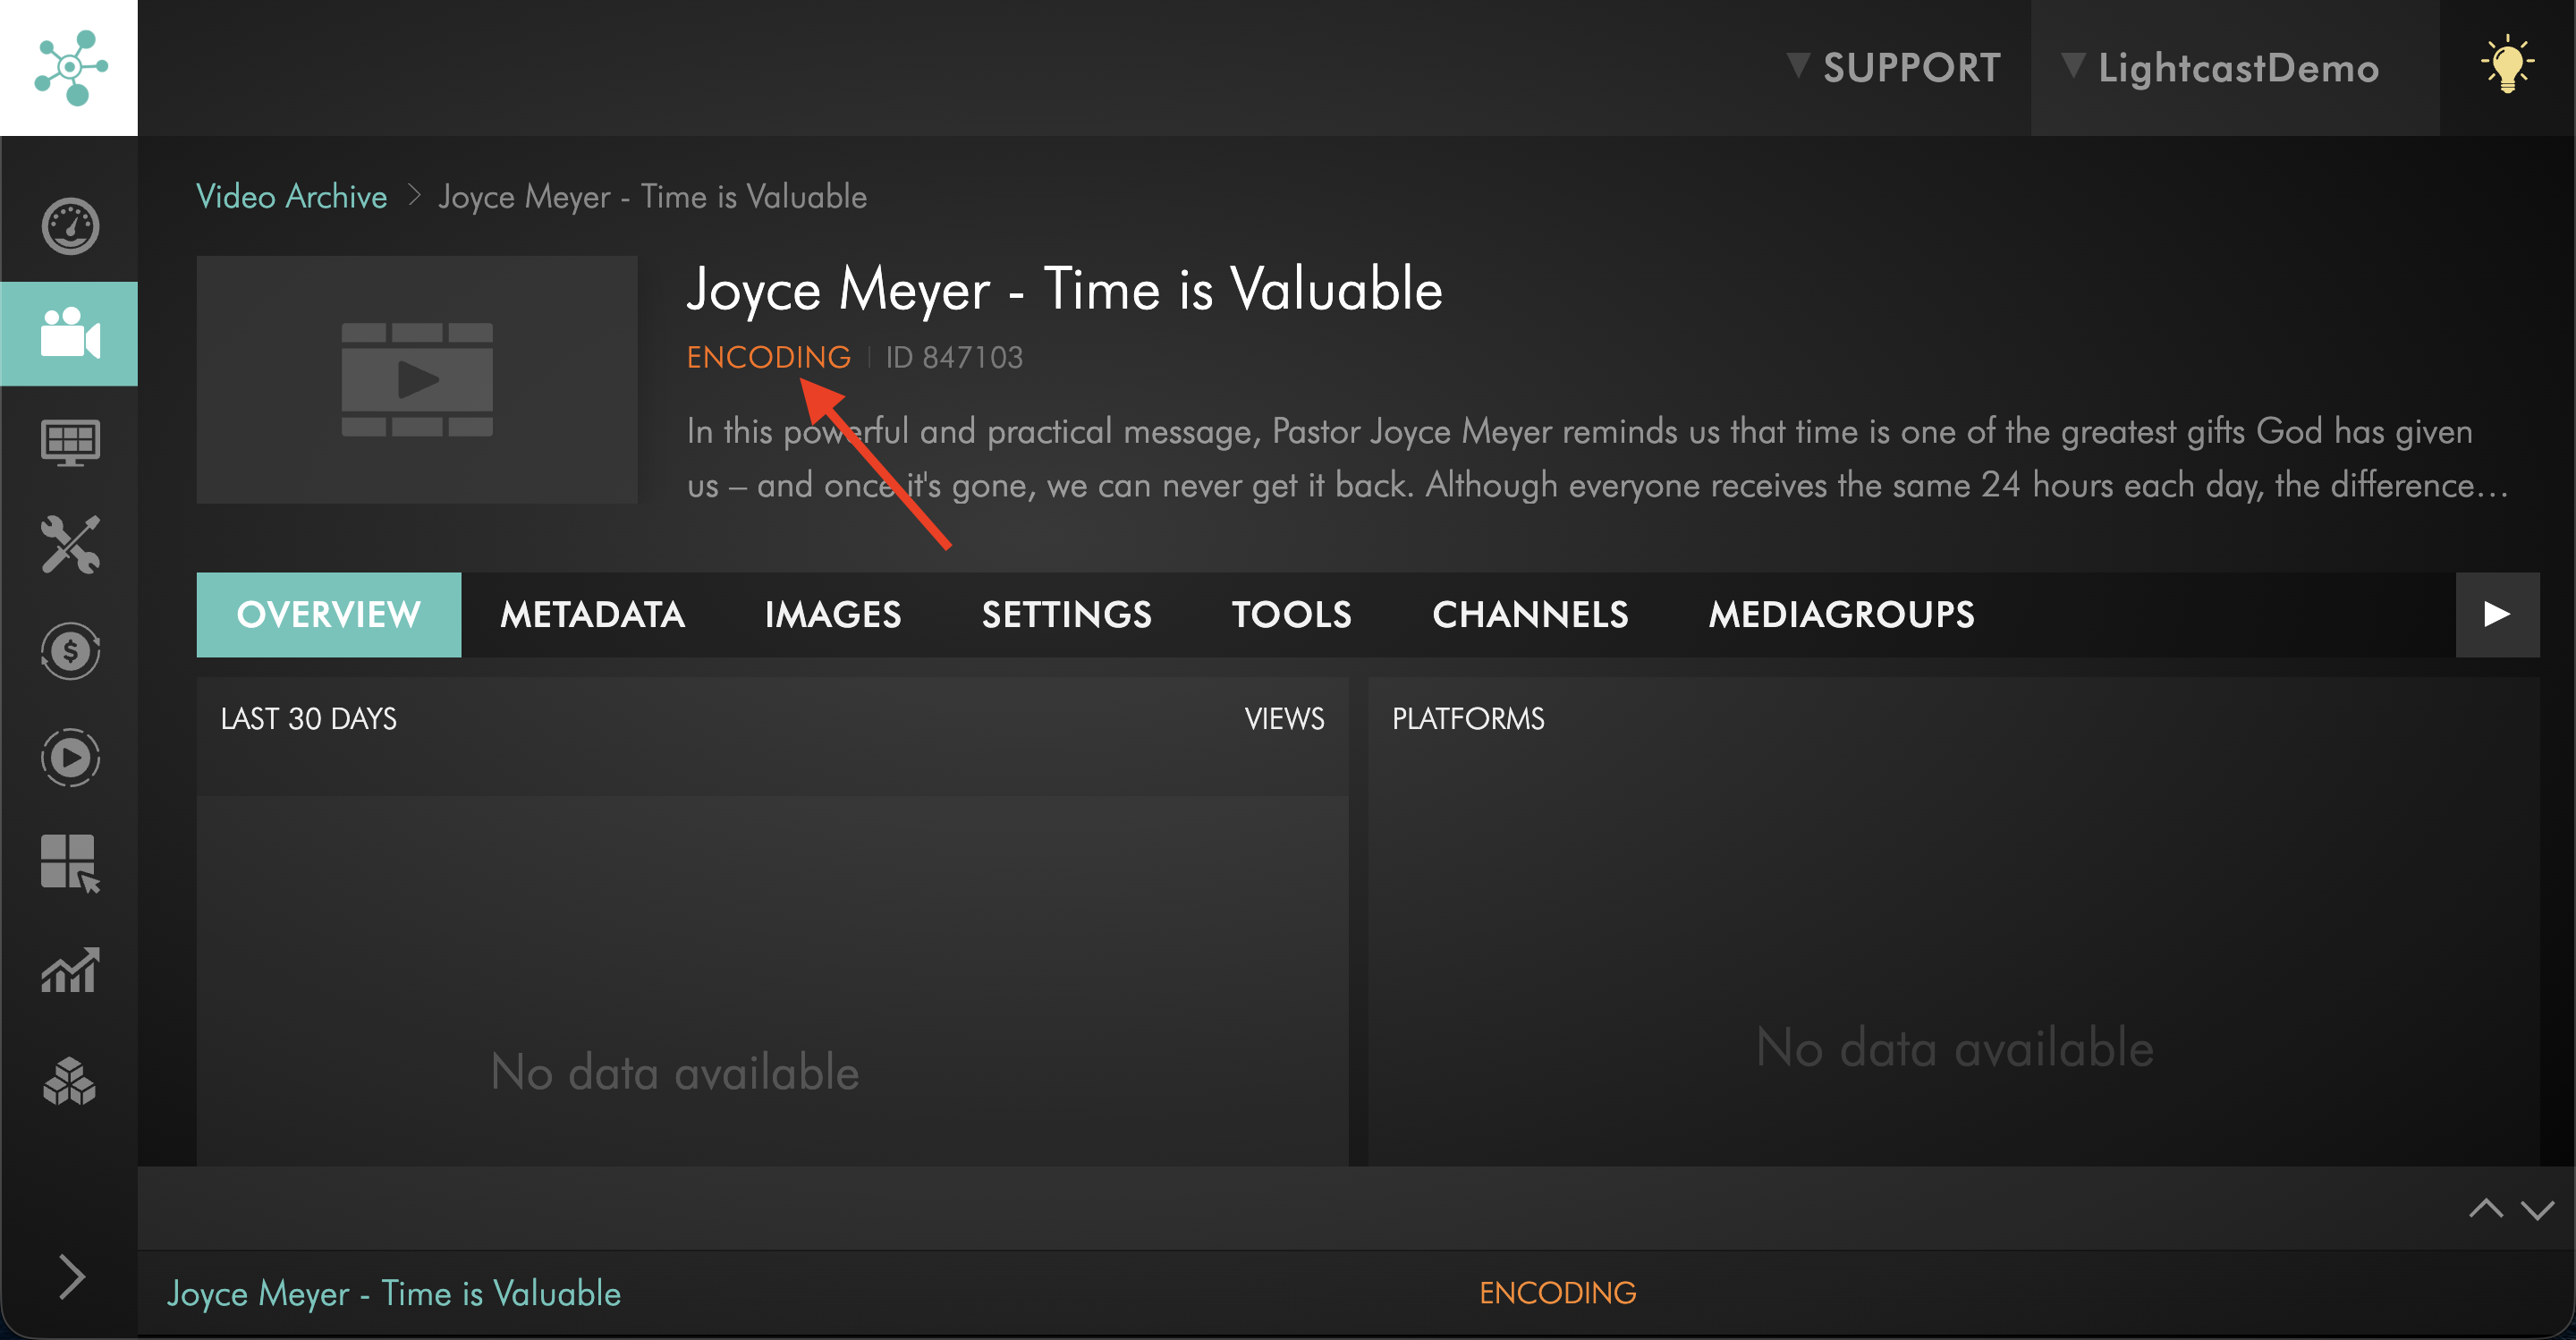
Wait for the new media item to finish encoding.
Step 2
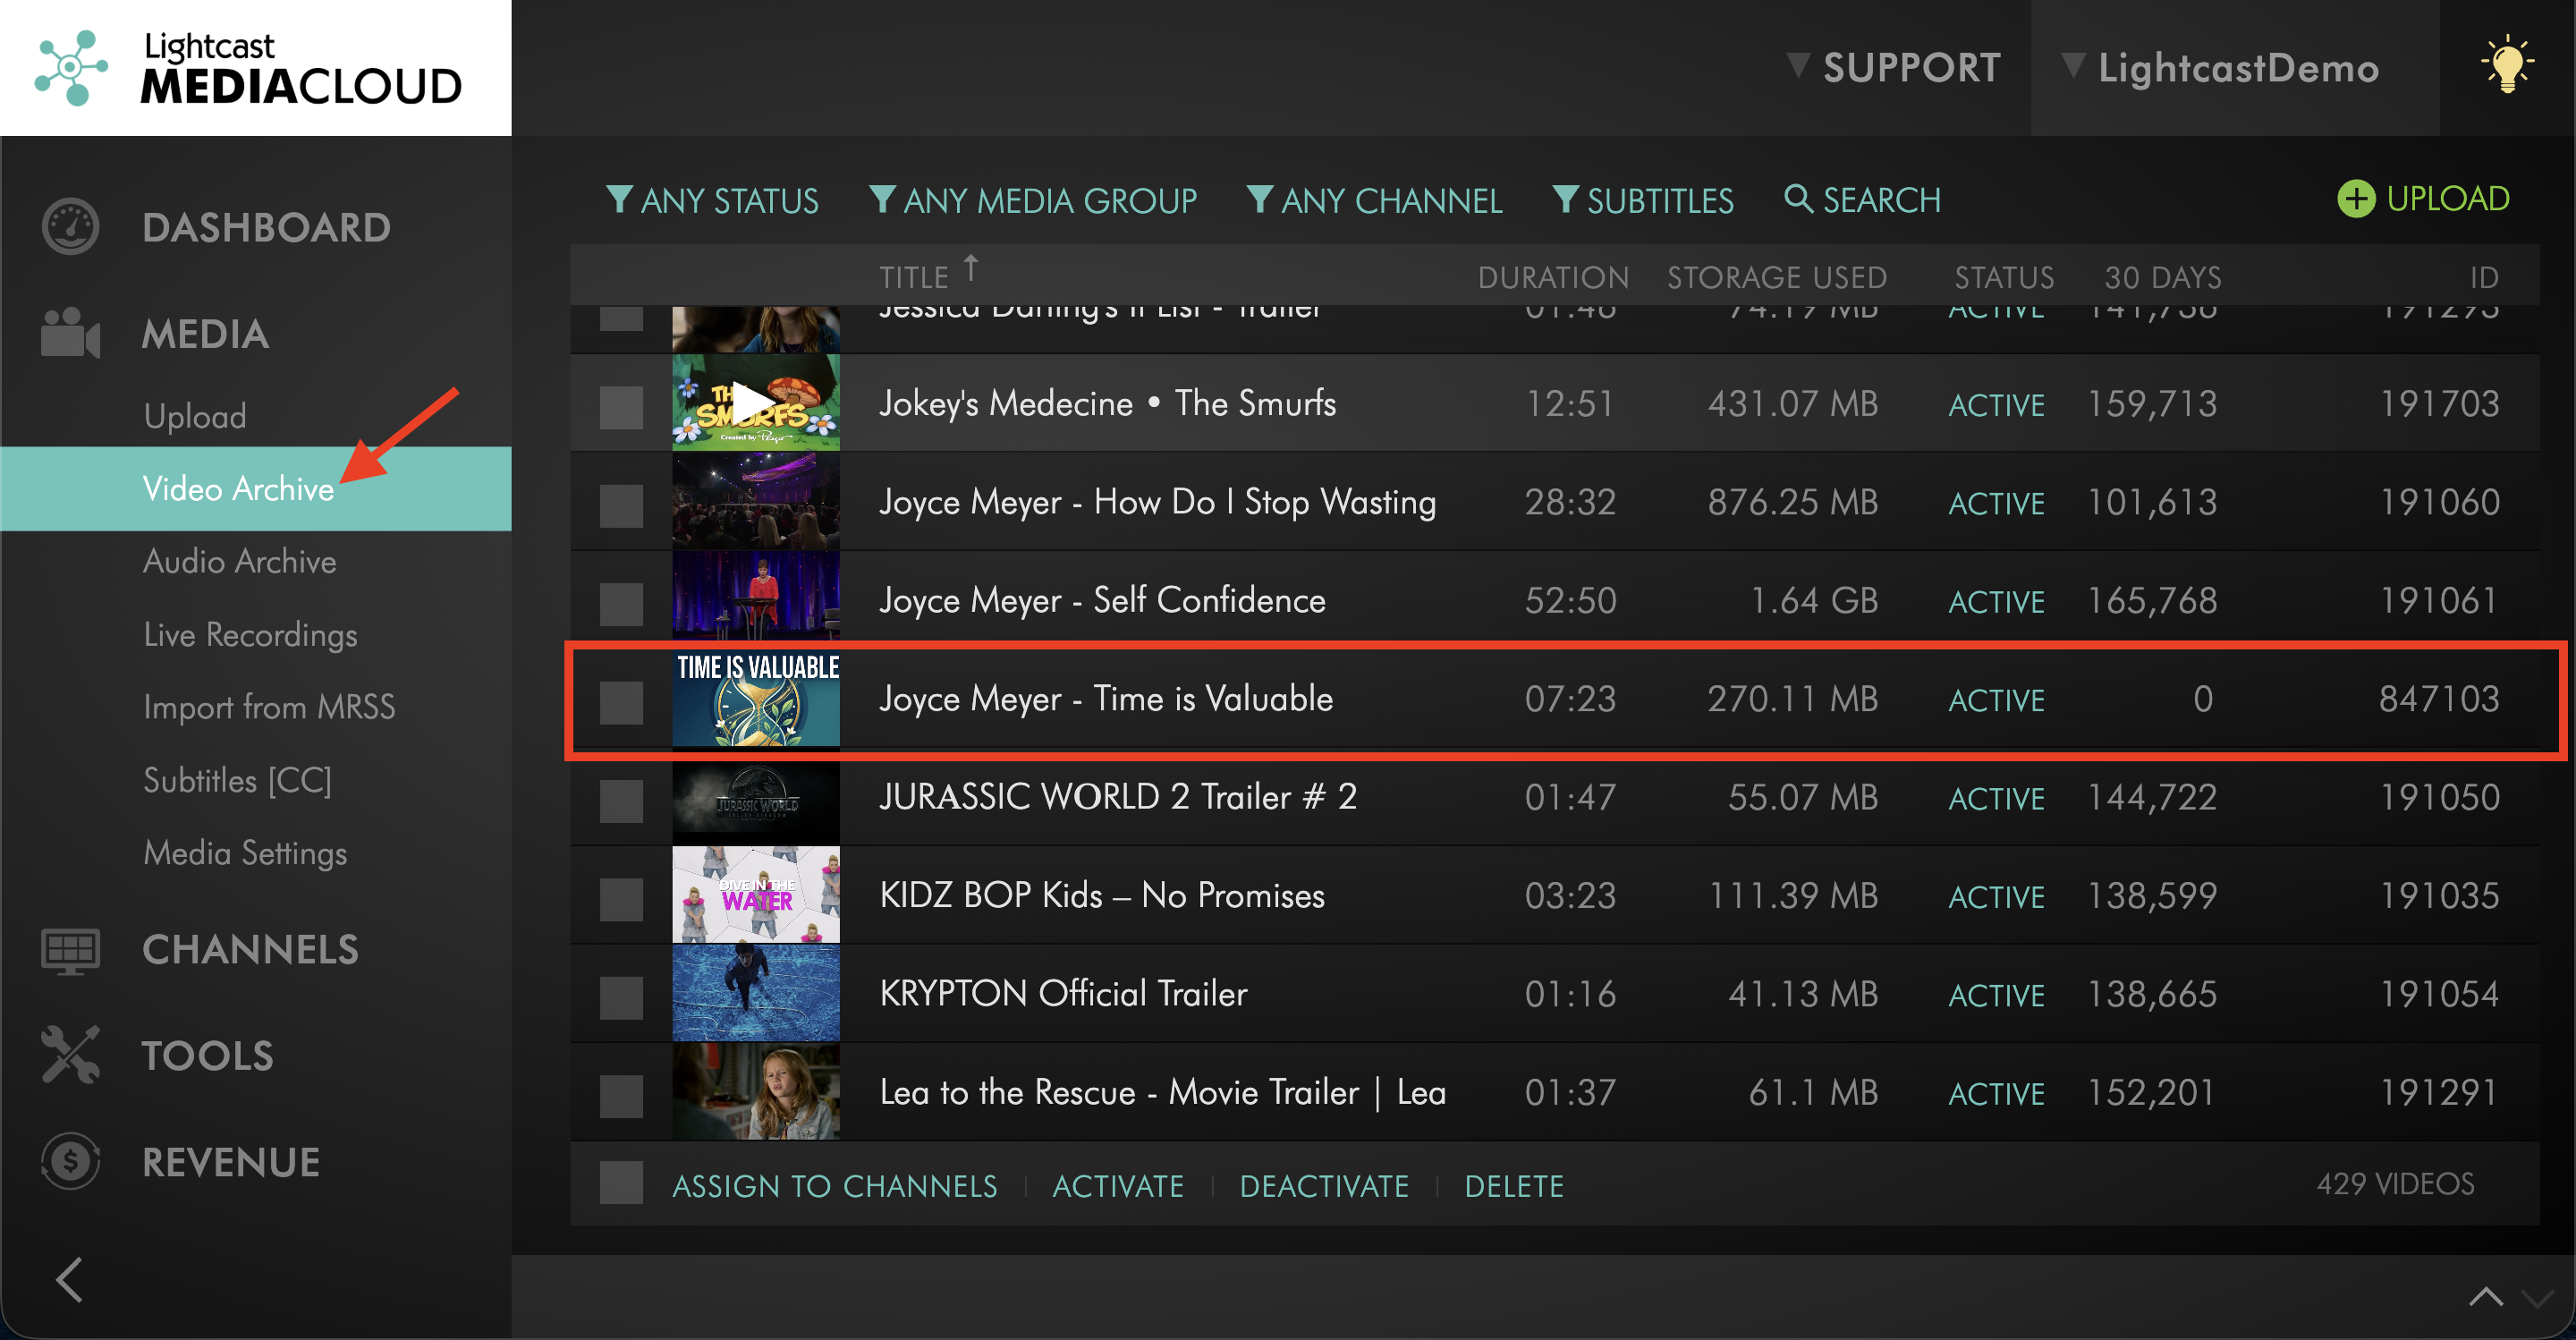
Go to Video Archive or Audio Archive and locate the newly created clip.
Once encoding is complete, the clip appears as an ACTIVE media item.
The original media file remains unchanged.
FAQs
Does the Clipping Tool change or overwrite the original media file?
No. The Clipping Tool creates a new, separate media item containing only the selected portion of the original video or audio file.
The original media item remains unchanged.
Can I create multiple clips from the same media item?
Yes. You can use the Clipping Tool multiple times to create different clips from the same original media item.
Each clip is created as a separate media item and uses its own transcoding and storage resources.
Can I use the Clipping Tool to remove a section from the middle of a video?
The Clipping Tool allows you to select one continuous portion of an existing media item. It cannot remove a section from the middle of a video and combine the remaining portions into a single media item.
For this type of editing, use dedicated video editing software before uploading the finished video to the Media Cloud.
Does creating a clip use additional transcoding and storage resources?
Yes. The Media Cloud generates and encodes a new media file based on the selected portion.
The new clip uses additional transcoding and storage resources, while the original media item remains unchanged and continues to use its existing storage resources.
Do I have to assign a clip to a Channel when creating it?
No. You can create a clip without assigning it to a Channel and assign it to a Channel later from the Video Archive or Audio Archive.
This is helpful if you want to prepare a clip in advance without making it immediately available through your publishing destinations.
Can I schedule a clip to publish at a specific date and time?
Yes. You can schedule a newly created clip to publish at a future date and time.
To do this, leave the Channel assignment empty when creating the clip. After the new clip has finished encoding, assign it to the desired VOD or AOD Channel and configure its scheduled publishing date and time.
If you assign the clip to a Channel during creation, it will automatically be published once encoding is complete.
For detailed instructions, see How to schedule media to publish or unpublish in the Media Cloud.
Where can I find my clip after it has been created?
The new clip appears as a separate media item in the Video Archive or Audio Archive, depending on the type of clip.
Once encoding is complete, its status changes to ACTIVE.
Can I apply a Workflow Preset or Watermark when creating a clip?
Yes. You can select an existing Workflow Preset when configuring a new clip.
For supported video workflows, you can also apply an existing Watermark before submitting the clip for encoding.
Can I create a clip from a Live Event?
The Clipping Tool is designed for existing on-demand media items in the Video Archive or Audio Archive.
Live Event recordings use a separate LIVE-to-VOD trimming tool before they are sent to encoding.
Once a Live Event recording has been processed into an on-demand video and is available in the Video Archive, you can use the Clipping Tool to create additional clips from that media item.
For more information about preparing Live Event recordings, see How to trim a LIVE-to-VOD recording.