
Troubleshooting encoder connection and buffering issues
Overview
This article explains how to troubleshoot common live streaming issues, including encoder connection errors, buffering, frequent disconnects, unstable playback, and network-related problems.
Follow the troubleshooting steps below to identify whether the issue is related to your encoder, internet connection, streaming configuration, or viewer playback.
When to use this article
Use this article when:
Your encoder cannot connect to Lightcast or reports a connection error.
Your live stream buffers, disconnects, or experiences interrupted playback.
Your Live Channel displays an error, a black screen, or audio without video.
Your stream works inconsistently across devices or viewer locations.
You suspect issues with upload bandwidth, encoder performance, or your internet connection.
Quick troubleshooting guide
Use this table to identify your problem and find the most relevant troubleshooting section.
Problem | What to check first |
|---|---|
Encoder cannot connect | |
Channel shows offline or feed error | |
Stream buffers or disconnects | |
Video is jerky or frames are dropping | |
Connection fails intermittently | |
Only some viewers experience issues |
What to check first
Before proceeding with detailed troubleshooting, verify the following:
Encoder connection: Confirm that your encoder is running and actively sending a stream.
Stream credentials: Verify that your encoder uses the correct credentials from the Channel's STREAM tab in the Media Cloud.
Streaming method: Confirm that your encoder is configured for the correct ingestion method (RTMP Ingestion or SRT Ingestion).
Encoder settings: Verify that your encoder uses supported video and audio codecs, such as H.264 and AAC.
Internet connection: Use a wired connection whenever possible and ensure sufficient upload bandwidth.
Encoder performance: If using a software encoder, check that CPU usage is not consistently excessive.
If the issue continues, follow the relevant troubleshooting section below.
For more information, see How to find your LIVE Channel stream credentials and Recommended encoder settings for live streaming.
Troubleshooting
Confirm the stream is active and using the correct credentials
Start here if your encoder cannot connect, your Live Channel appears offline, or the live feed returns an error.
Step 1
Log in to your Media Cloud account.
Step 2
Confirm that your encoder is running and actively sending a stream.
Step 3
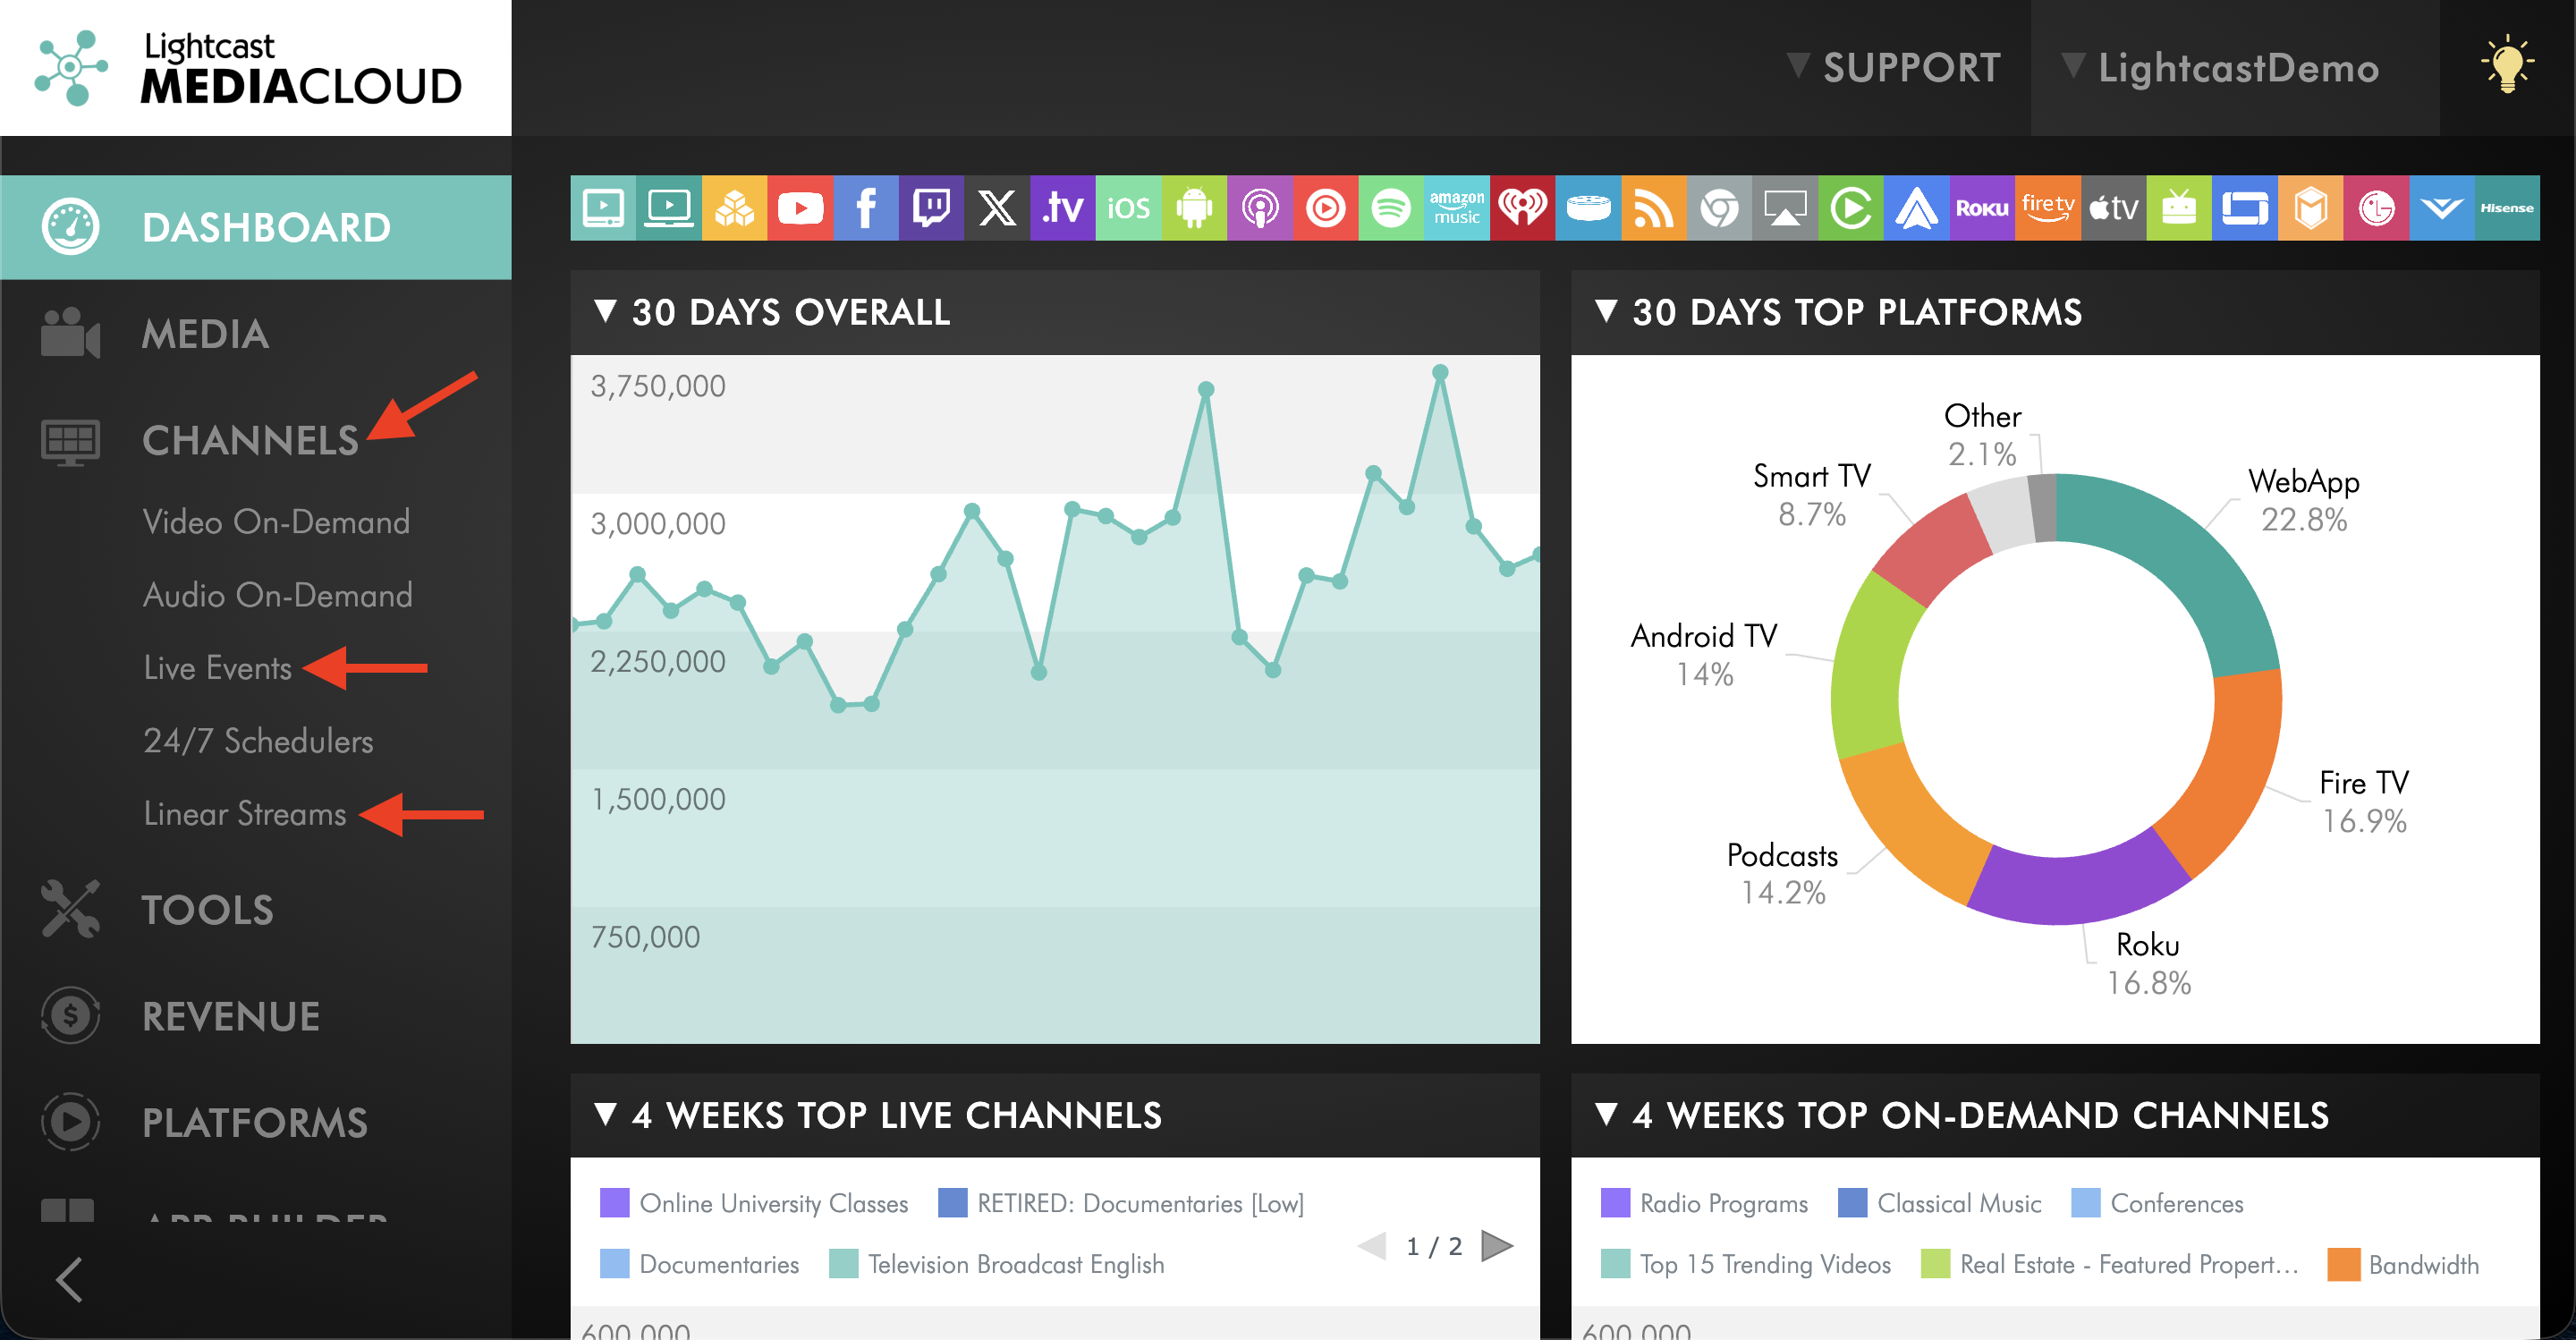
Go to CHANNELS, then select Live Events or Linear Streams, depending on your Channel type.
Select the Channel you want to stream to.
Step 4
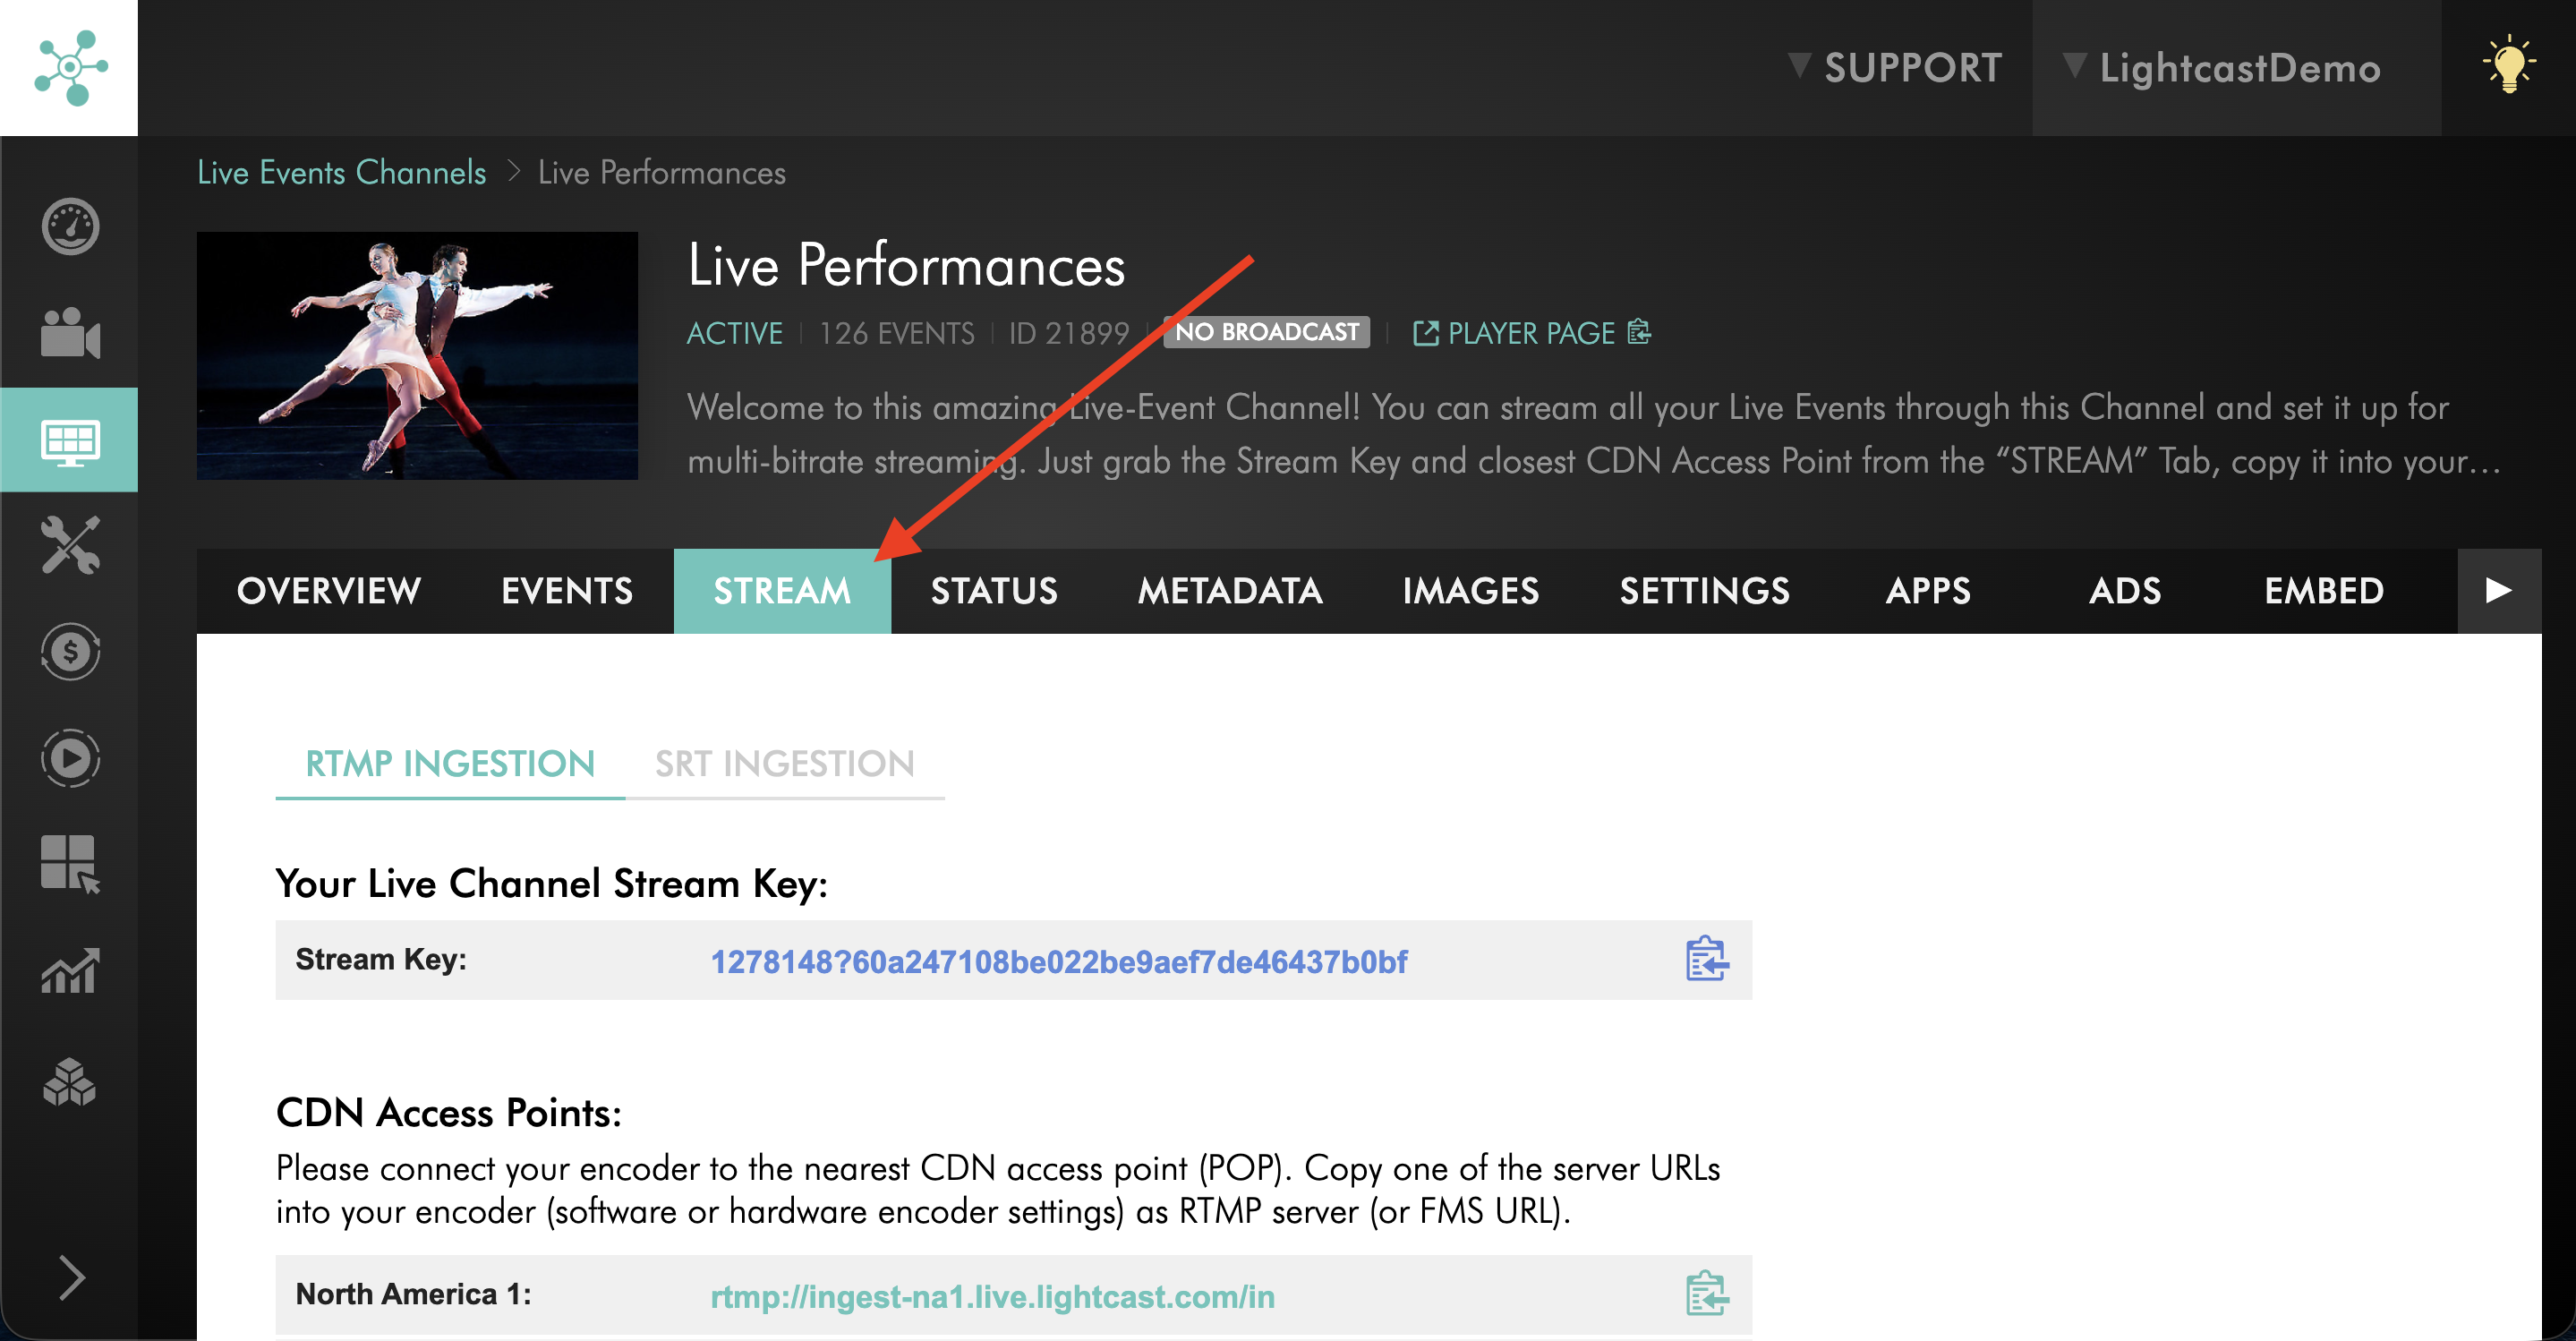
Click the STREAM tab.
Step 5
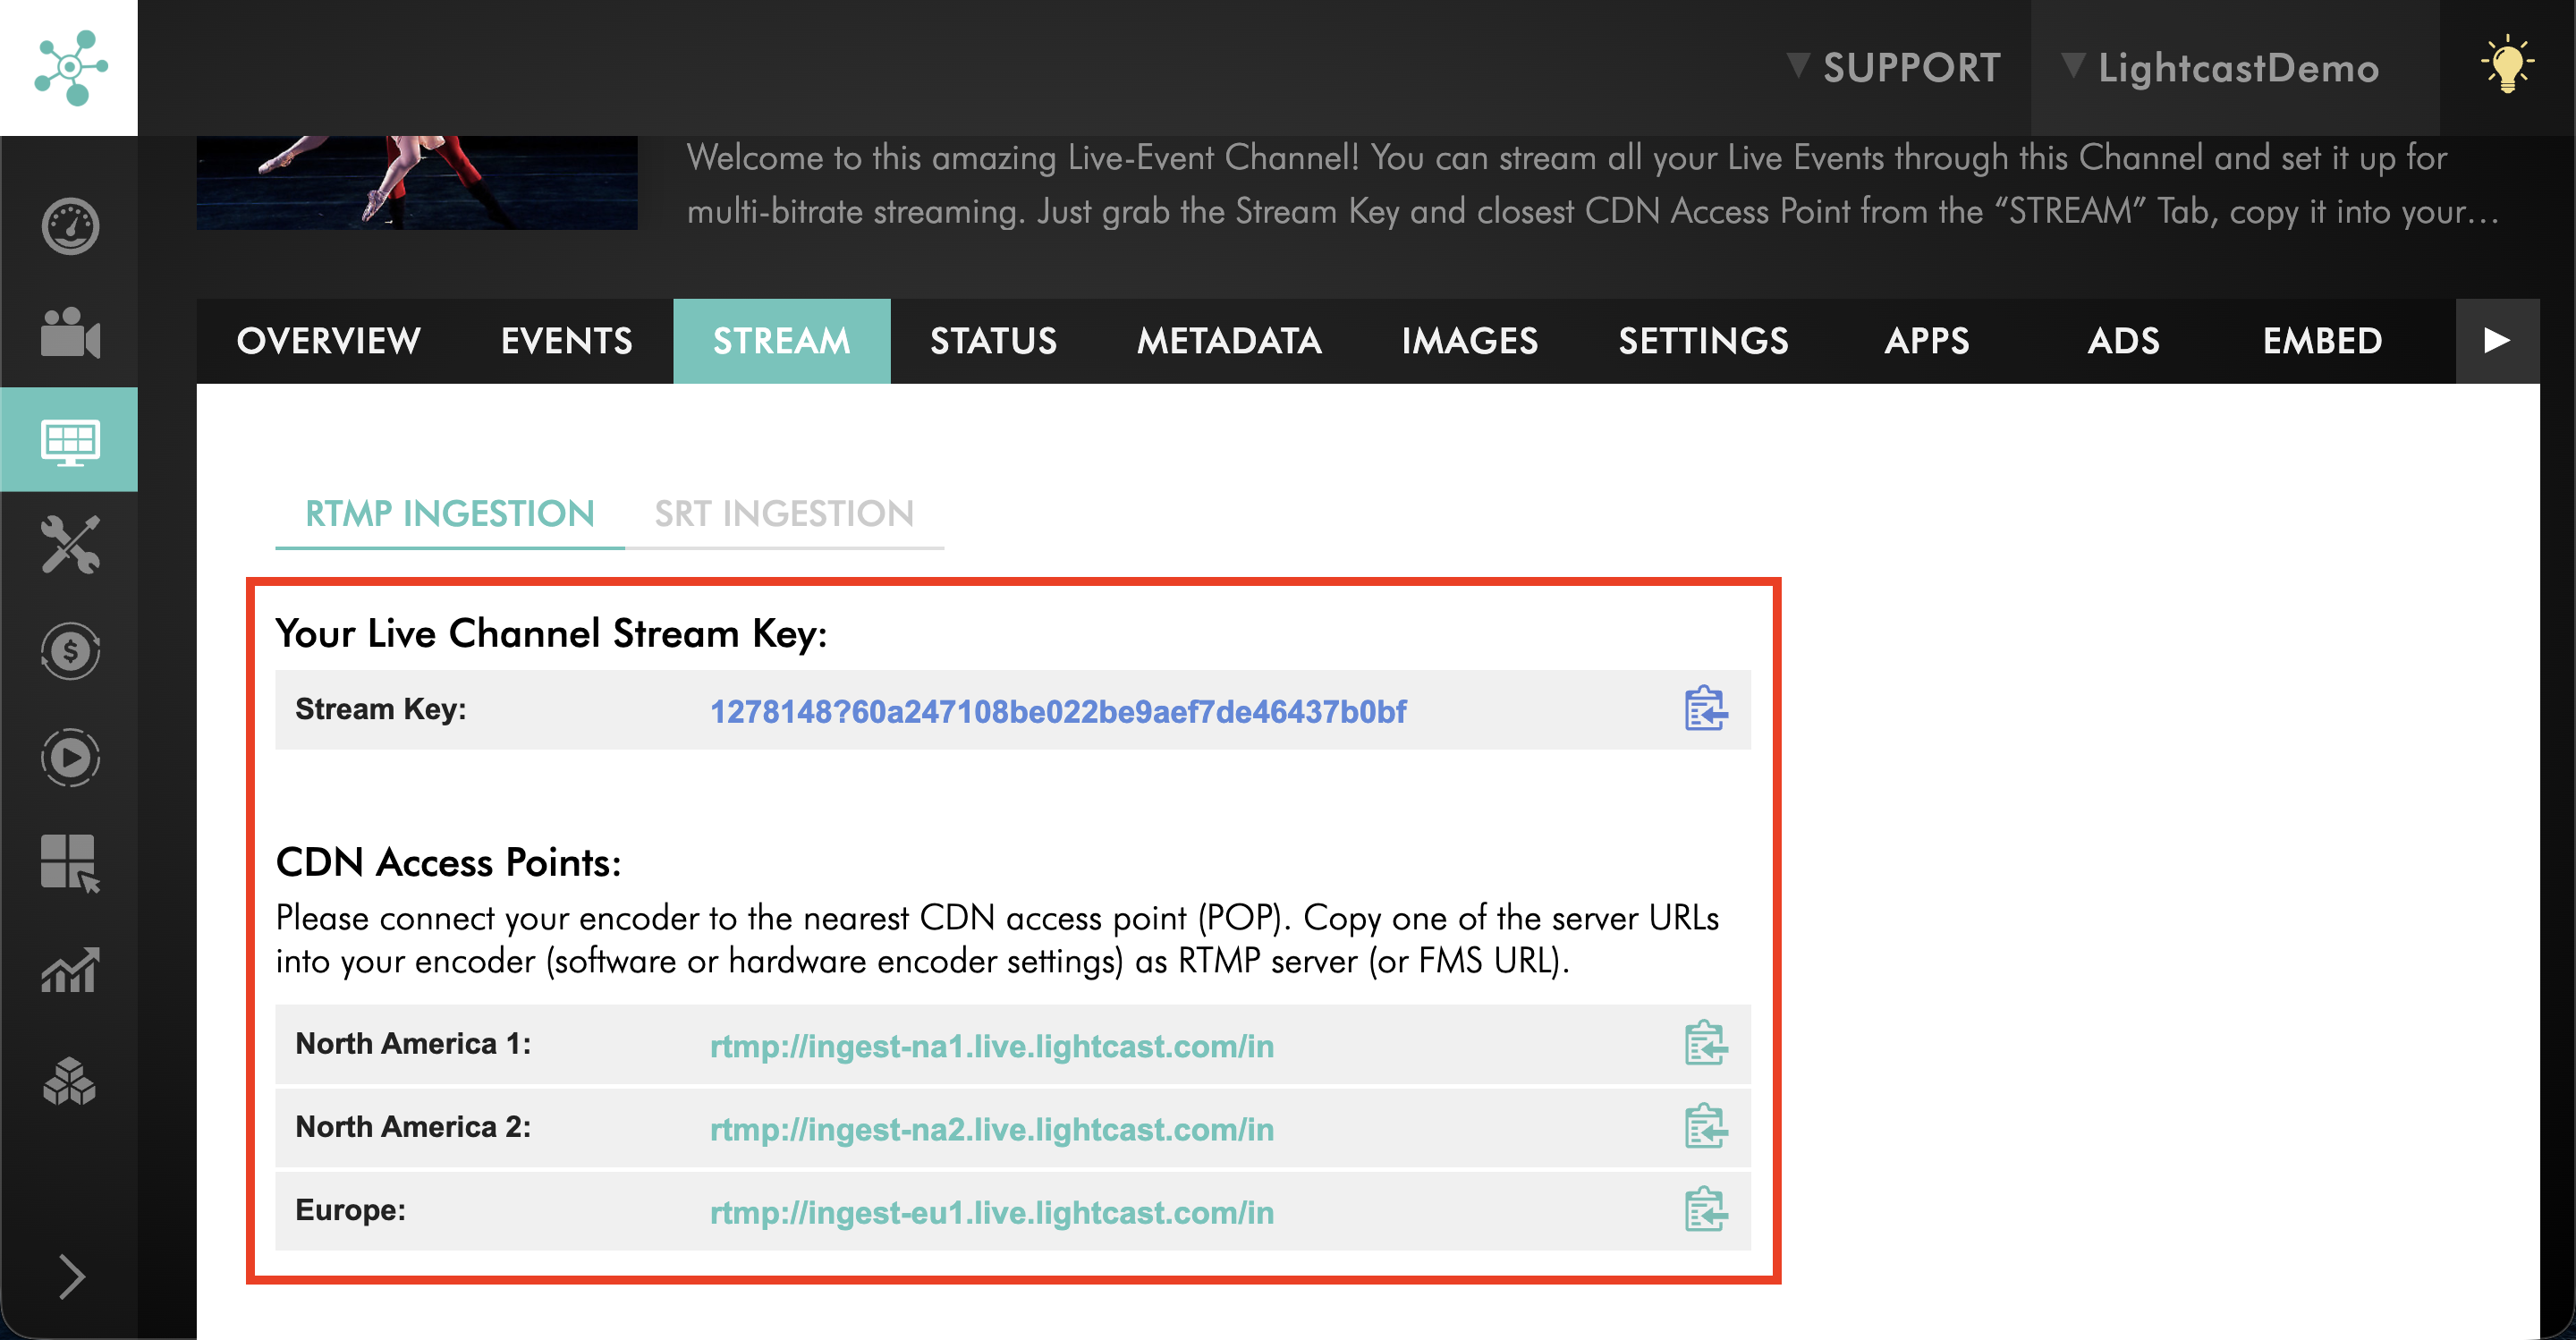
Verify that your encoder is using the correct streaming credentials:
For RTMP Ingestion, confirm the Stream Key and CDN Access Point.
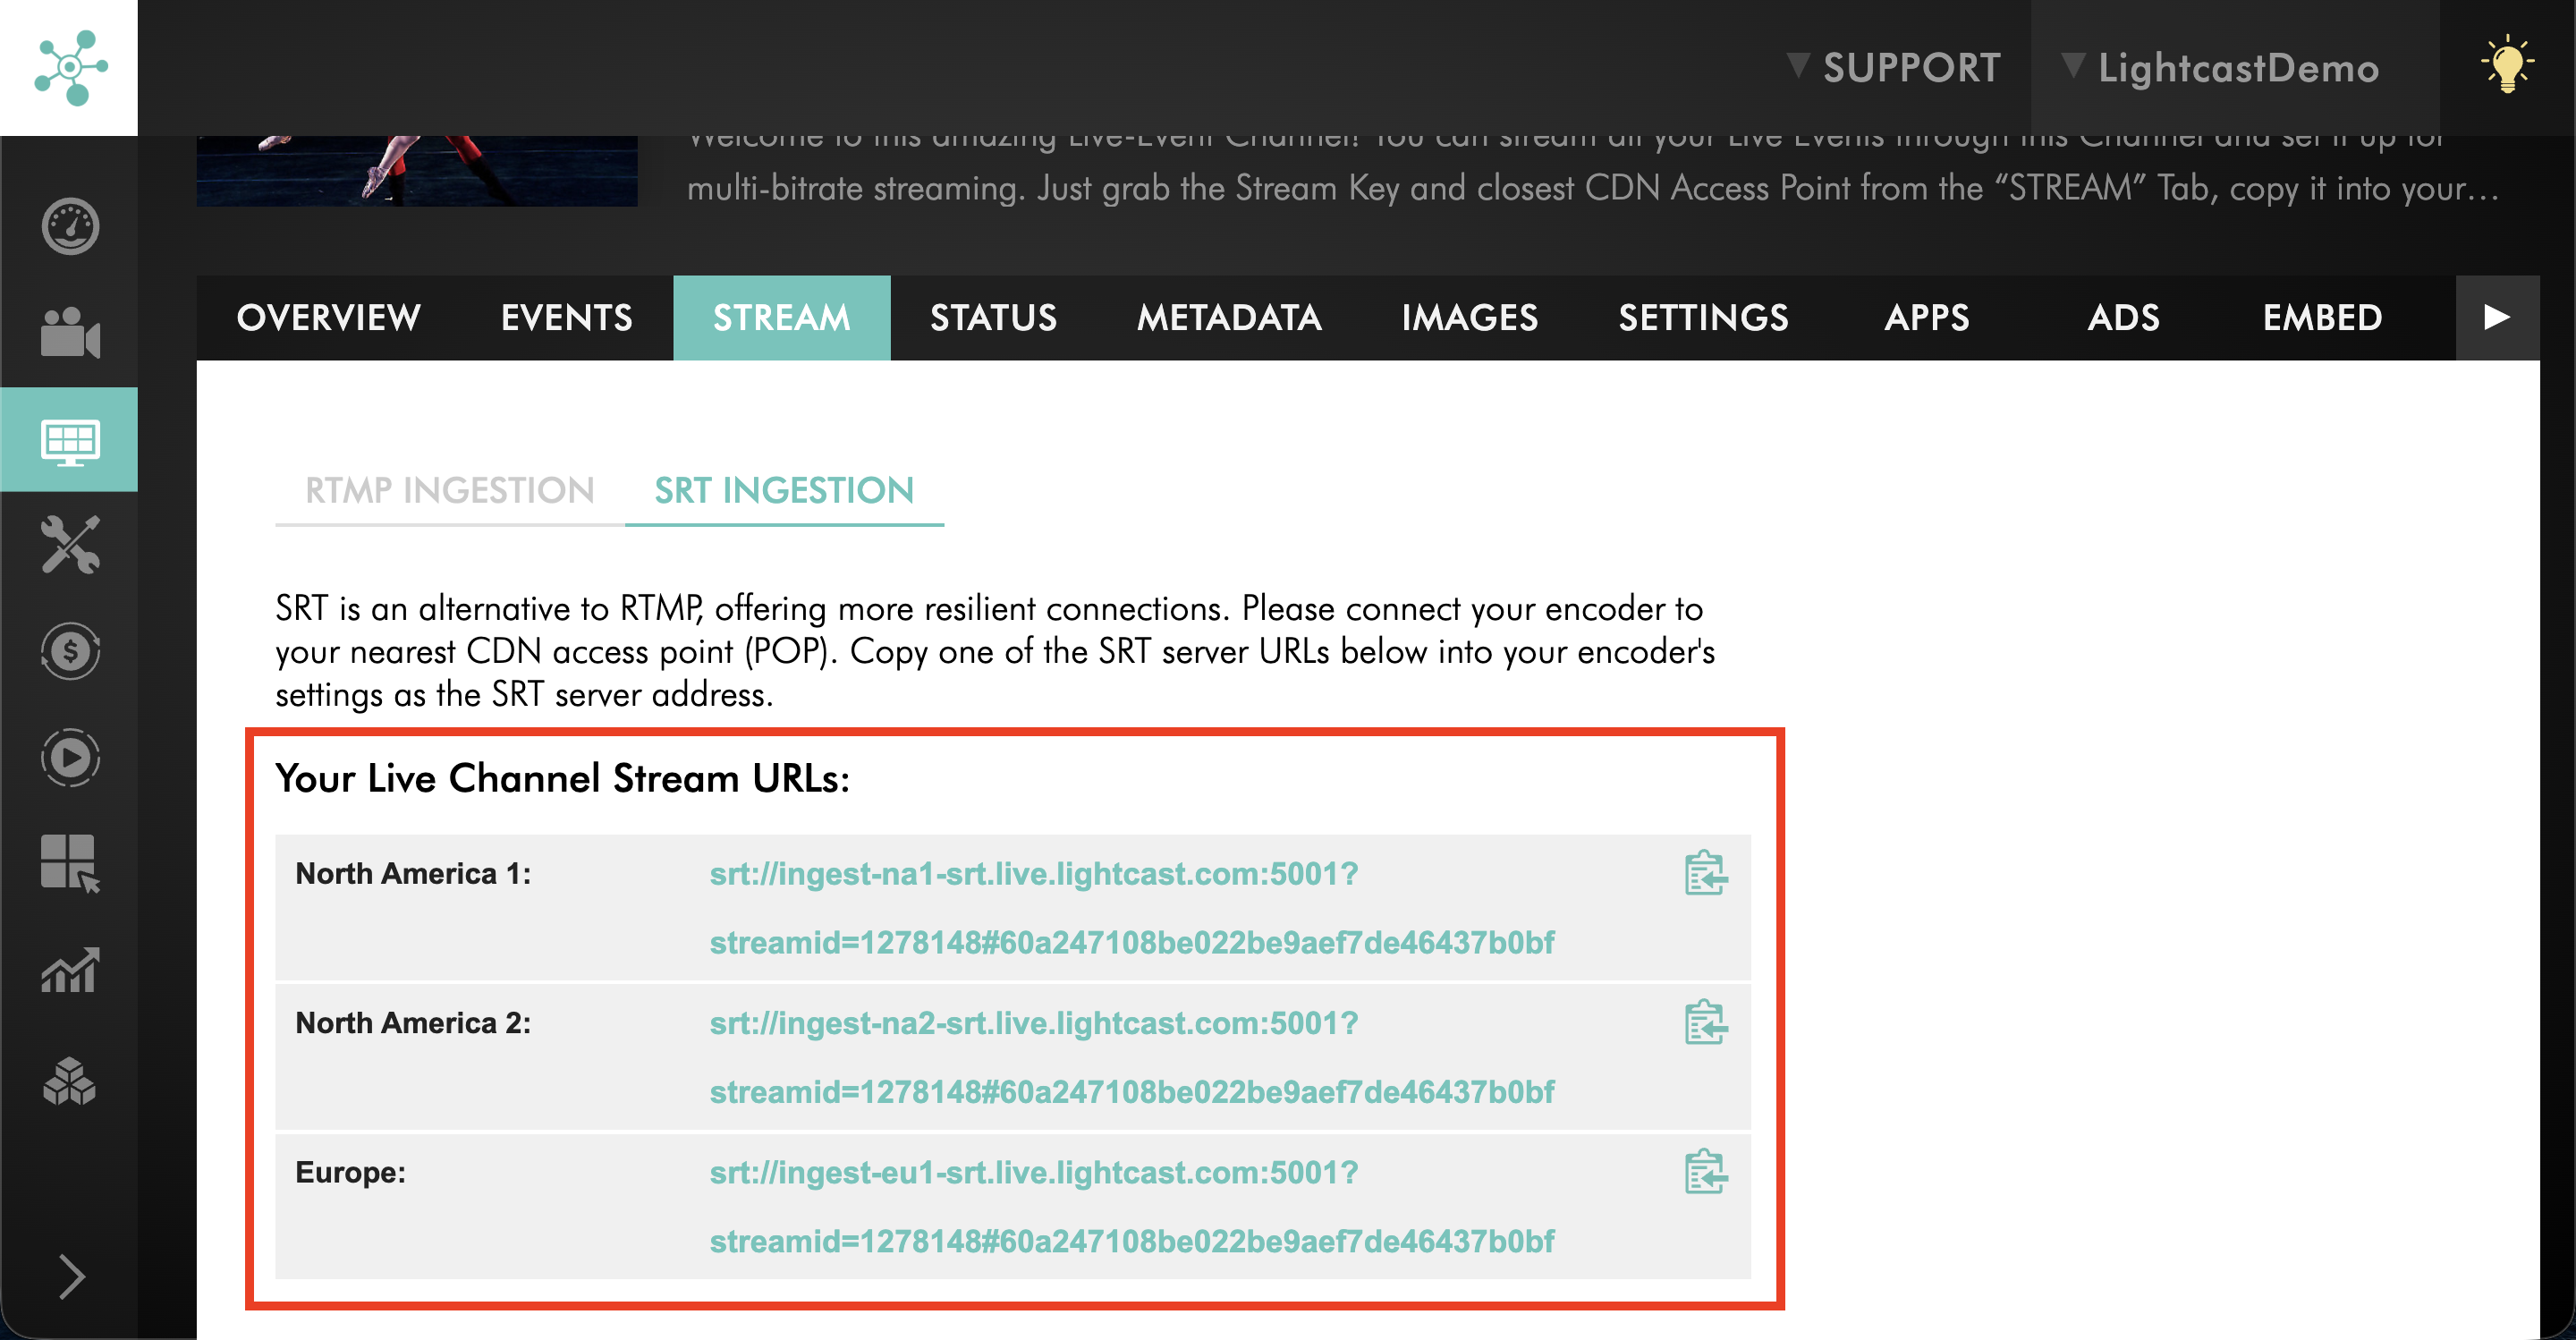
For SRT Ingestion, confirm the selected SRT Streaming URL.
Make sure the credentials are copied from the correct Channel and do not contain extra spaces.
Step 6
Confirm that your encoder is configured for the correct ingestion method.
For example, use RTMP settings when connecting through RTMP Ingestion and SRT settings when connecting through SRT Ingestion.
After correcting any settings, reconnect your encoder and verify that the Media Cloud receives the live stream.
Check upload bandwidth and stream bitrate
Check your upload bandwidth if your stream buffers, disconnects frequently, or becomes unstable, particularly after increasing the bitrate or when multiple streams share the same internet connection.
Step 1
Run an upload speed test from the same network used by your encoder.
You can use a tool such as Speedtest by Ookla.
For more accurate results, test when other devices and applications are not heavily using the internet connection.
Step 2
Compare your available upload bandwidth with your total streaming bitrate, including video and audio.
For reliable streaming, we recommend having at least twice the total bitrate available as upload bandwidth.
For example:
Setting | Value |
|---|---|
Video bitrate | 2,500 kbps |
Audio bitrate | 128 kbps |
Total streaming bitrate | 2,628 kbps (approximately 2.6 Mbps) |
Recommended minimum upload bandwidth | Approximately 5.3 Mbps |
This provides a recommended safety margin rather than representing a technical bandwidth limit.
Important: A single speed test does not guarantee a stable connection throughout a broadcast. Internet performance can fluctuate, so additional bandwidth headroom is recommended for critical Live Events.
Step 3
If you are sending multiple streams simultaneously, include the combined bitrate of all outgoing streams.
For example, if you are sending both a primary and backup stream, your internet connection must support the combined upload requirements.
Step 4
If your upload bandwidth is insufficient, lower the stream bitrate and test again.
If lowering the bitrate improves stability, adjust your encoder settings to match the upload bandwidth your connection can consistently support.
Check encoder CPU usage and encoder settings
Check your encoder performance if video is jerky, frames are dropping, audio plays without video, or the stream becomes unstable during encoding.
Step 1
If you use a software encoder, check the computer's CPU usage.
Mac: Open Activity Monitor.
Windows: Open Task Manager.
As a general guideline, CPU usage should not consistently exceed approximately 80% during live encoding.
Step 2
Close unnecessary applications that may be consuming CPU, memory, or other system resources.
Step 3
Confirm that your encoder is using supported streaming settings, including H.264 video and AAC audio.
Review your resolution, frame rate, and bitrate against Lightcast's recommended settings.
Step 4
If CPU usage is consistently high, reduce the encoding workload.
Depending on your setup, this may involve adjusting the input or output resolution, bitrate, frame rate, or encoding complexity.
Real-time video scaling, especially when the input resolution is higher than the output resolution, may also increase CPU usage.
Step 5
Review your encoder's connection timeout, reconnect, or retry settings.
If supported, configure the encoder to reconnect automatically after temporary network interruptions.
Test the stream again after making changes.
For more information, see Recommended encoder settings for live streaming.
Check the local network
Review your local network if the stream disconnects frequently, becomes unstable at certain times, or behaves differently depending on the streaming location.
Check the following:
Use a wired internet connection whenever possible instead of Wi-Fi.
Avoid large downloads, cloud backups, file uploads, software updates, and other bandwidth-intensive activities during the stream.
Check network cables, switches, routers, firewalls, and other local network equipment.
Confirm that your router or firewall is not blocking the encoder connection.
If possible, use a dedicated internet connection for the encoder.
If you are sending both primary and backup streams, confirm that your network can support their combined bandwidth requirements.
If your connection cannot reliably support both streams, test the primary stream by itself to determine whether the additional upload bandwidth requirement is contributing to the problem.
Switch CDN Access Points or SRT Streaming URLs
If your encoder repeatedly disconnects from one ingestion point or cannot reliably reach the streaming server, switching to another available CDN Access Point or SRT Streaming URL may help.
A different ingestion point may allow your stream to use an alternative network route between your location and Lightcast's streaming infrastructure.
Important: Changing your CDN Access Point or SRT Streaming URL requires reconnecting your encoder and may interrupt an active live stream. Whenever possible, test alternative ingestion points before your scheduled broadcast.
Step 1
Log in to your Media Cloud account.
Step 2
Go to CHANNELS, select the appropriate Live Events Channel or Linear Stream Channel, and open its STREAM tab.
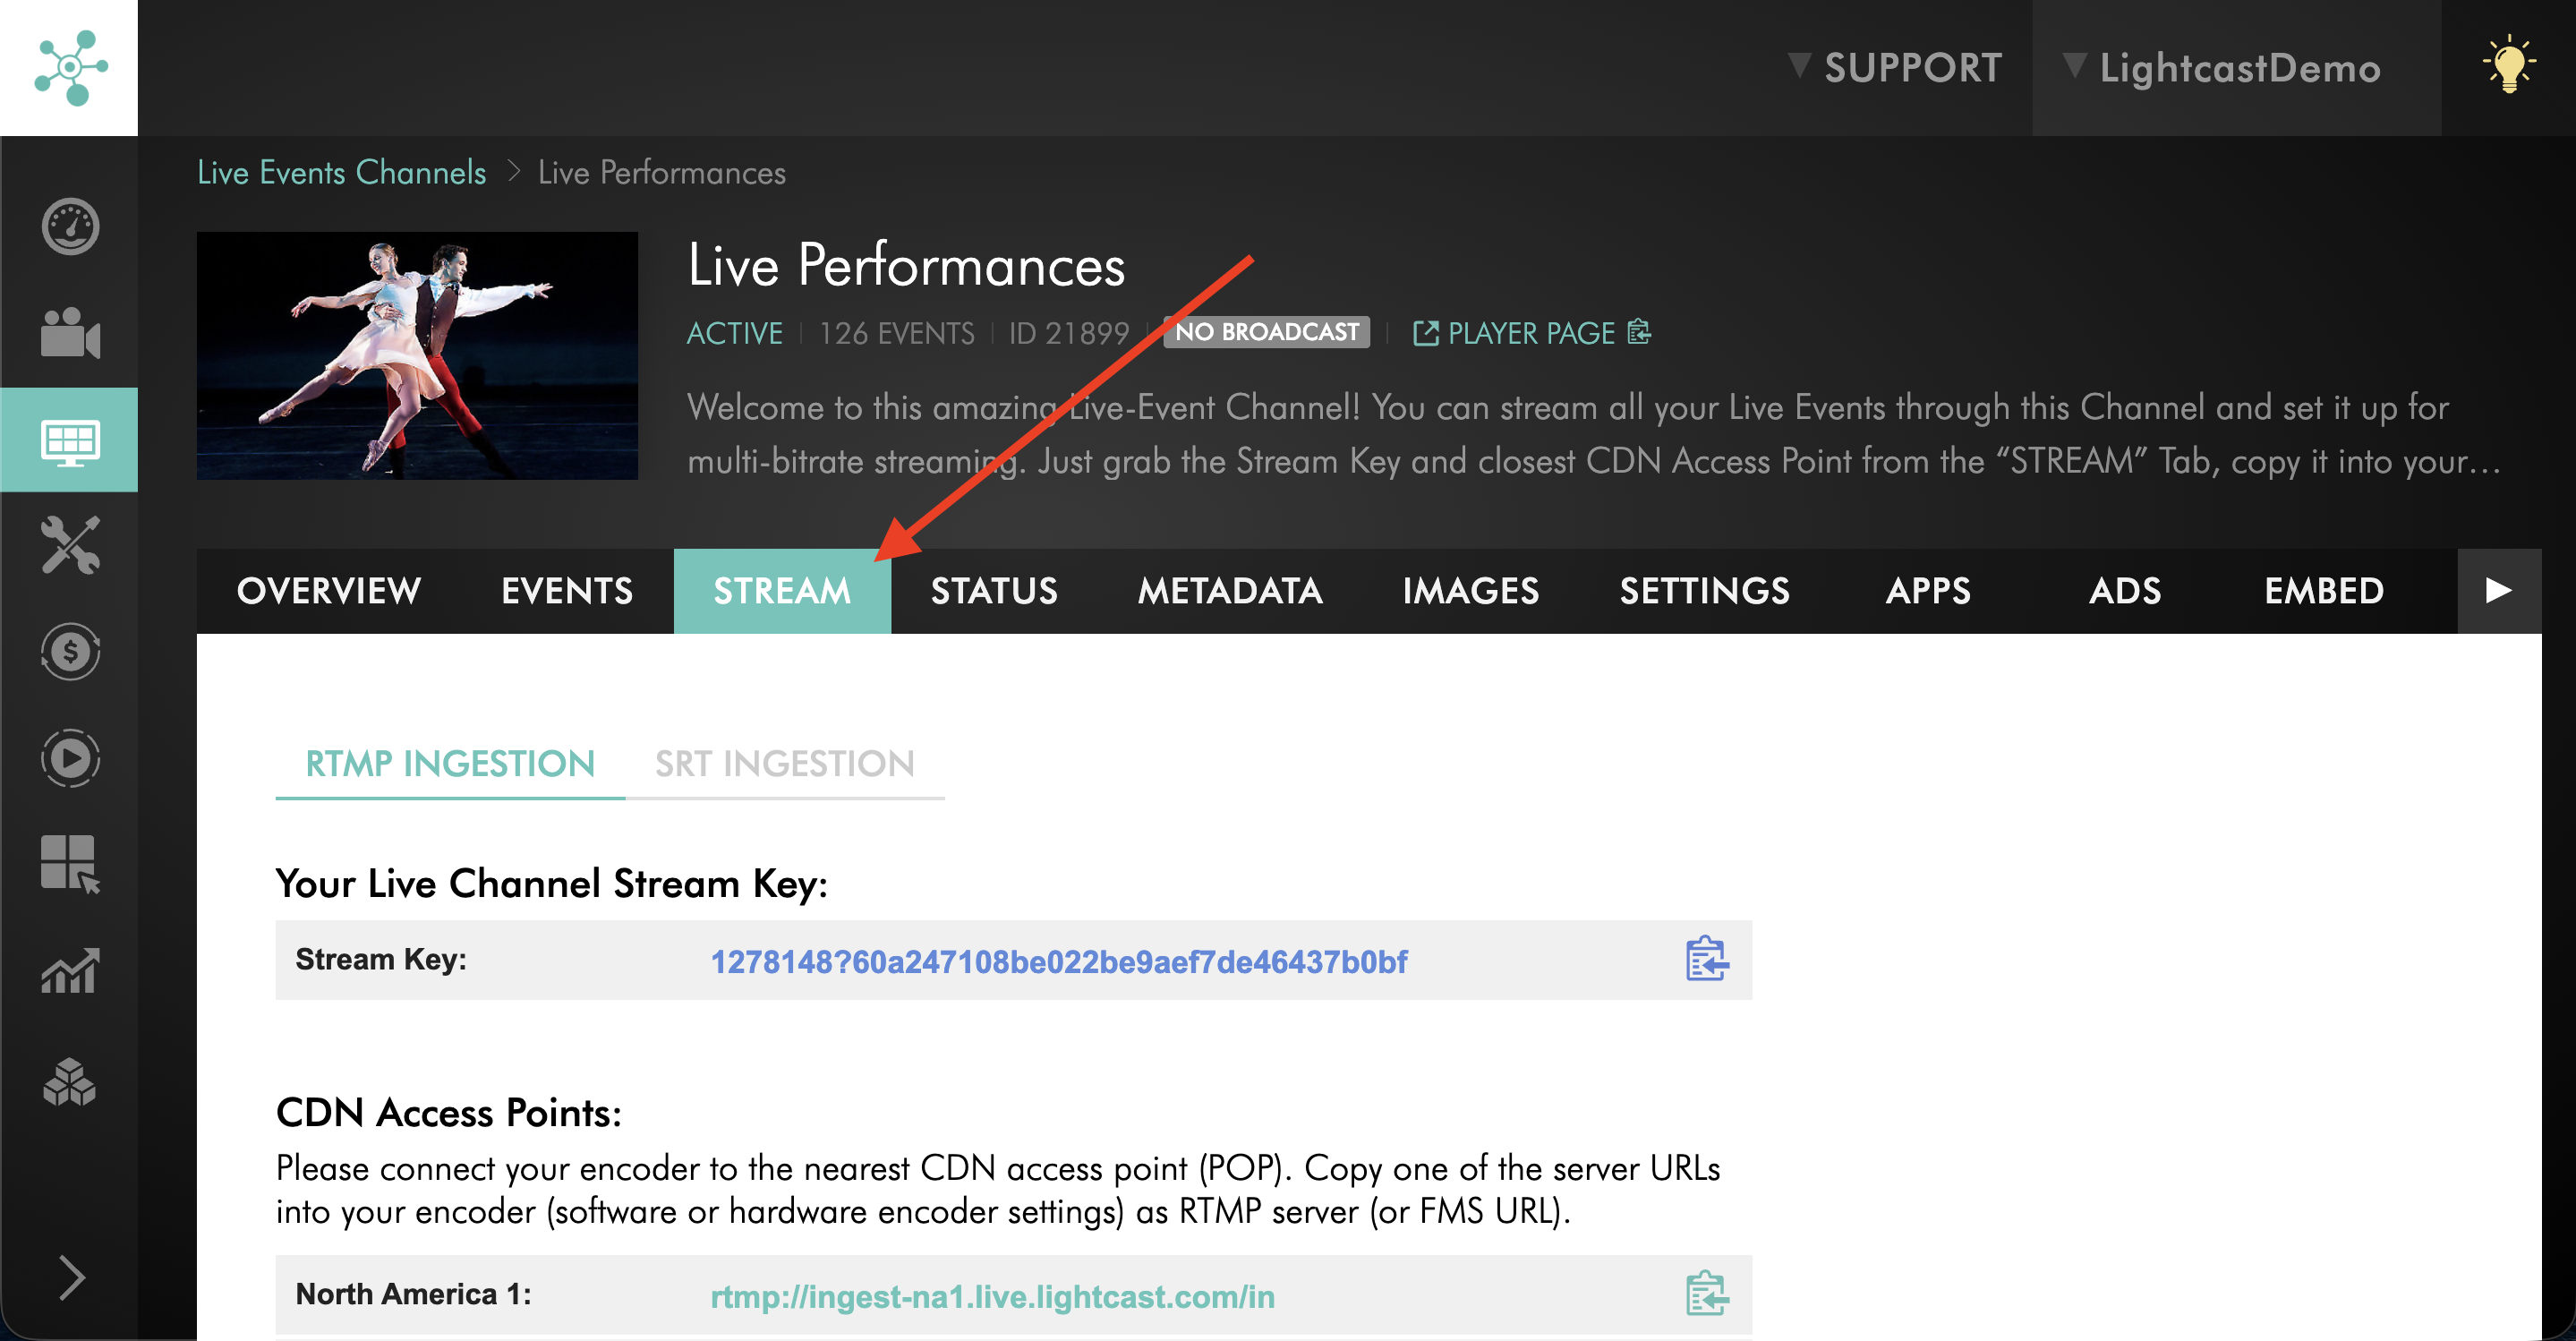
Step 3
Locate the available ingestion points for your streaming method:
RTMP Ingestion: Review the available CDN Access Points.
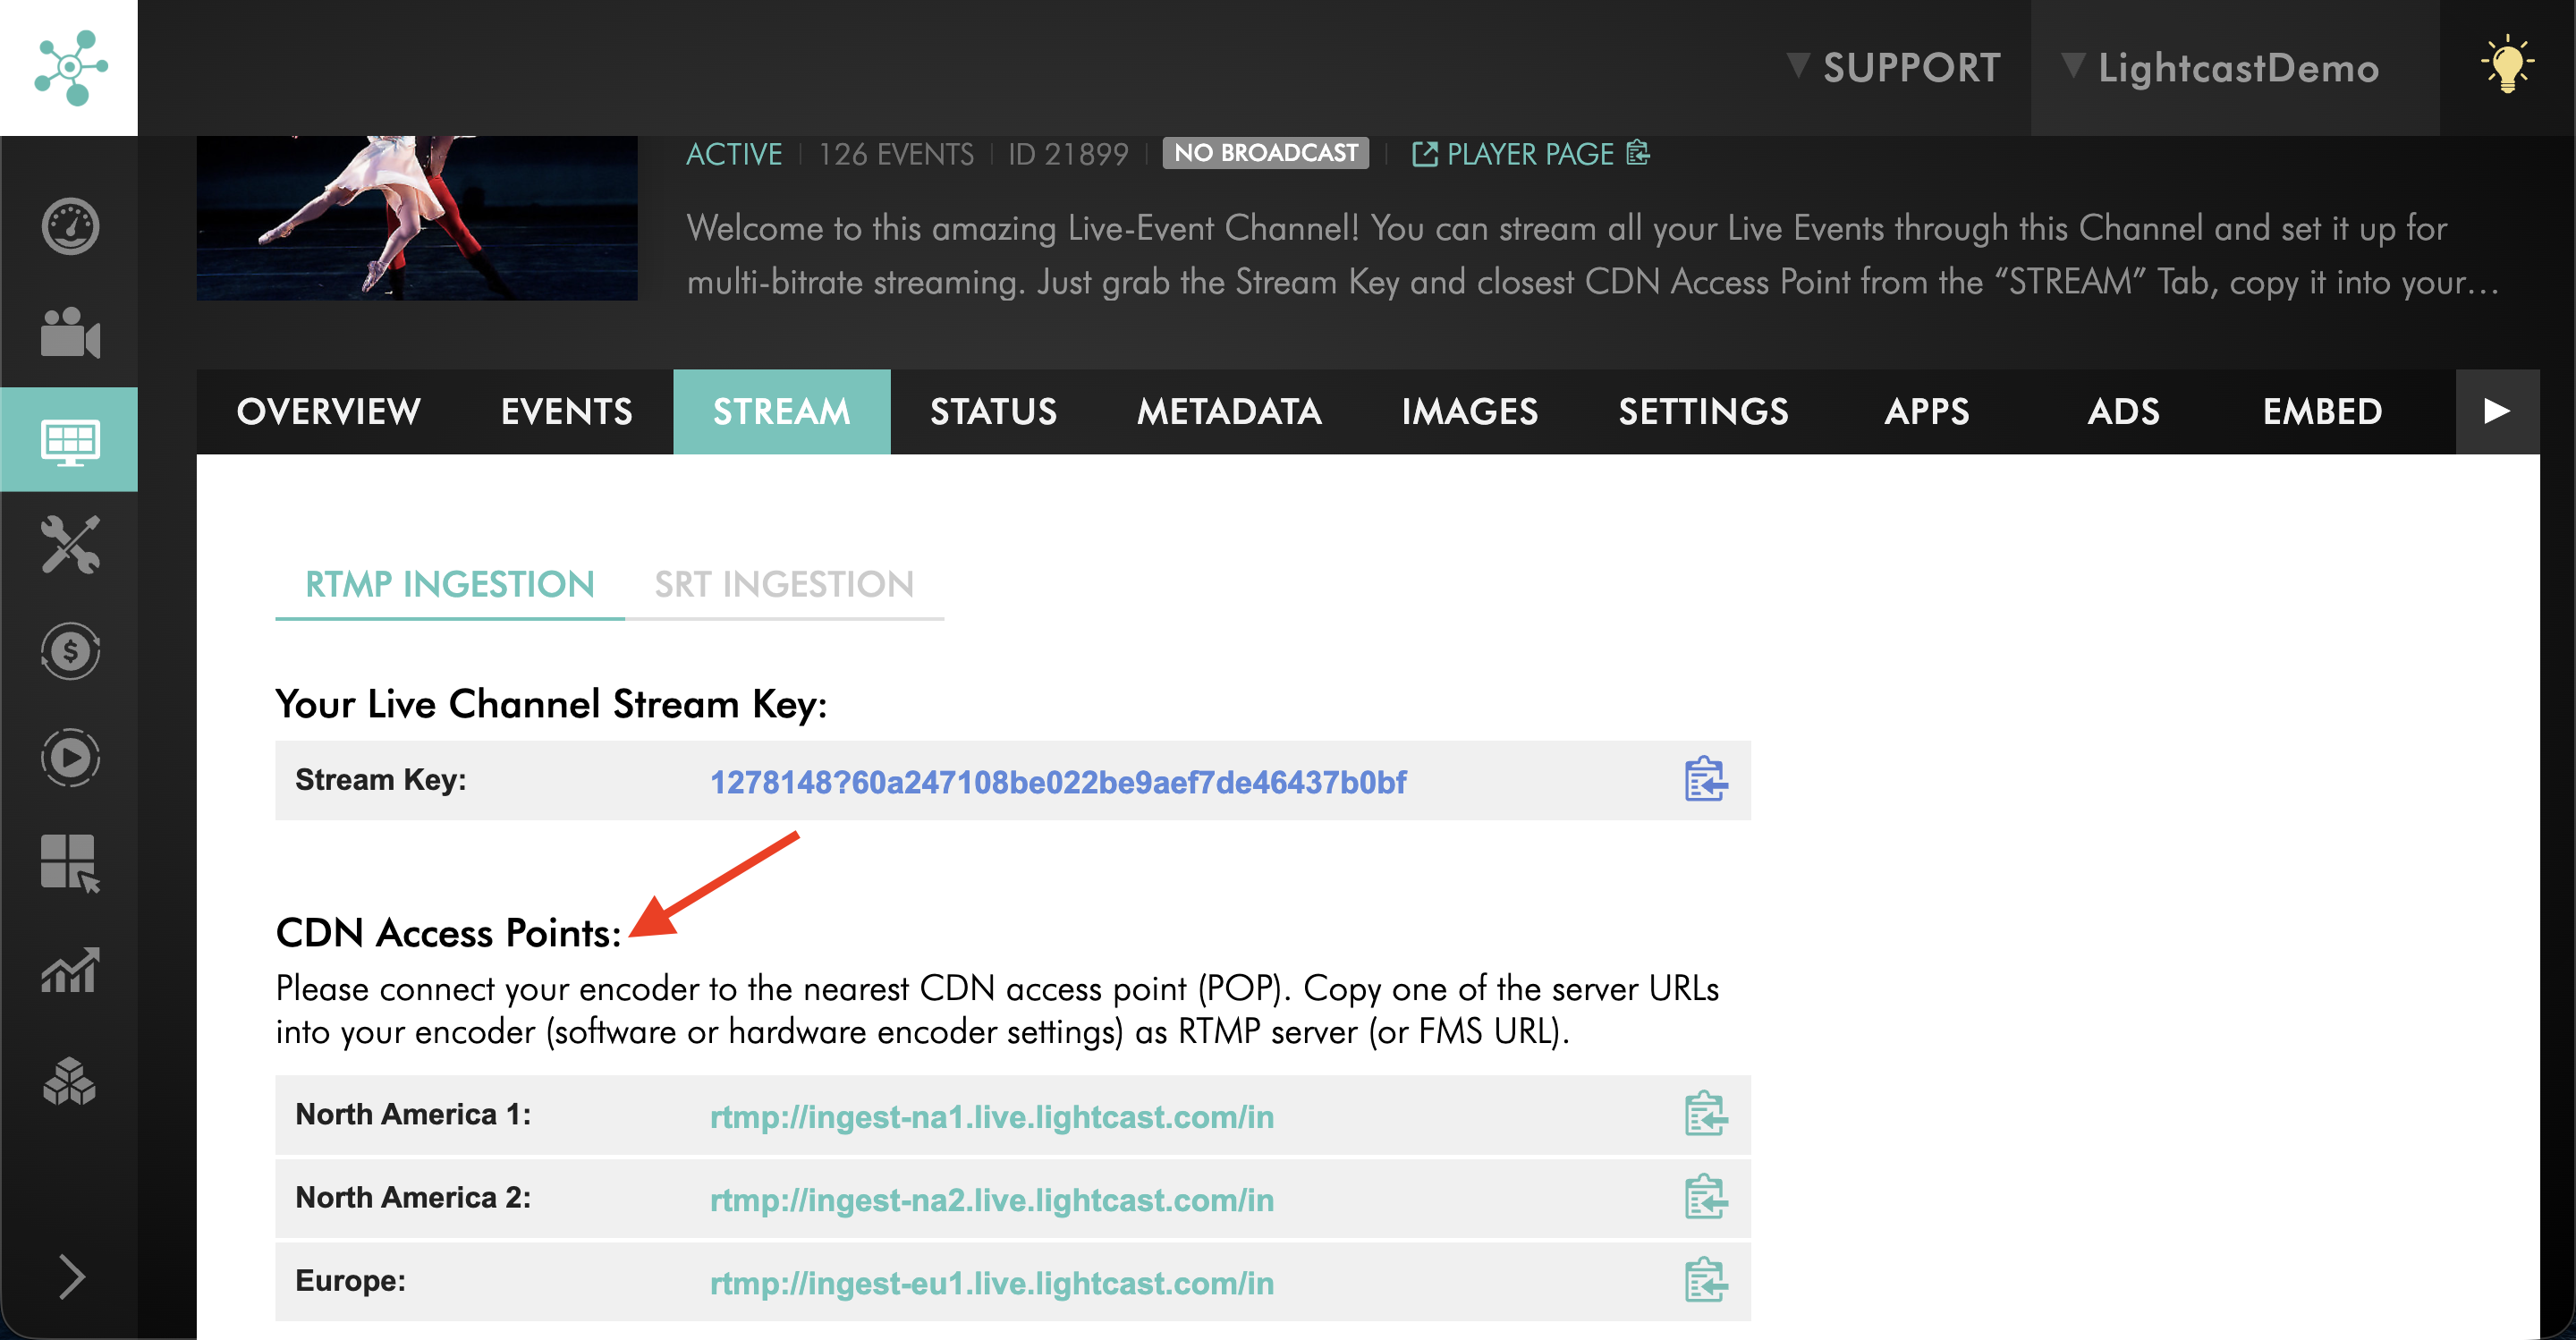
SRT Ingestion: Review the available SRT Streaming URLs.
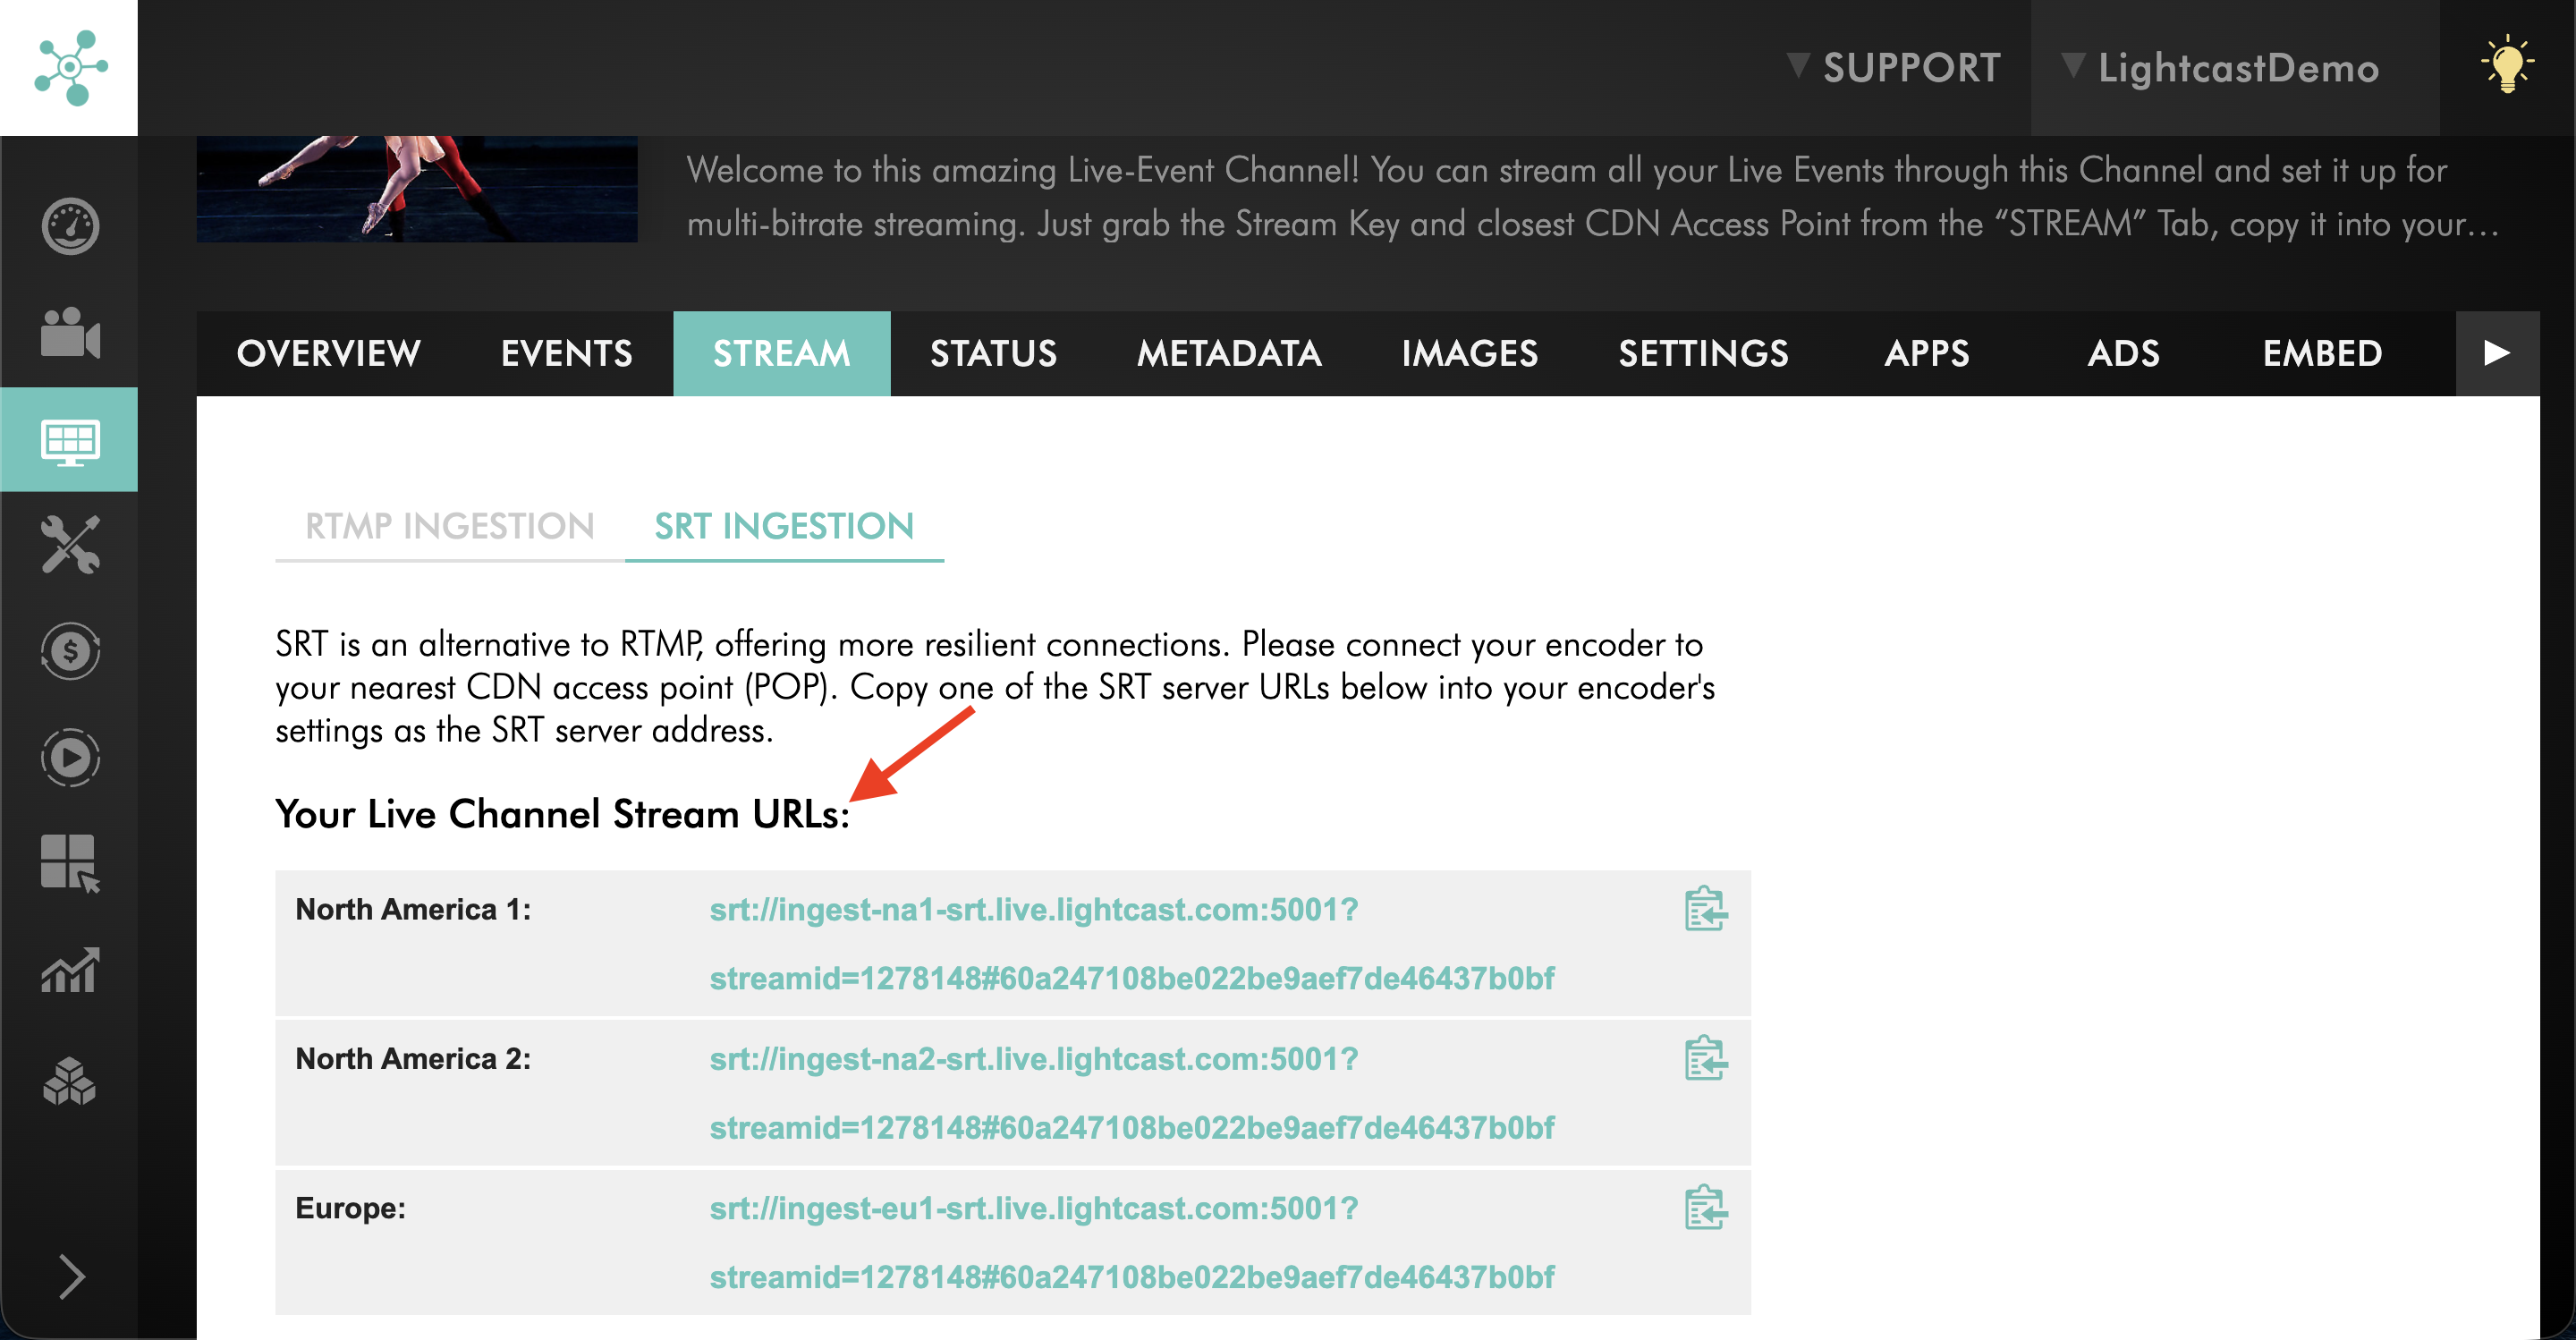
Step 4
Copy an alternative ingestion point from the list.
Step 5
Update the corresponding server address or destination URL in your encoder.
Important: Change only the ingestion destination. Keep your existing Stream Key and other connection credentials unchanged unless Lightcast Customer Support instructs you otherwise.
Step 6
Reconnect your encoder and test the live stream.
If the connection becomes stable after changing ingestion points, the previous network route may have contributed to the problem.
If the issue continues, review your local network, encoder settings, and ISP routing.
Check ISP routing or generate an MTR report
Check your internet service provider (ISP) routing if the encoder continues to have connection problems even though your local network, upload bandwidth, and encoder settings appear correct.
An MTR report or traceroute can help identify possible network routing or connectivity problems between your streaming location and Lightcast's ingestion infrastructure.
Step 1
Identify the ingestion point your encoder is using.
For RTMP Ingestion: Use the hostname from your CDN Access Point.
For SRT Ingestion: Use the hostname from your SRT Streaming URL.
Step 2
Generate an MTR report or traceroute for the selected ingestion point.
For more information, see How to generate an MTR report.
Step 3
Review the report for possible packet loss, increased latency, or connectivity problems.
Some routers do not respond to traceroute or MTR requests. An asterisk or packet loss at an intermediate hop does not necessarily indicate a network problem.
Packet loss or increased latency that continues through subsequent hops, particularly to the destination, may indicate a routing or connectivity issue.
Step 4
If the report suggests a possible routing problem, share the results with your ISP or Lightcast Customer Support for further investigation.
Your ISP may need the hostname of the selected ingestion point to investigate the network route.
Check whether the issue is viewer-side
If the incoming stream appears stable but only certain viewers experience buffering, interruptions, or playback problems, check their devices and internet connections.
Step 1
Test the stream on multiple supported devices and networks.
For example, compare playback on a desktop computer, mobile device, and another internet connection.
Step 2
Confirm that the affected viewer has sufficient download bandwidth.
As a planning guideline, the viewer's available download speed should be at least twice the bitrate required to play the stream.
Step 3
Ask the viewer to close unnecessary applications or background processes that may be consuming device resources or internet bandwidth.
Step 4
Test playback using another browser, app, device, or internet connection.
This can help determine whether the problem is limited to a particular playback environment.
Step 5
If viewers with lower internet speeds consistently experience buffering, consider whether Multi-Bitrate Streaming may be appropriate for your live streaming setup.
Multi-Bitrate Streaming allows supported viewers to receive a stream quality that better matches their internet connection.
For more information, see Understanding Multi-Bitrate streaming.
When to contact Customer Support
If the issue continues after following the troubleshooting steps above, contact Lightcast Customer Support.
Please include:
Your account name and affected Channel name
The date and approximate time of the issue, including your time zone
A brief description of the problem and any error messages
Your encoder model or software and whether you are using RTMP or SRT
Whether the issue affects all viewers or only certain viewers
If available, also include:
Channel ID
CDN Access Point or SRT Streaming URL used
Upload speed test results
MTR report or traceroute results
Screenshots of encoder errors or warnings
Customer Support can help review the information and determine the appropriate next troubleshooting steps.
Additional consulting services may be available for encoder configuration or advanced troubleshooting. Advanced encoder setup and configuration assistance may fall outside the scope of standard technical support.
Preventing future live streaming issues
For important live broadcasts, we recommend testing your encoder, internet connection, stream settings, and playback before the event begins.
For additional recommendations, see Best practices for reliable Live Events and Linear Streams.
FAQs
What should I try first if my encoder is buffering?
Confirm your stream credentials, then try switching to another available CDN Access Point or SRT Streaming URL from the Channel’s STREAM tab.
If the issue continues, test your upload speed and confirm that your available upload bandwidth is at least twice the total bitrate of your stream.
Why does my encoder say it cannot connect to the server?
This may be caused by incorrect stream credentials, the wrong ingestion method, local firewall or router restrictions, ISP routing issues, or a temporary issue reaching the selected ingestion point.
Confirm your credentials first, then try another available CDN Access Point or SRT Streaming URL.
Why does my live encoder disconnect frequently?
Frequent disconnects may be caused by Wi-Fi instability, shared network usage, insufficient upload bandwidth, encoder CPU overload, router or firewall issues, ISP routing problems, or a timeout setting in the encoder.
Why does my live feed return an error?
A live feed may return an error when there is no active stream being sent to that Channel.
Confirm that your encoder is actively streaming to the correct Live Events Channel or Linear Stream Channel using the correct stream credentials.
Why does the player show audio but no video?
Audio-only playback may be caused by unsupported video codec settings, encoder CPU issues, video signal issues, or device/player compatibility problems.
Confirm that your encoder is using supported video and audio settings, including H.264 video and AAC audio.
Why is the player jerky or interrupted?
Jerky or interrupted playback may be caused by source stream instability, insufficient upload bandwidth, encoder CPU overload, local network issues, viewer download bandwidth, viewer device limitations, or viewer network conditions.
Should I use Wi-Fi for live streaming?
A wired connection is recommended whenever possible, especially for critical live streams.
Wi-Fi can be affected by interference, distance from the router, local congestion, and other devices on the network.
Should I use a backup stream if my encoder disconnects frequently?
A backup stream can help if the issue is related to the primary ingestion point or route.
However, a backup stream also increases upload bandwidth requirements. If your upload connection cannot support both the primary and backup streams, using a backup stream may make stability worse. Test your available upload bandwidth before using a backup stream.
When should I send an MTR report or traceroute?
Send an MTR report or traceroute when the encoder has trouble reaching a CDN Access Point or SRT Streaming URL, when switching ingestion points does not resolve the issue, or when Support asks for network route details.
This can help identify possible routing delays or packet loss between your streaming location and the selected ingestion point.
Can Multi-Bitrate Streaming help with viewer buffering?
Yes. Multi-Bitrate Streaming can help viewers with different internet speeds receive a version of the stream that better matches their connection.
It does not fix source-side encoder instability, but it can improve the viewing experience for viewers with lower download bandwidth when configured for your account and workflow.