
How to publish Live Events and Simulated Live Events to Twitch
Overview
This article explains how to publish scheduled Live Events and Simulated Live Events from the Media Cloud to Twitch.
It covers how to connect your Twitch account, configure Twitch as a publishing destination, manage your Twitch connection, and troubleshoot common publishing issues.
When to publish Live Events to Twitch
Use this feature when you want to:
Expand your audience by making your Live Events available on Twitch.
Publish a Live Broadcast to Twitch while simultaneously delivering it through your Lightcast-powered website and apps.
Broadcast prerecorded content as a scheduled Simulated Live Event on Twitch.
Manage your Live Events and social media publishing destinations centrally from the Media Cloud.
How it works
Twitch publishing is configured within a scheduled Live Event in a Live Events Channel.
When you select Twitch as a publishing destination, the Media Cloud prompts you to sign in with your Twitch account and authorize the connection.
For Live Broadcasts: Your encoder sends the live source stream to the Media Cloud, which distributes the stream to Twitch during the scheduled Live Event.
For Simulated Live Events: The Media Cloud uses a previously uploaded video from your Media Archive as the source for the scheduled broadcast. No live encoder is required.
Once the stream reaches Twitch, Twitch controls its own player, processing, viewer experience, and platform-specific behavior.
Twitch account requirements
Before publishing a Live Event to Twitch, make sure:
You have an active Twitch account.
Your account's contact information has been verified as required by Twitch.
Your account is permitted to broadcast live and is not subject to an active streaming suspension.
You can sign in to the Twitch account you want to connect to the Media Cloud.
Twitch controls its own account requirements, streaming permissions, content policies, and platform availability. These requirements may change.
For more information, see Twitch Help: Getting Started on Twitch and Twitch Help: Why Can't I Stream?.
Twitch connections and Live Events Channels
Although Twitch is connected while creating or editing a Live Event, the account connection applies to the entire Live Events Channel rather than an individual event.
Each Live Events Channel can have one connected Twitch account at a time. Different Live Events Channels can be connected to different Twitch accounts.
To use a different Twitch account for an existing Live Events Channel, disconnect the current account and connect the new one.
Recurring Live Events
Recurring Live Events can be scheduled for up to 26 weeks at a time.
If you need the recurring event to continue beyond 26 weeks, create another recurring event beginning at a future date.
Using the Media Cloud as the publishing source
When publishing a Live Event to Twitch through the Media Cloud, we recommend sending your source stream to the Media Cloud and allowing it to distribute the stream to Twitch and your other configured destinations.
This keeps your publishing workflow centralized and avoids sending multiple separate streams from your encoder.
Sending one stream to the Media Cloud and another stream directly to Twitch may use additional upload bandwidth and can make it more difficult to identify the source of a connection, publishing, or playback issue.
If you are broadcasting to Twitch and other social media platforms simultaneously, make sure your broadcast complies with Twitch's Simulcasting Guidelines.
Twitch duration limits and 24/7 streams
Twitch publishing through the Media Cloud is designed for scheduled Live Events and Simulated Live Events, rather than continuous 24/7 streaming.
If you need continuous 24/7 streaming, you can use a 24/7 Scheduler or Linear Stream to deliver content to supported destinations, such as your website and Lightcast apps.
Twitch currently limits individual live broadcasts to a maximum of 48 hours. This limit is controlled by Twitch and may change.
For more information, see Twitch Help: Broadcasting Guidelines.
Publishing prerecorded content as a Simulated Live Event
When you publish a Simulated Live Event to Twitch, the Media Cloud streams your selected prerecorded video to Twitch at the scheduled event time.
Although the source content is prerecorded, viewers watch the event through Twitch's live player.
Twitch provides options for identifying prerecorded broadcasts as reruns. When publishing a Simulated Live Event, review Twitch's current guidance and make sure your broadcast is appropriately labeled so viewers understand that the content is prerecorded.
For more information, see Twitch Help: On-Demand Content on Twitch.
Viewer access on Twitch
When you publish a Live Event to Twitch, viewers watch the broadcast through Twitch's own live player.
Twitch manages viewer access, visibility, and monetization according to its own platform settings and policies.
Lightcast's subscriber authentication, subscription paywalls, and Pay-Per-View access restrictions do not carry over to viewers watching directly on Twitch.
Important: If your Live Event is available exclusively to paying subscribers or Pay-Per-View ticket holders through your Lightcast-powered website or apps, publishing the same event to Twitch may allow viewers to watch the content without purchasing a subscription or PPV ticket through Lightcast.
If you want to maintain exclusive access for your subscribers or PPV ticket holders, only publish the event to destinations where your Lightcast access restrictions are enforced.
Video Minutes and Twitch publishing
Publishing a Live Event or Simulated Live Event to Twitch through the Media Cloud does not incur additional Video Minute consumption for the Twitch publishing destination.
Video Minute consumption for viewers watching through your Lightcast-powered website, apps, or embedded web players continues to apply according to your Media Cloud package.
This allows you to expand your audience on Twitch without incurring additional Video Minute consumption for viewers watching directly on Twitch.
Instructions
Publish a Live Event or Simulated Live Event to Twitch
Step 1
Log in to your Media Cloud account.
Step 2
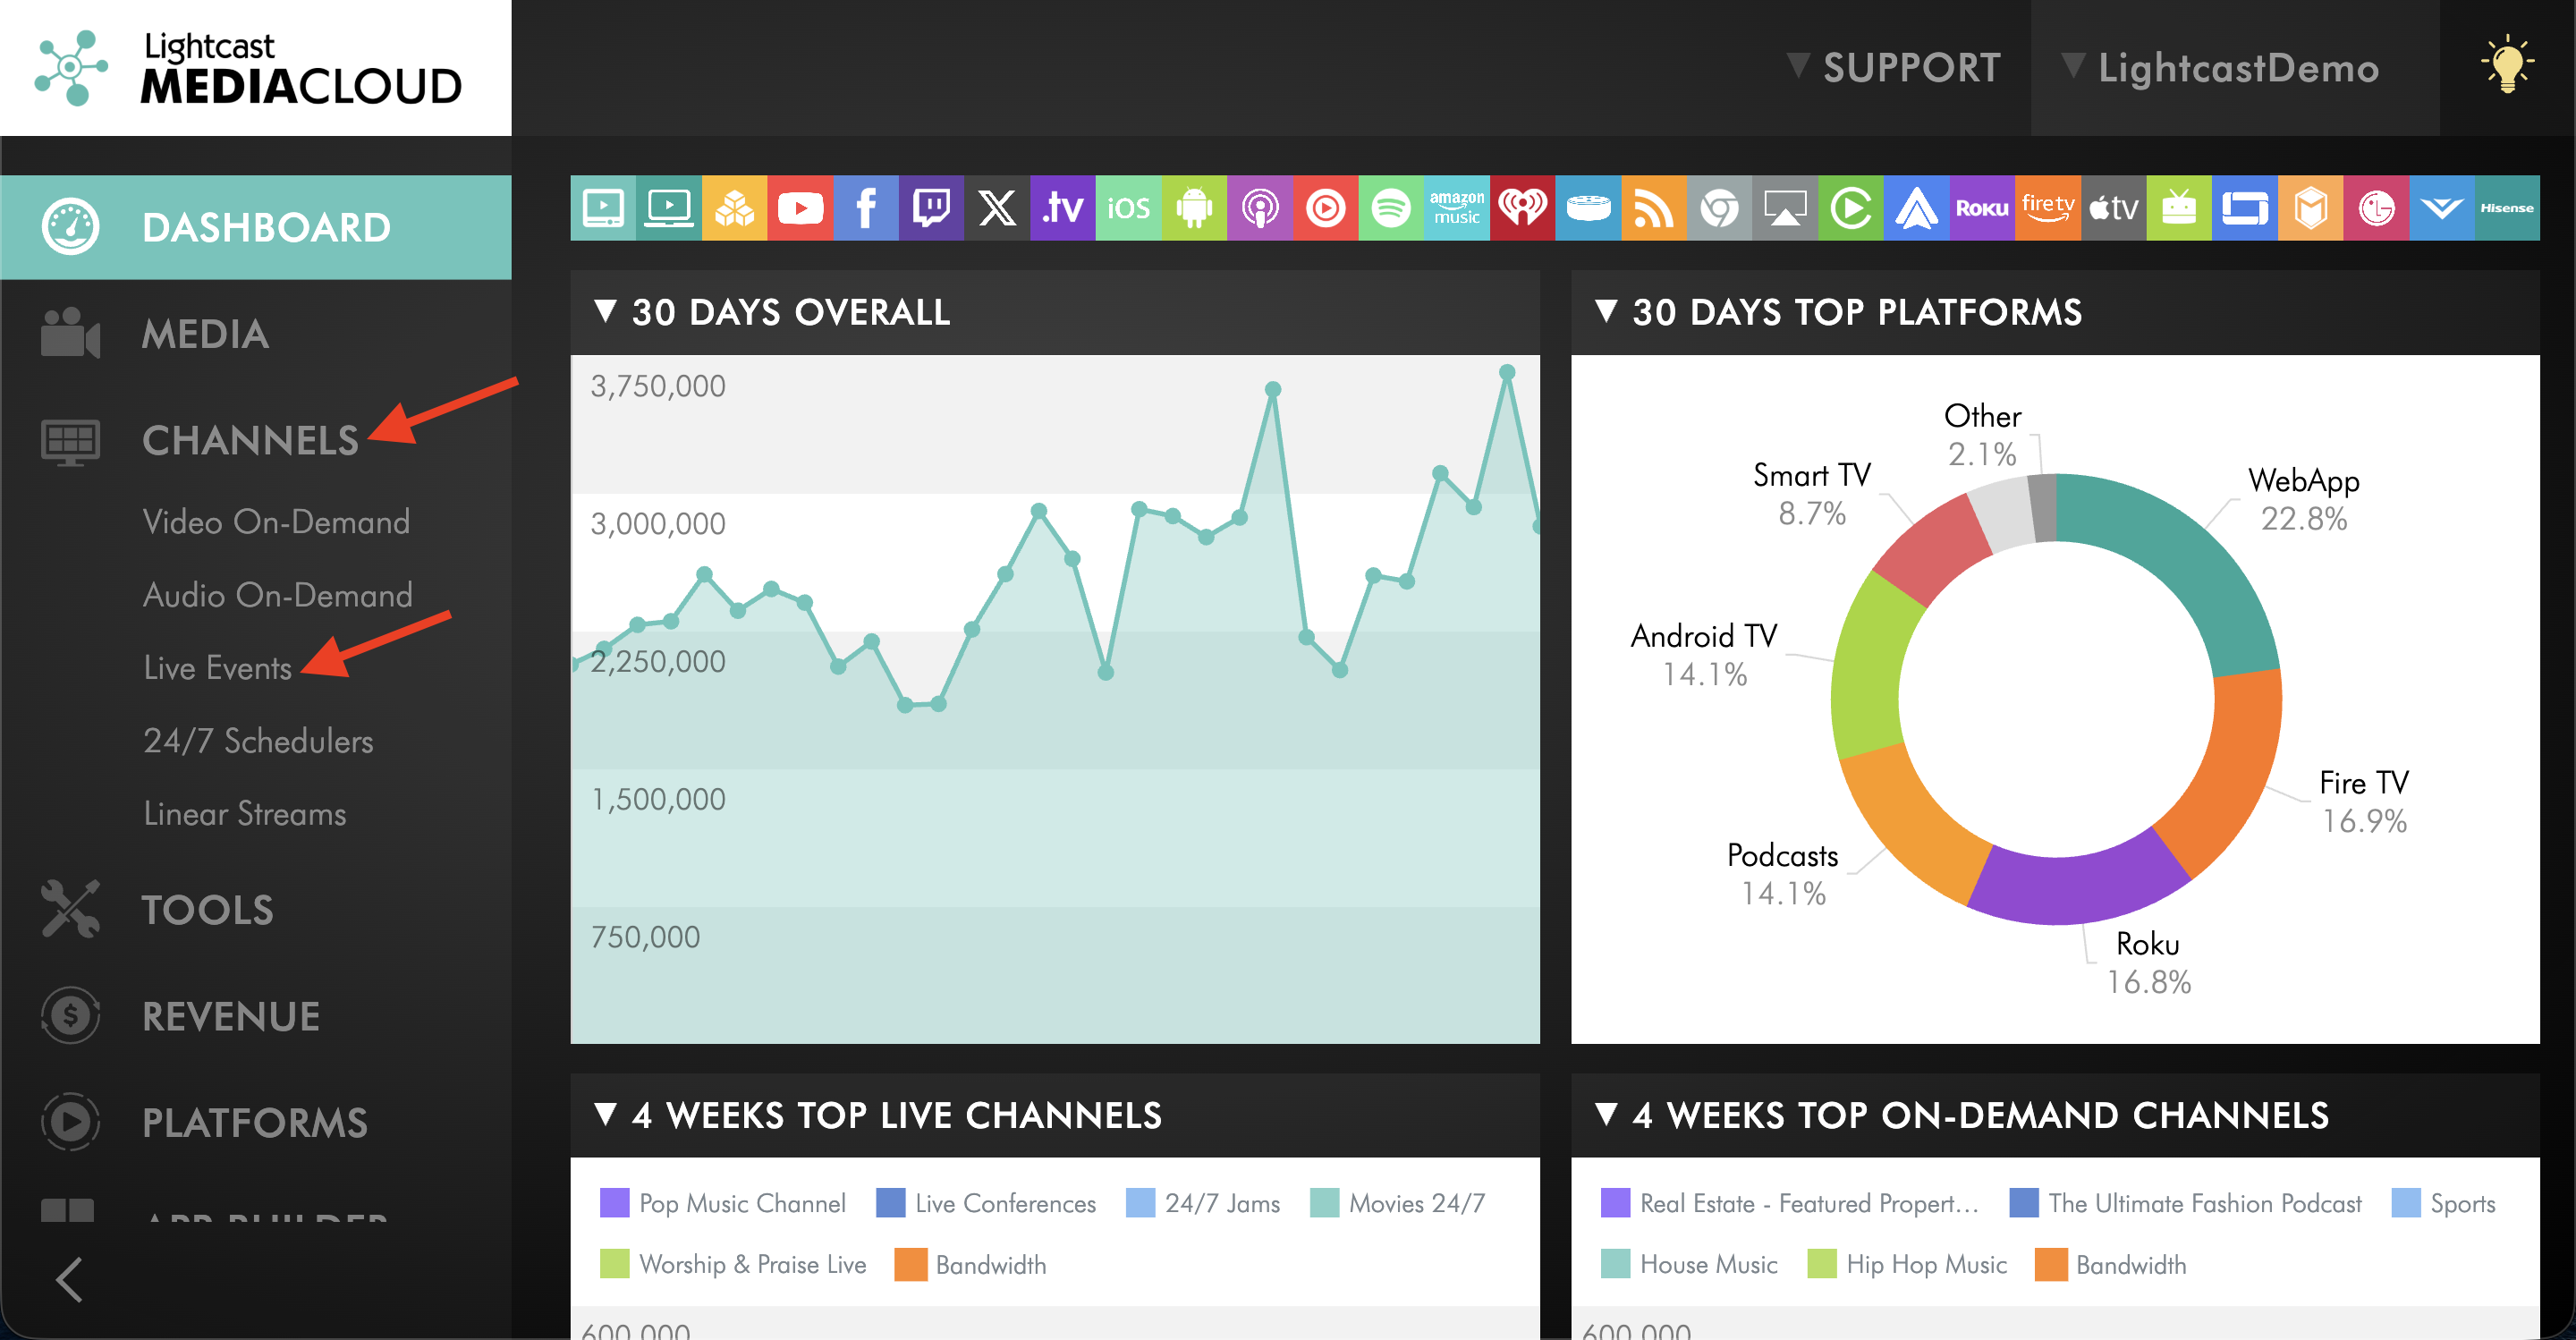
Go to CHANNELS, then select Live Events.
Step 3
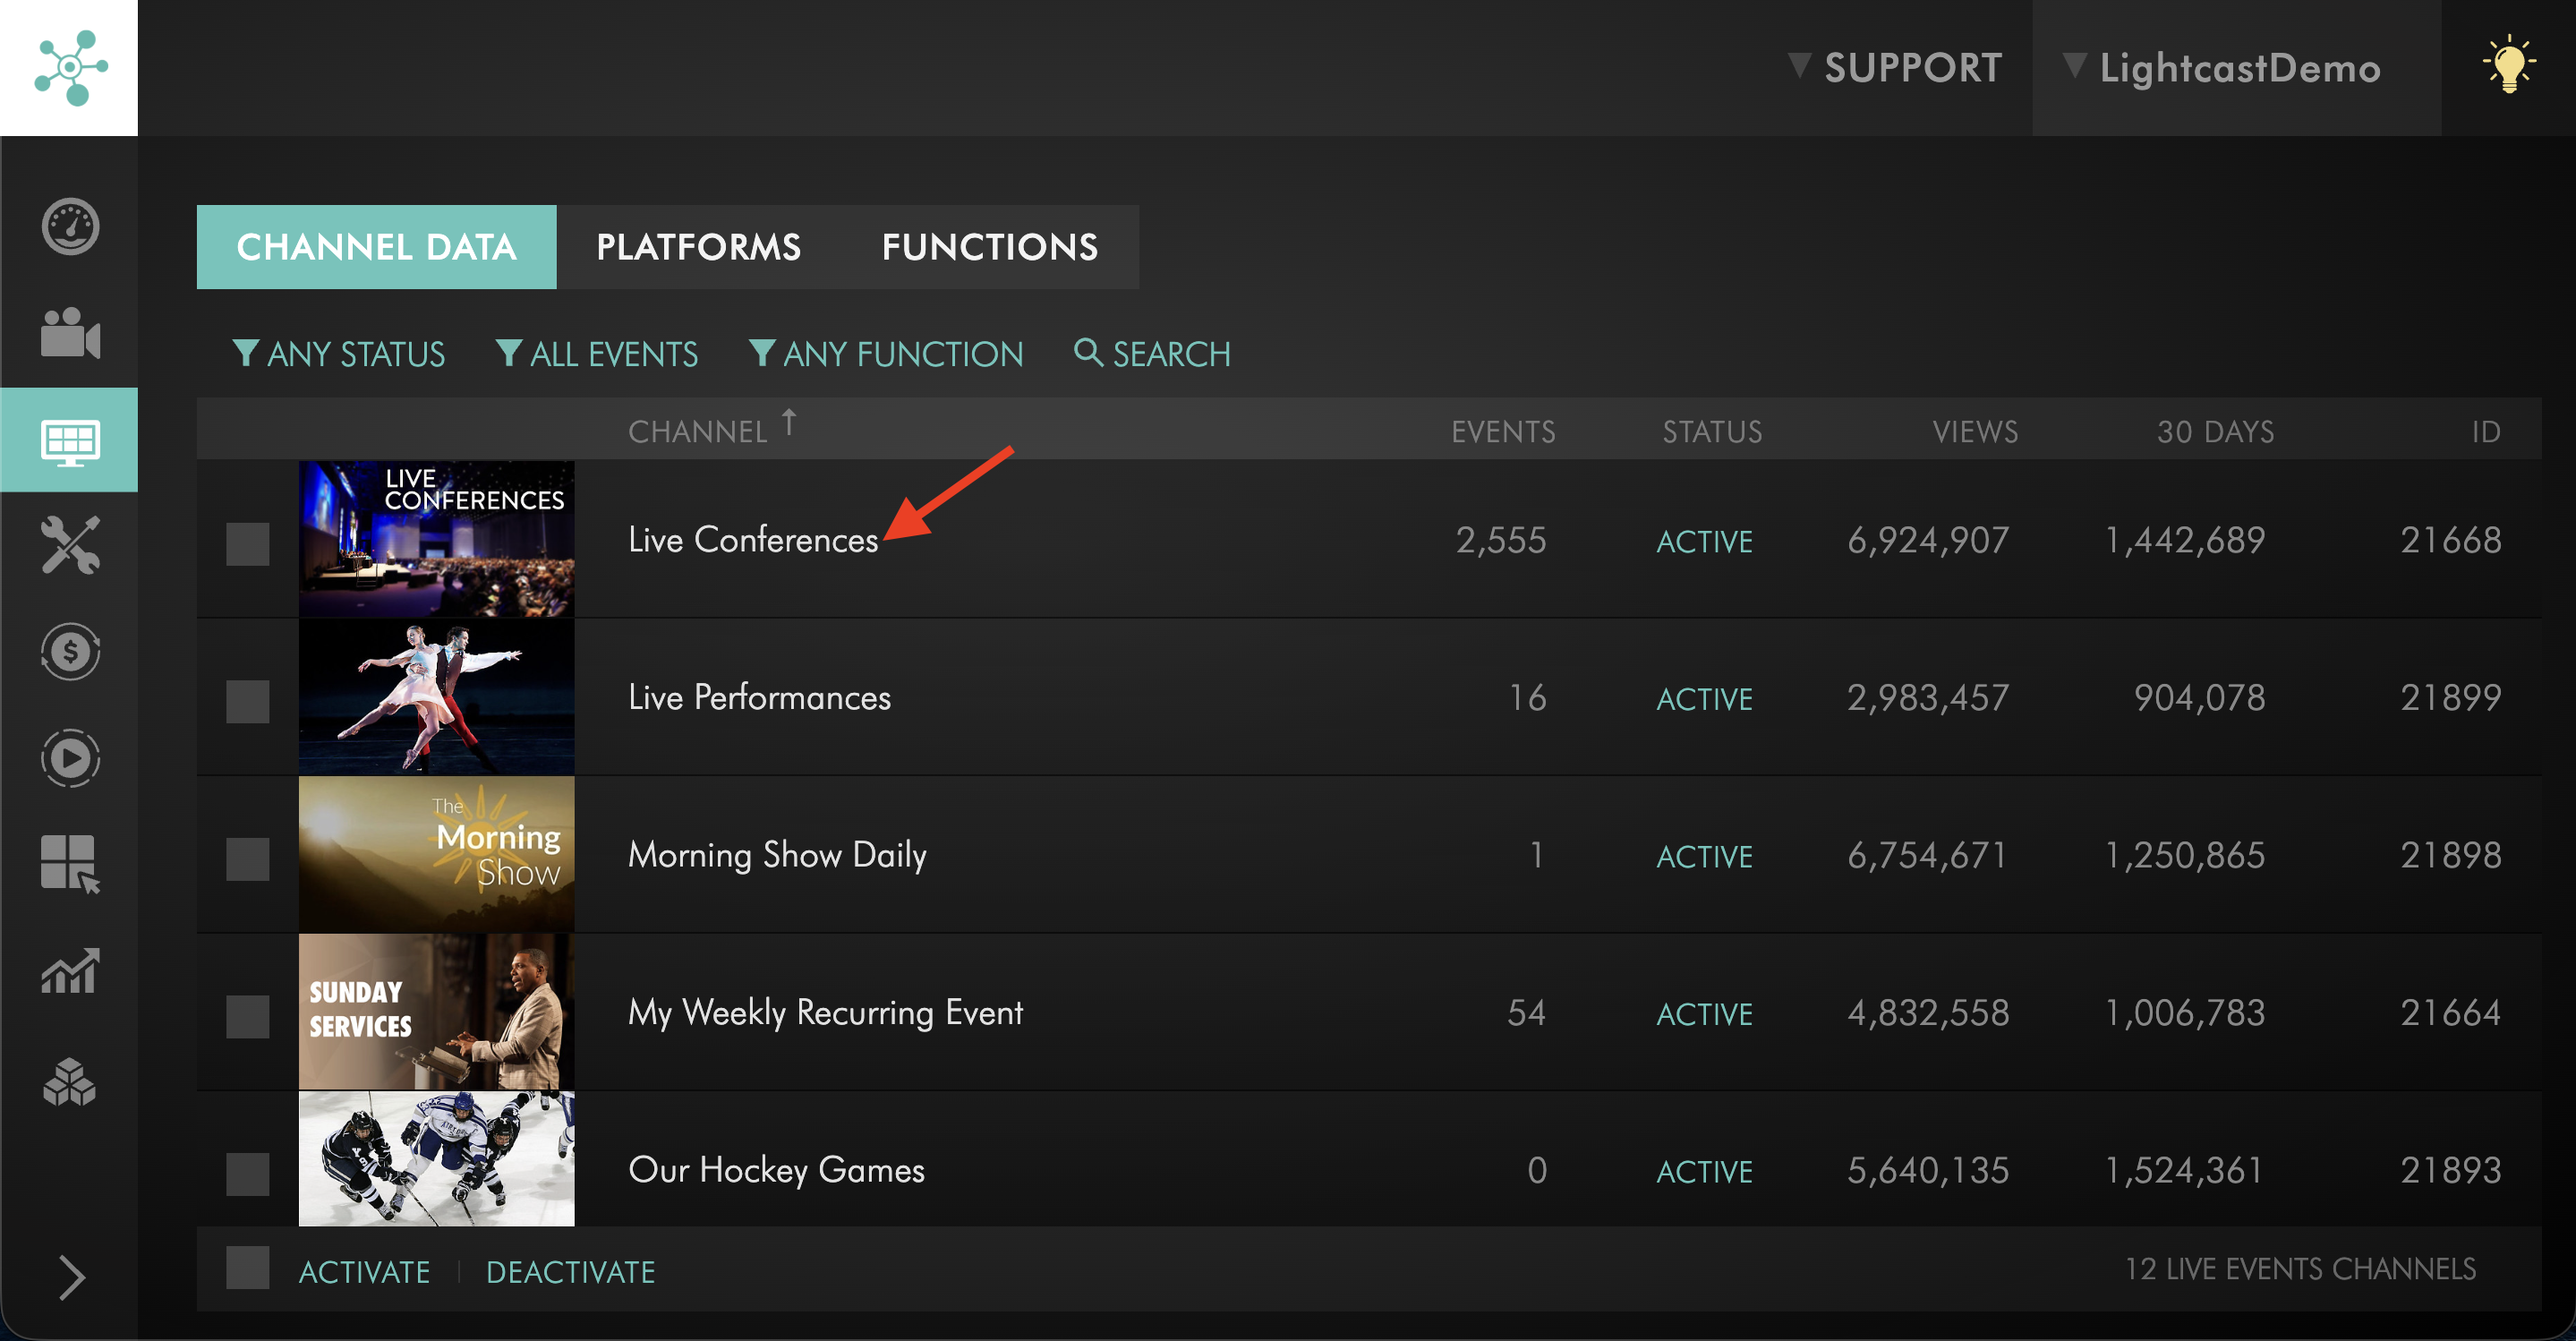
Select the Live Events Channel you want to use for the Twitch live stream.
Step 4
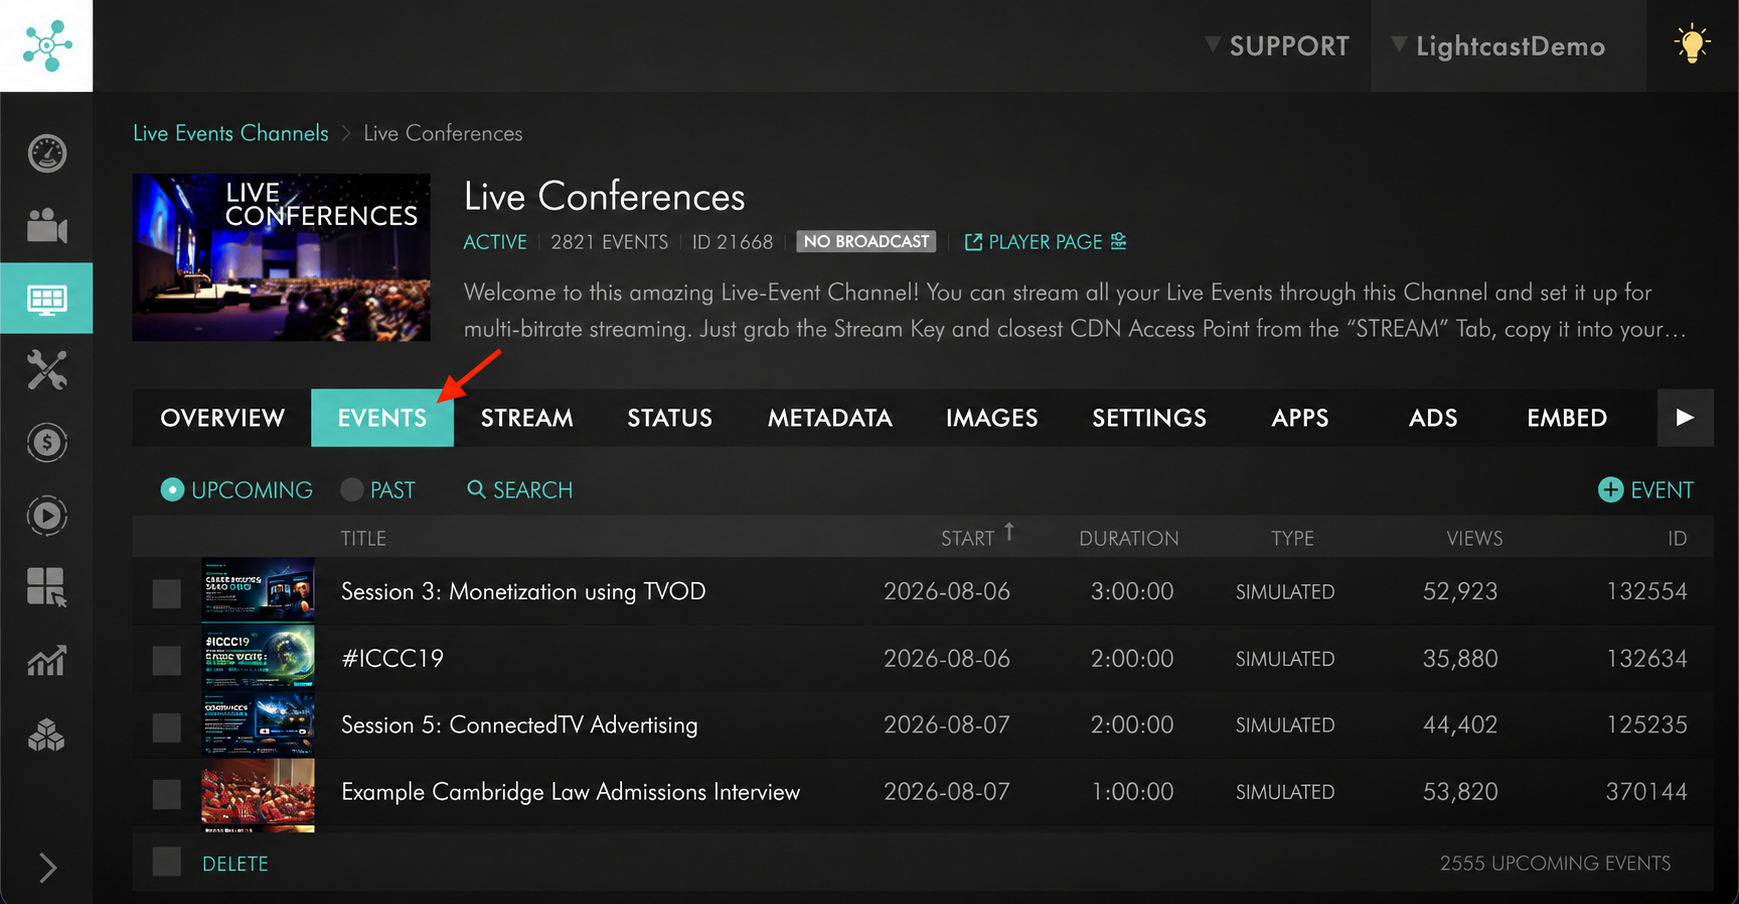
Go to the EVENTS tab.
Step 5
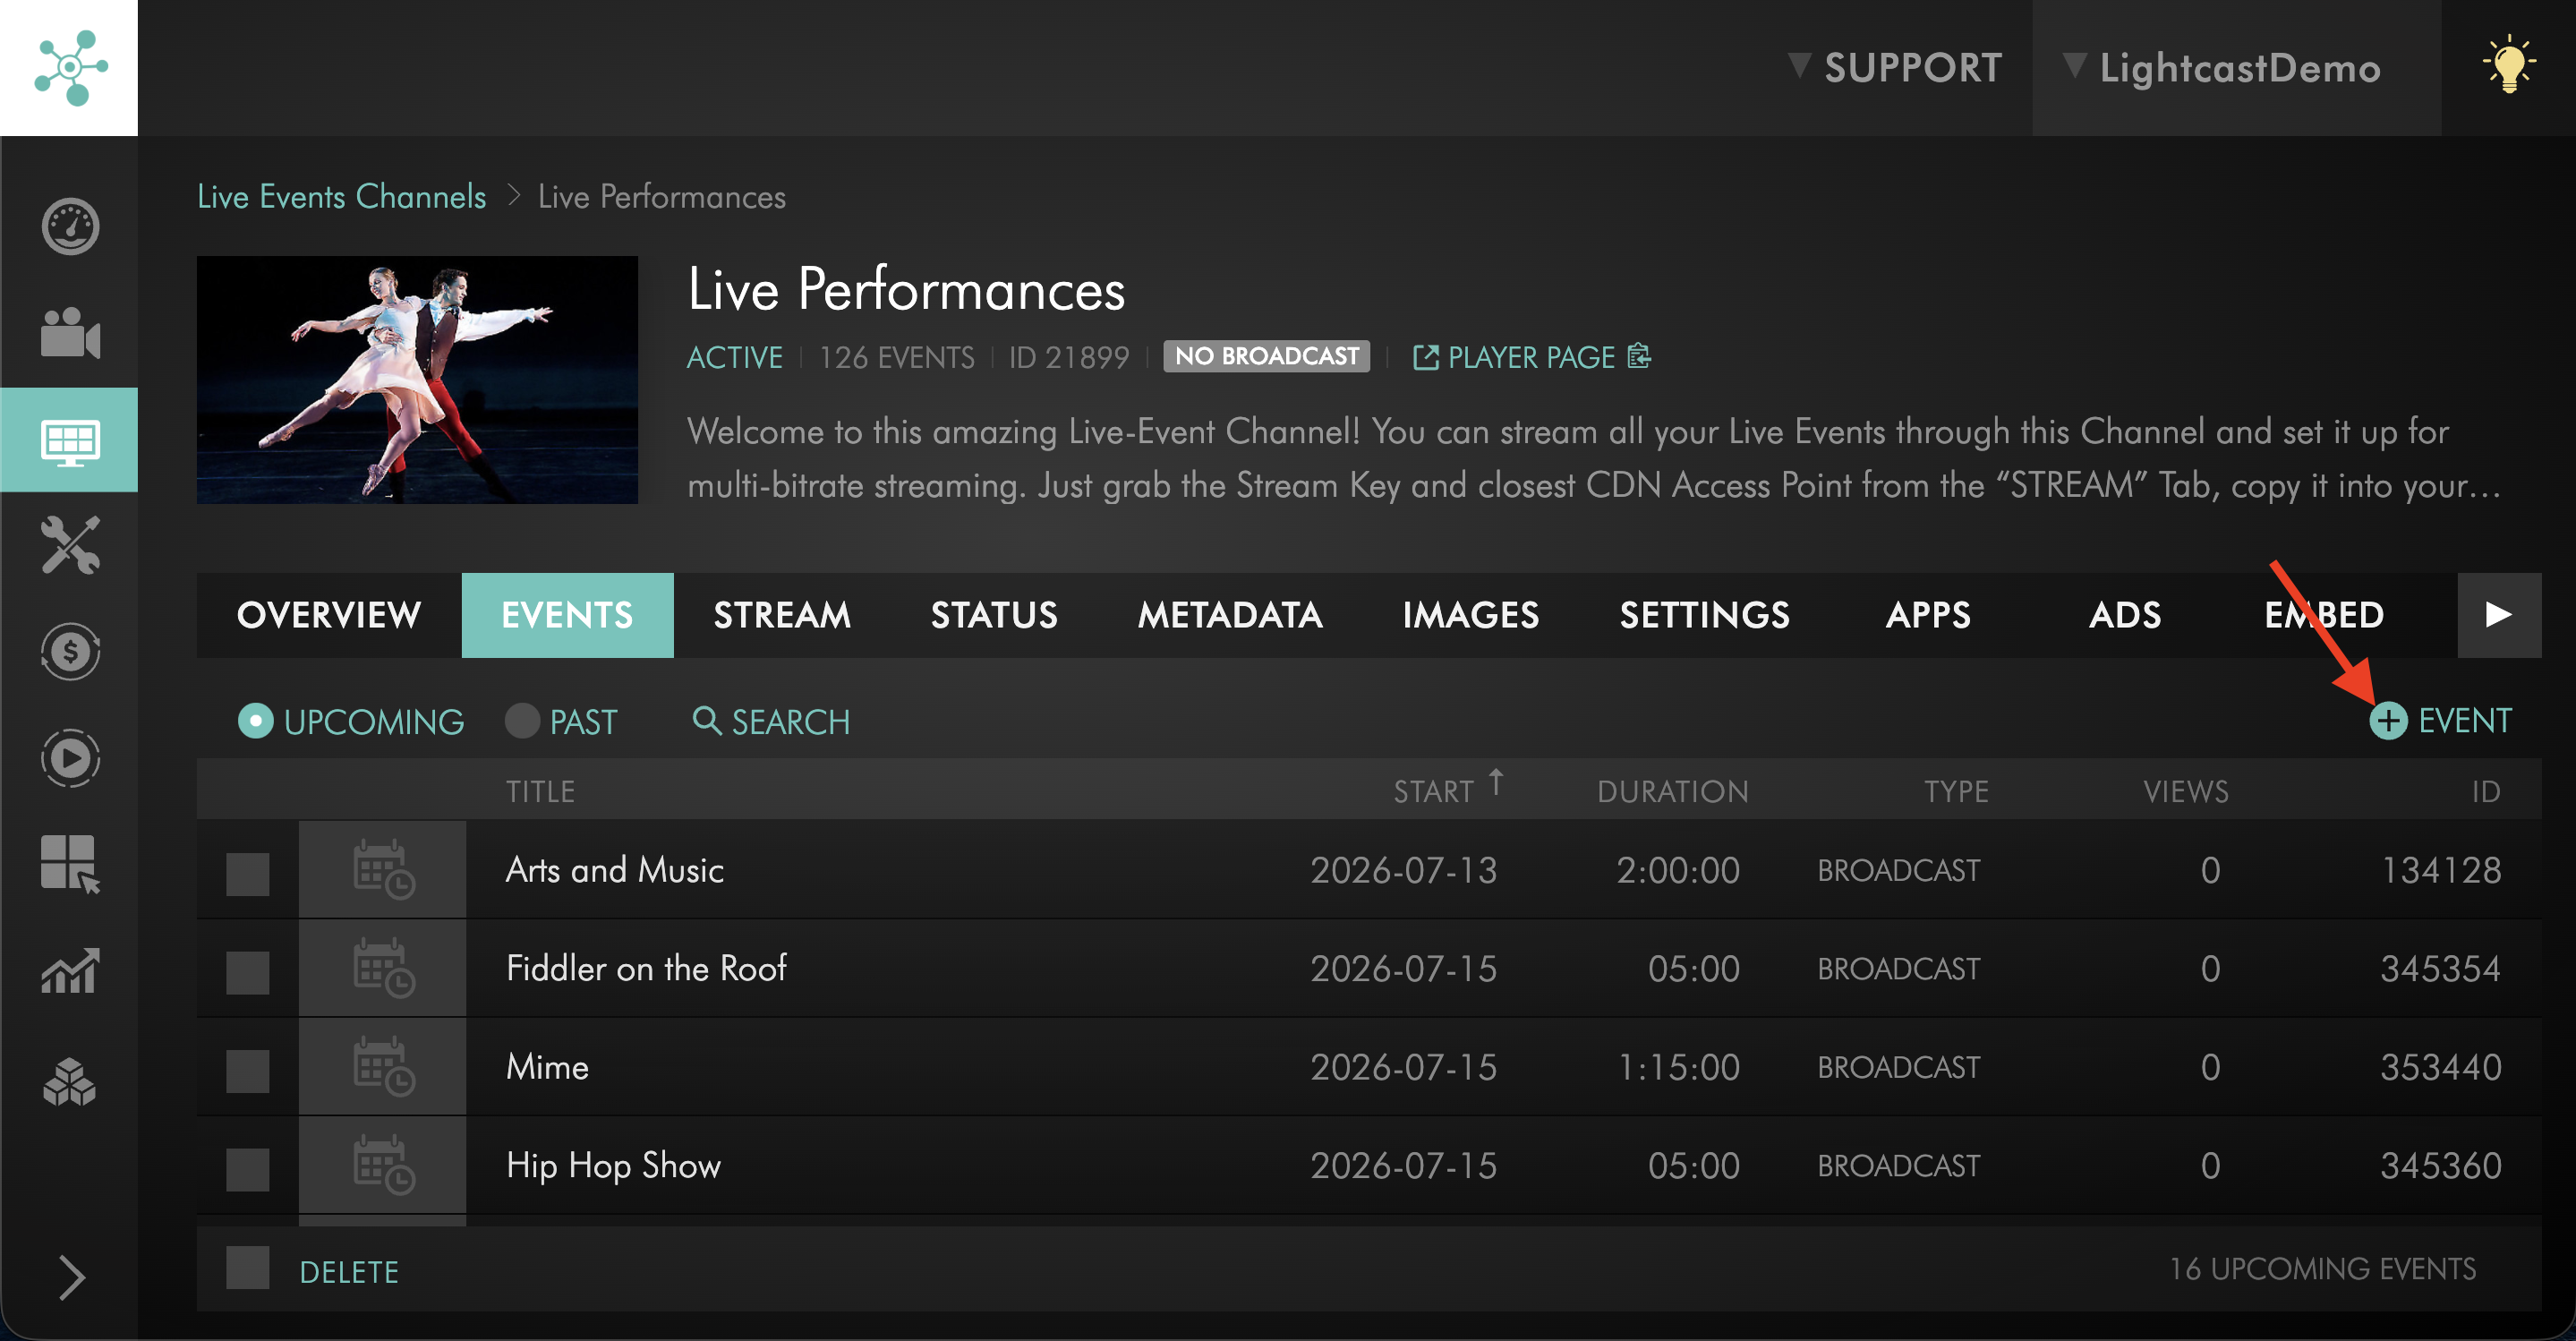
Click + EVENT to add a new Live Event, or select an existing scheduled Live Event.
To learn how to set up a scheduled event, see How to schedule a Live Event or How to schedule a Simulated Live Event.
Step 6
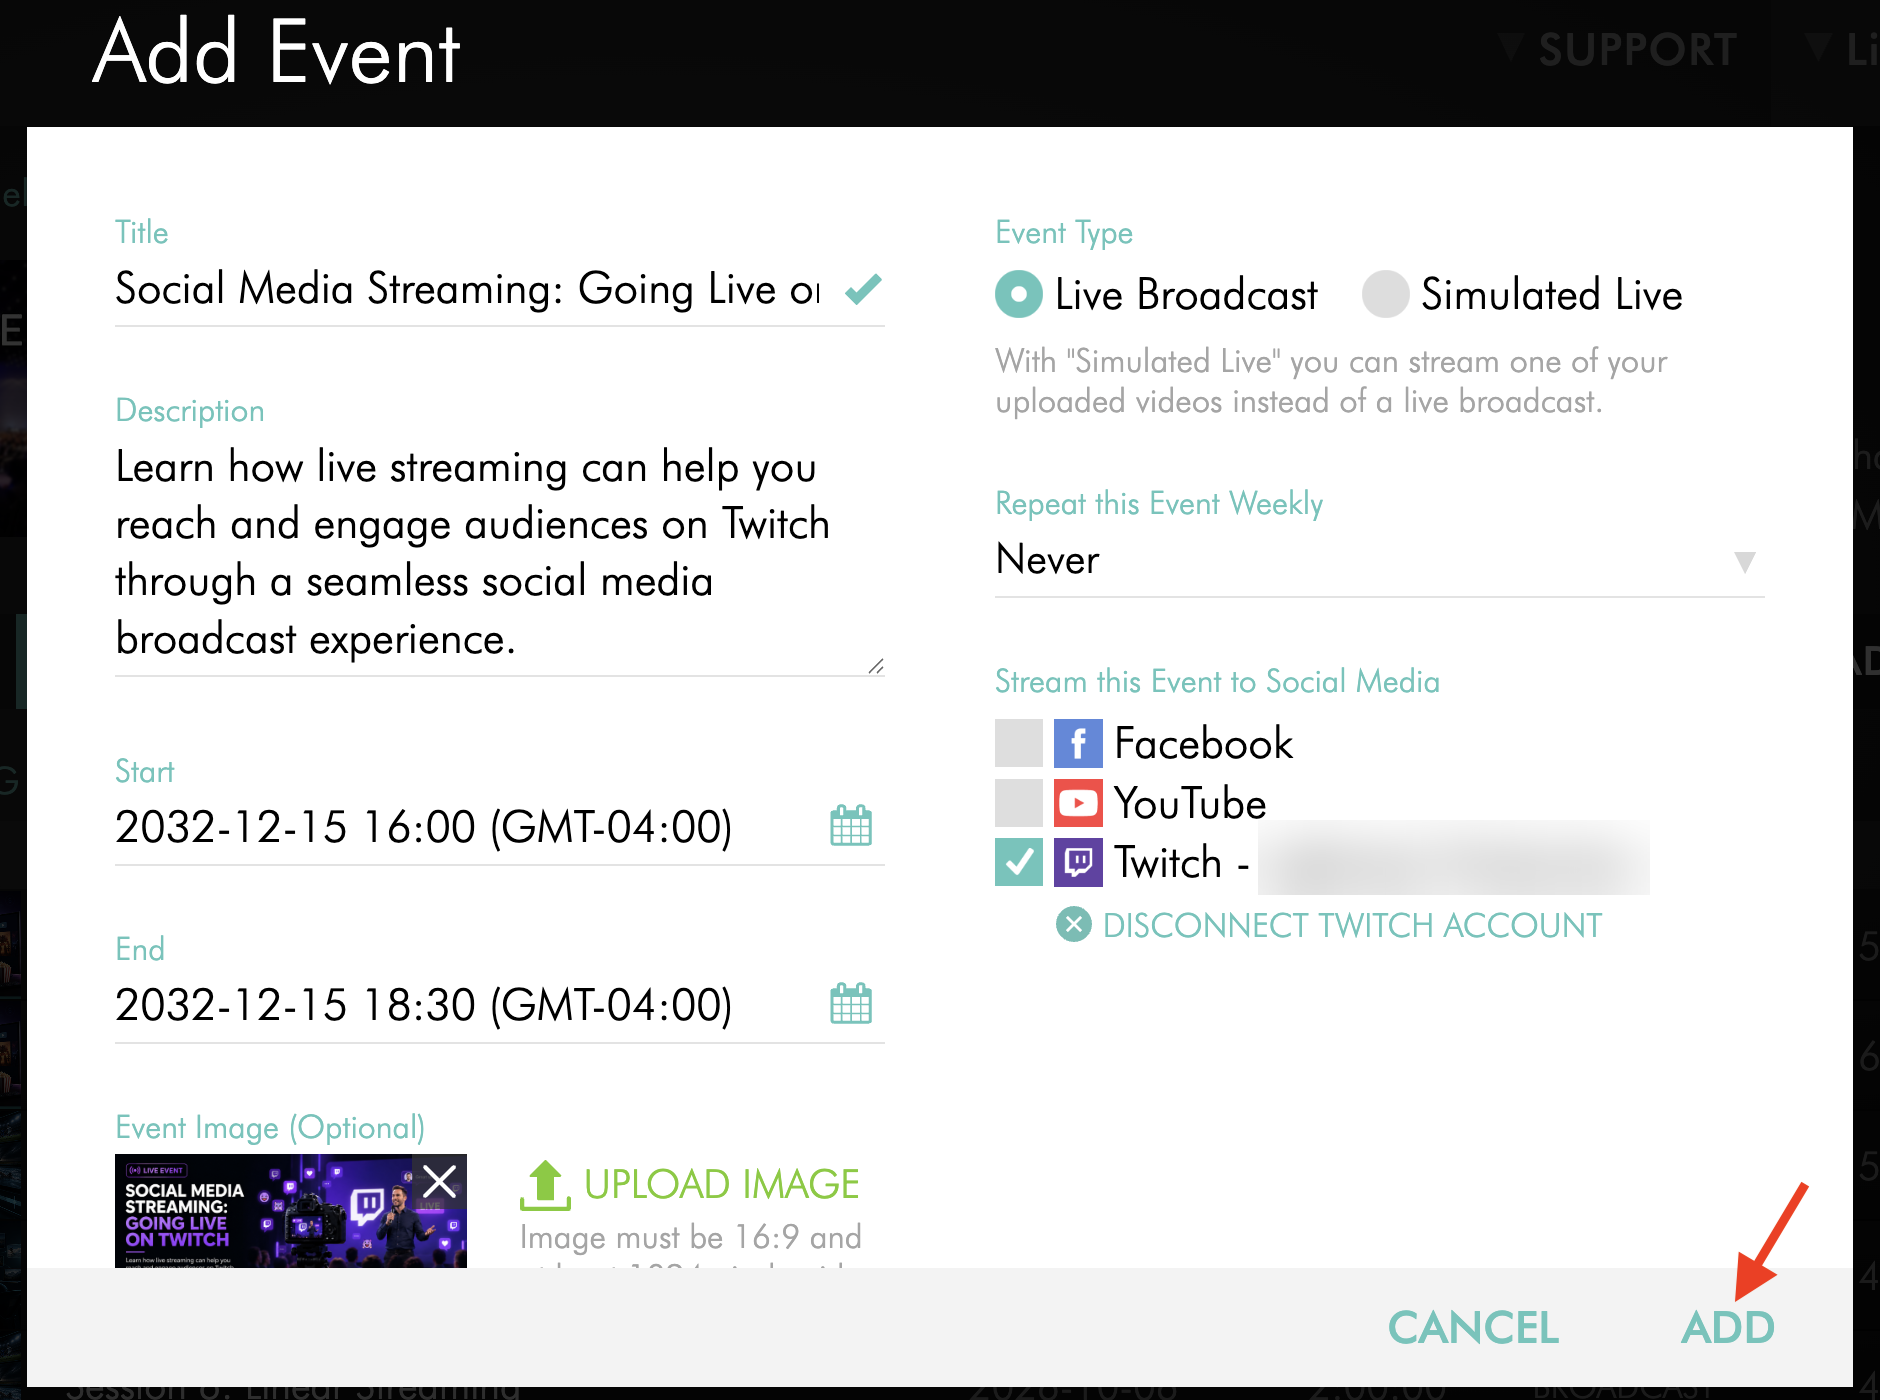
In the event settings, select the Twitch publishing option.
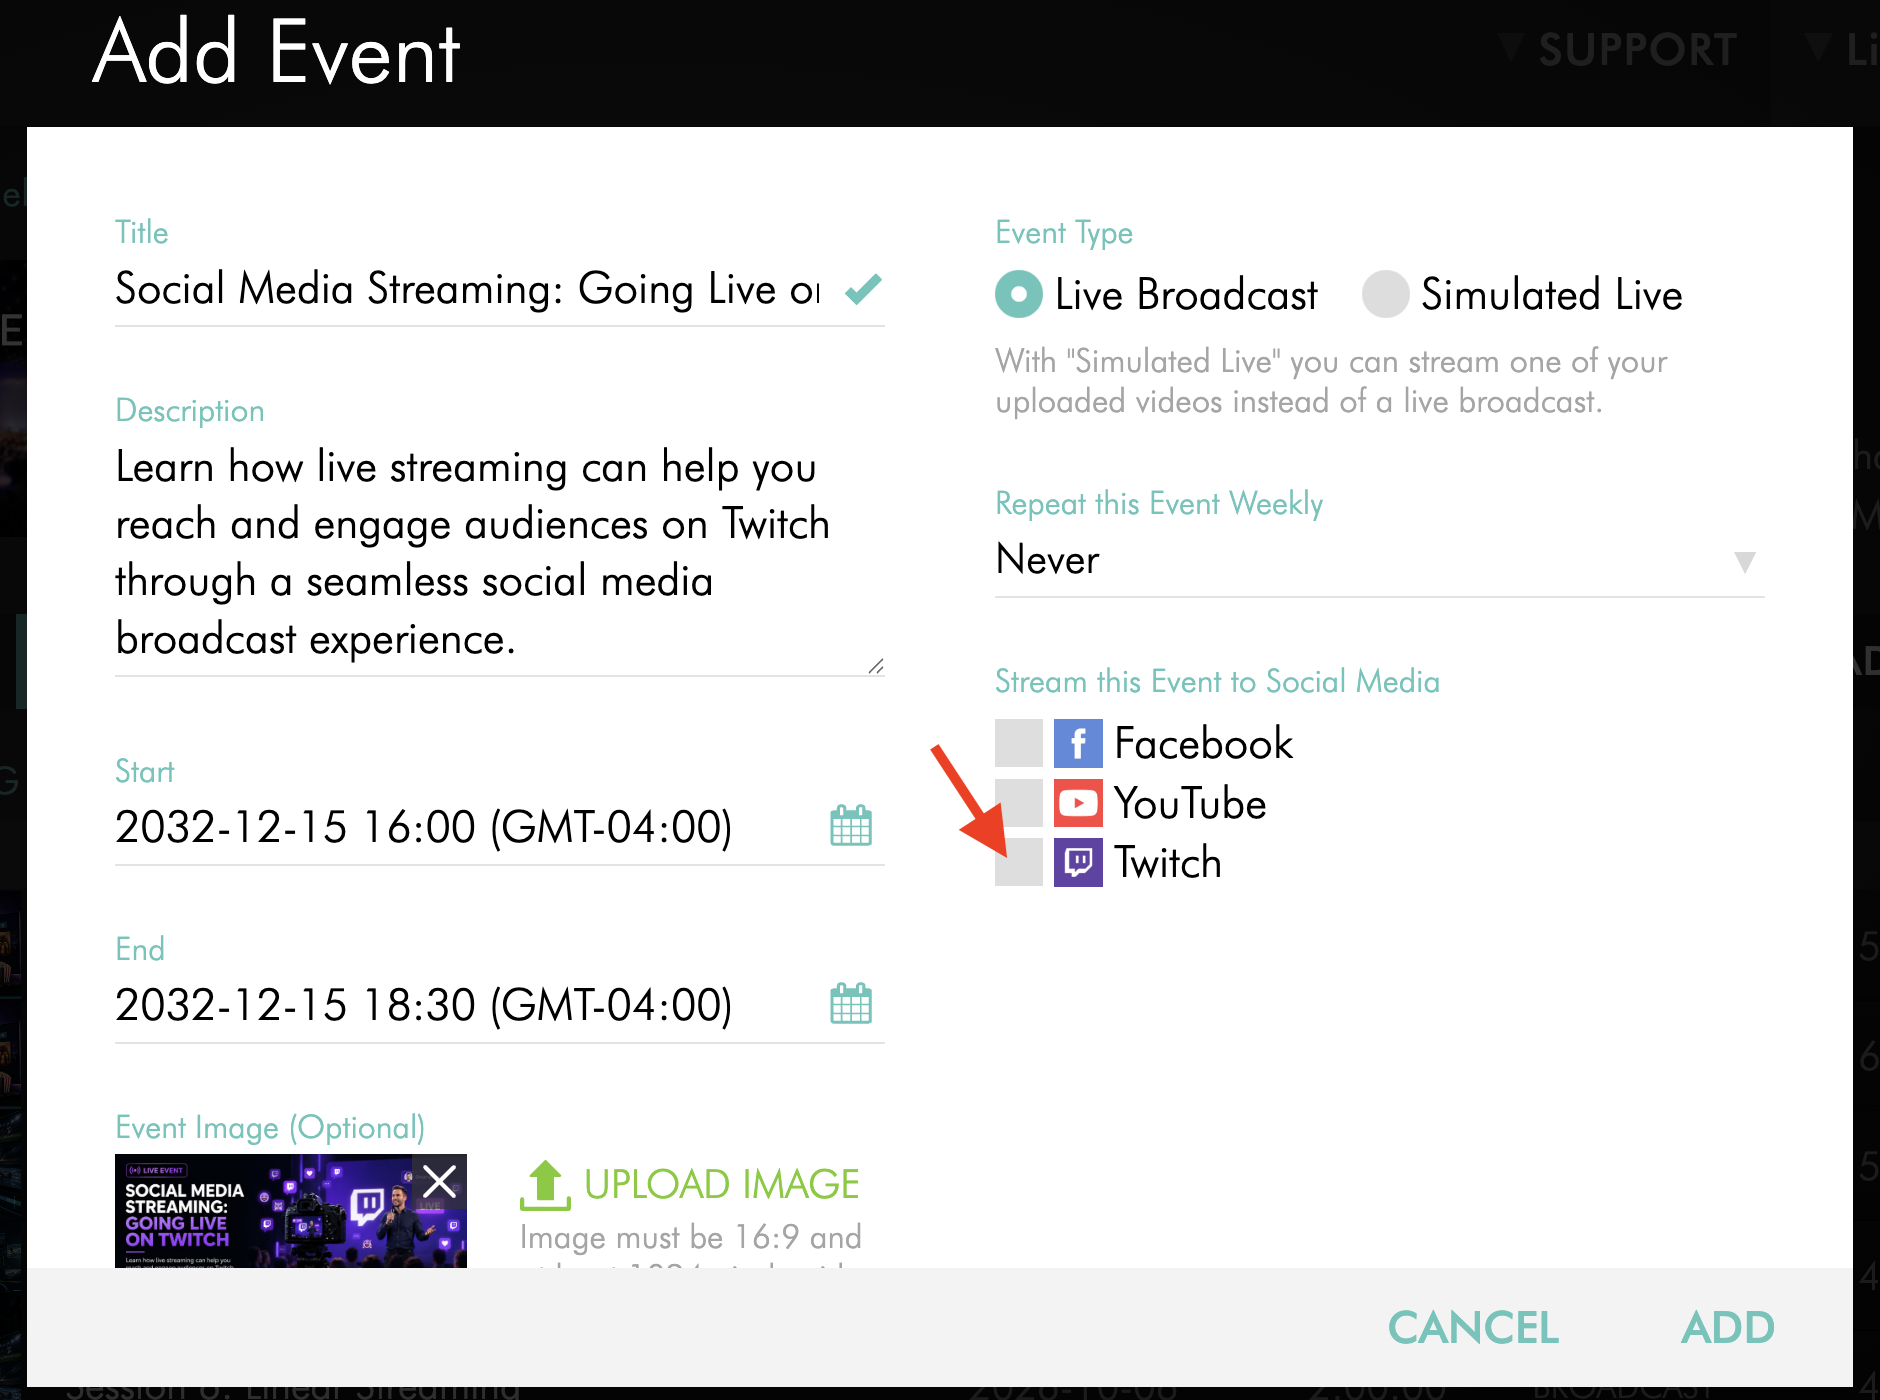
Step 7
When the Twitch authorization window appears, sign in to the Twitch account you want to connect.
Make sure you are signing in with the Twitch account associated with the Channel where you want to publish your Live Event.
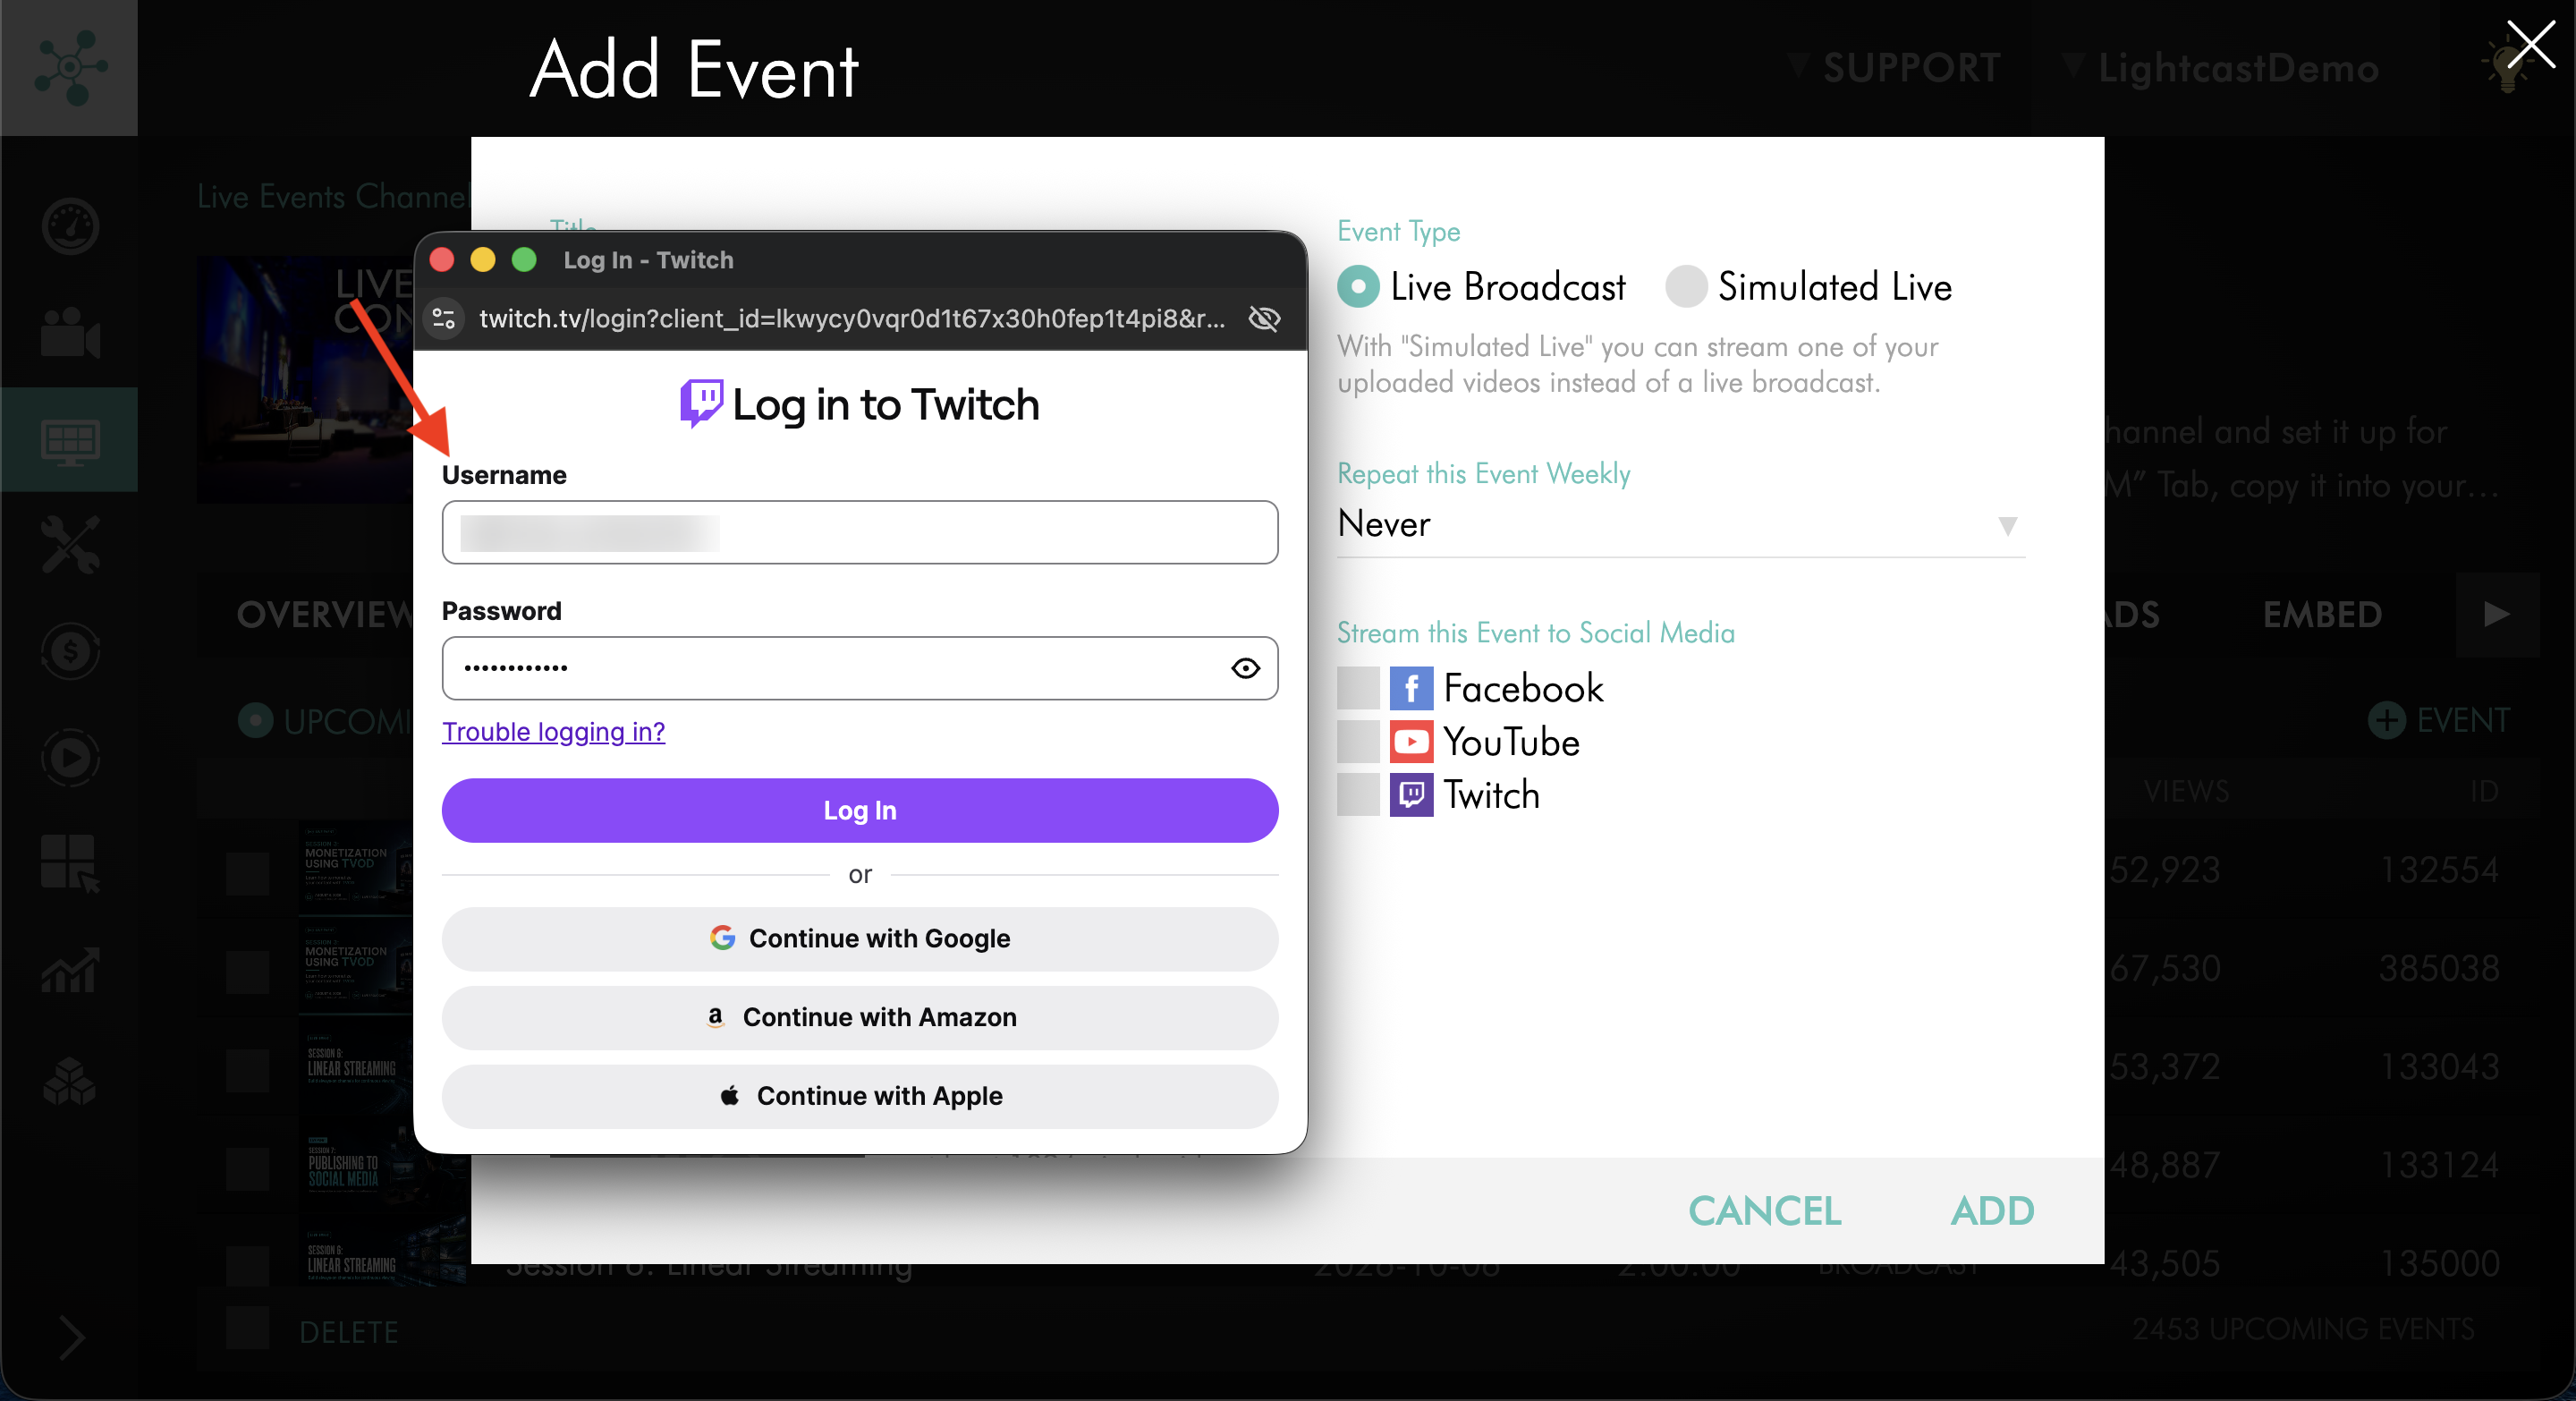
Step 8
Follow the Twitch authorization prompts to allow the Media Cloud to connect to your account.
The prompts may differ depending on whether you have previously connected your Twitch account to Lightcast.
First-time connection: Twitch may ask you to sign in and authorize the requested permissions.
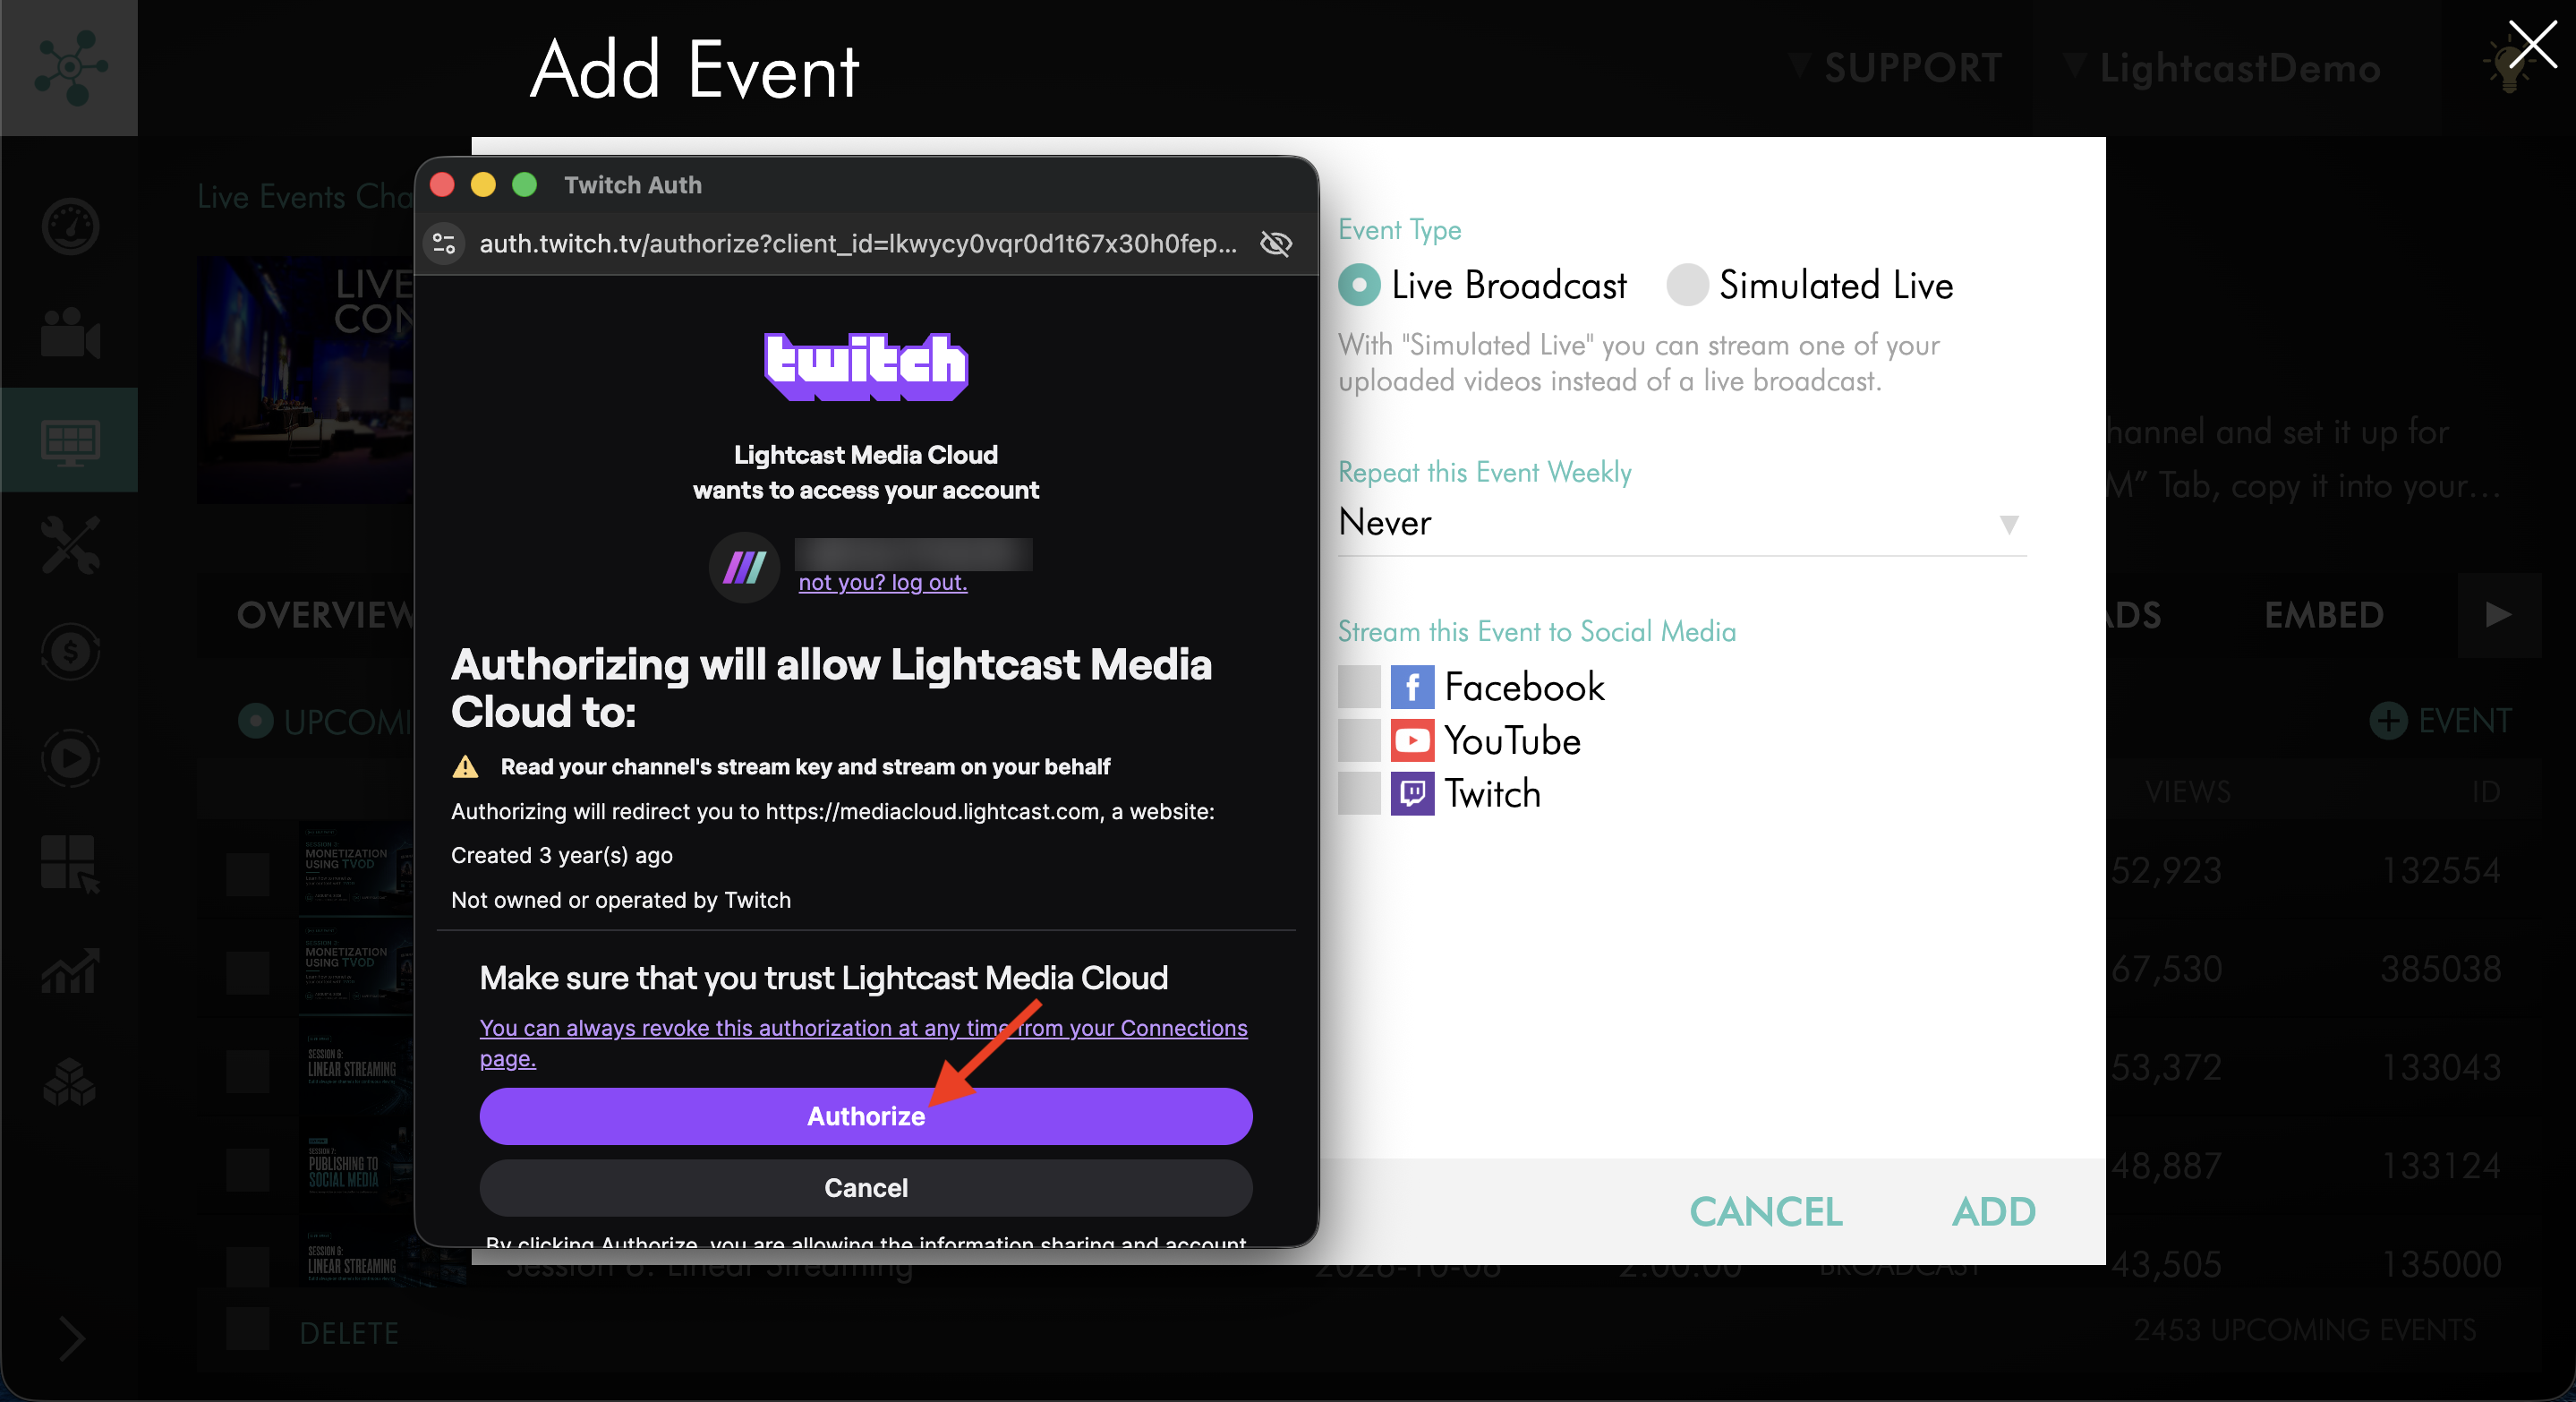
Previous connection: Twitch may allow you to continue using your existing authorization.
Complete the Twitch authorization process to continue scheduling the Live Event.
Step 9
Verify that the correct Twitch account is connected and that Twitch is selected as a publishing destination for your Live Event.
Before saving your Live Event, verify that:
The correct event type is selected.
The scheduled start and end date/time are correct.
The intended Twitch account is connected.
Twitch is selected as a publishing destination.
Any additional publishing destinations are configured correctly.
For Simulated Live Events, verify that the correct video is selected as the source.
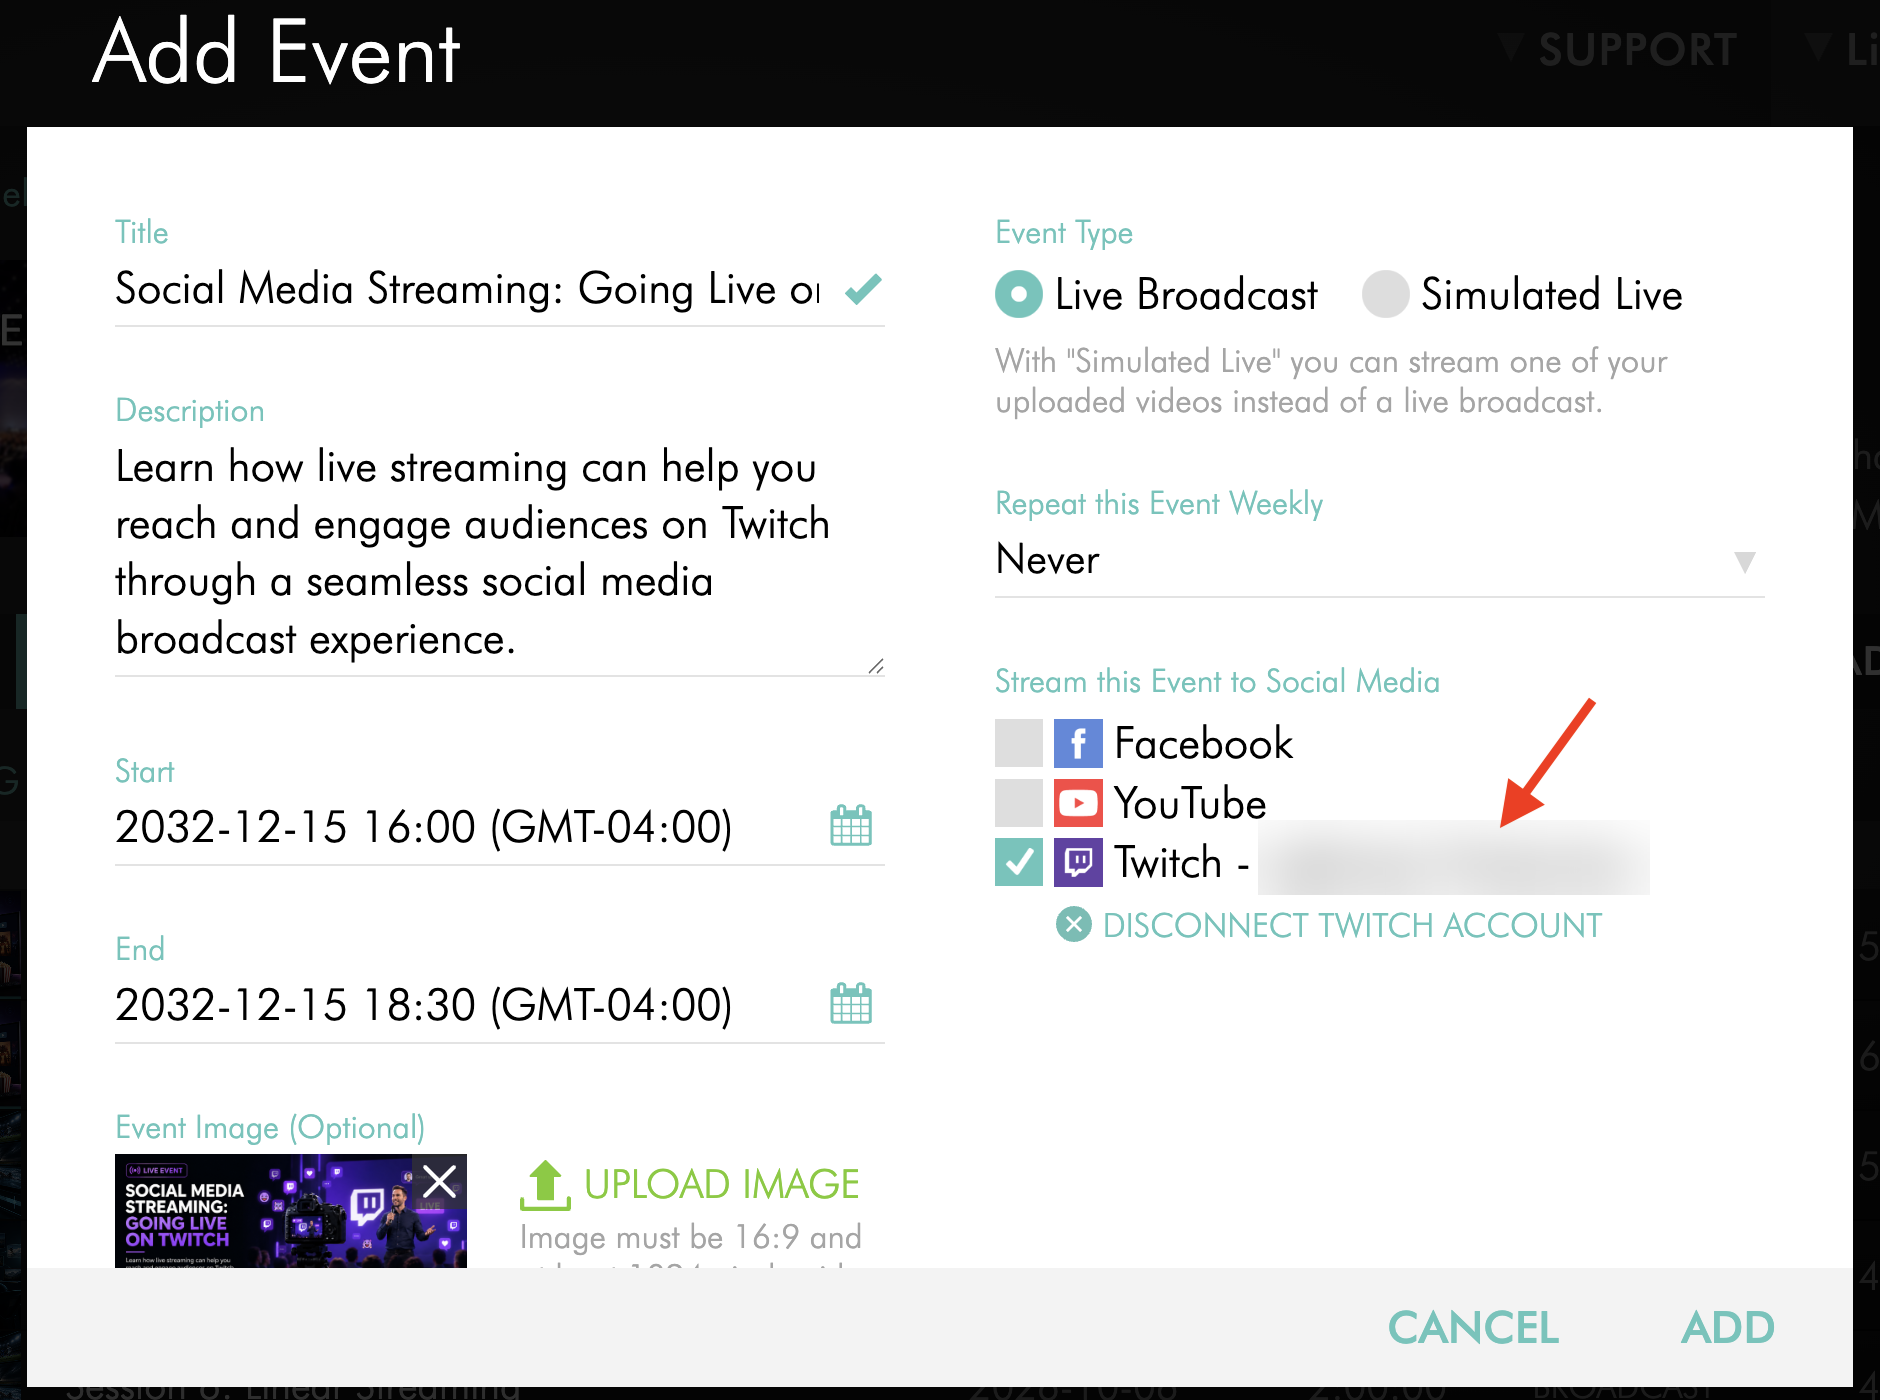
Step 10
Click ADD or SAVE to save the Live Event.
Step 11
Prepare your stream based on the event type:
For Live Broadcasts: Start your encoder before the scheduled event time to ensure the Media Cloud receives your source stream. The Media Cloud distributes the stream to Twitch for the scheduled Live Event.
For Simulated Live Events: No encoder is required. The Media Cloud automatically streams your selected video at the scheduled event time.
Once your event begins, check your Twitch Channel to verify that the broadcast is available as expected.
Identify a Simulated Live Event as prerecorded content on Twitch
Twitch recommends identifying prerecorded broadcasts so viewers understand they are watching previously recorded content.
Before your scheduled Simulated Live Event begins, review the following settings in Twitch.
Step 1
Sign in to your Twitch Creator Dashboard.
Step 2
Open Stream Manager and locate Edit Stream Info.
Step 3
Select the Rerun checkbox to identify your broadcast as prerecorded content.
Step 4
Add [Rerun] to the beginning of your stream title and Go Live notification, as recommended by Twitch.
Save your changes.
For more information, check the Rerun Queue section in Twitch Help: On-Demand Content on Twitch.
Change the connected Twitch account
Important: The Twitch connection is associated with the Live Events Channel. Changing or disconnecting the account may affect other scheduled Live Events within the same Live Events Channel.
Before making changes, review your upcoming events to ensure they are configured to publish to the intended Twitch account.
Step 1
Log in to your Media Cloud account.
Step 2
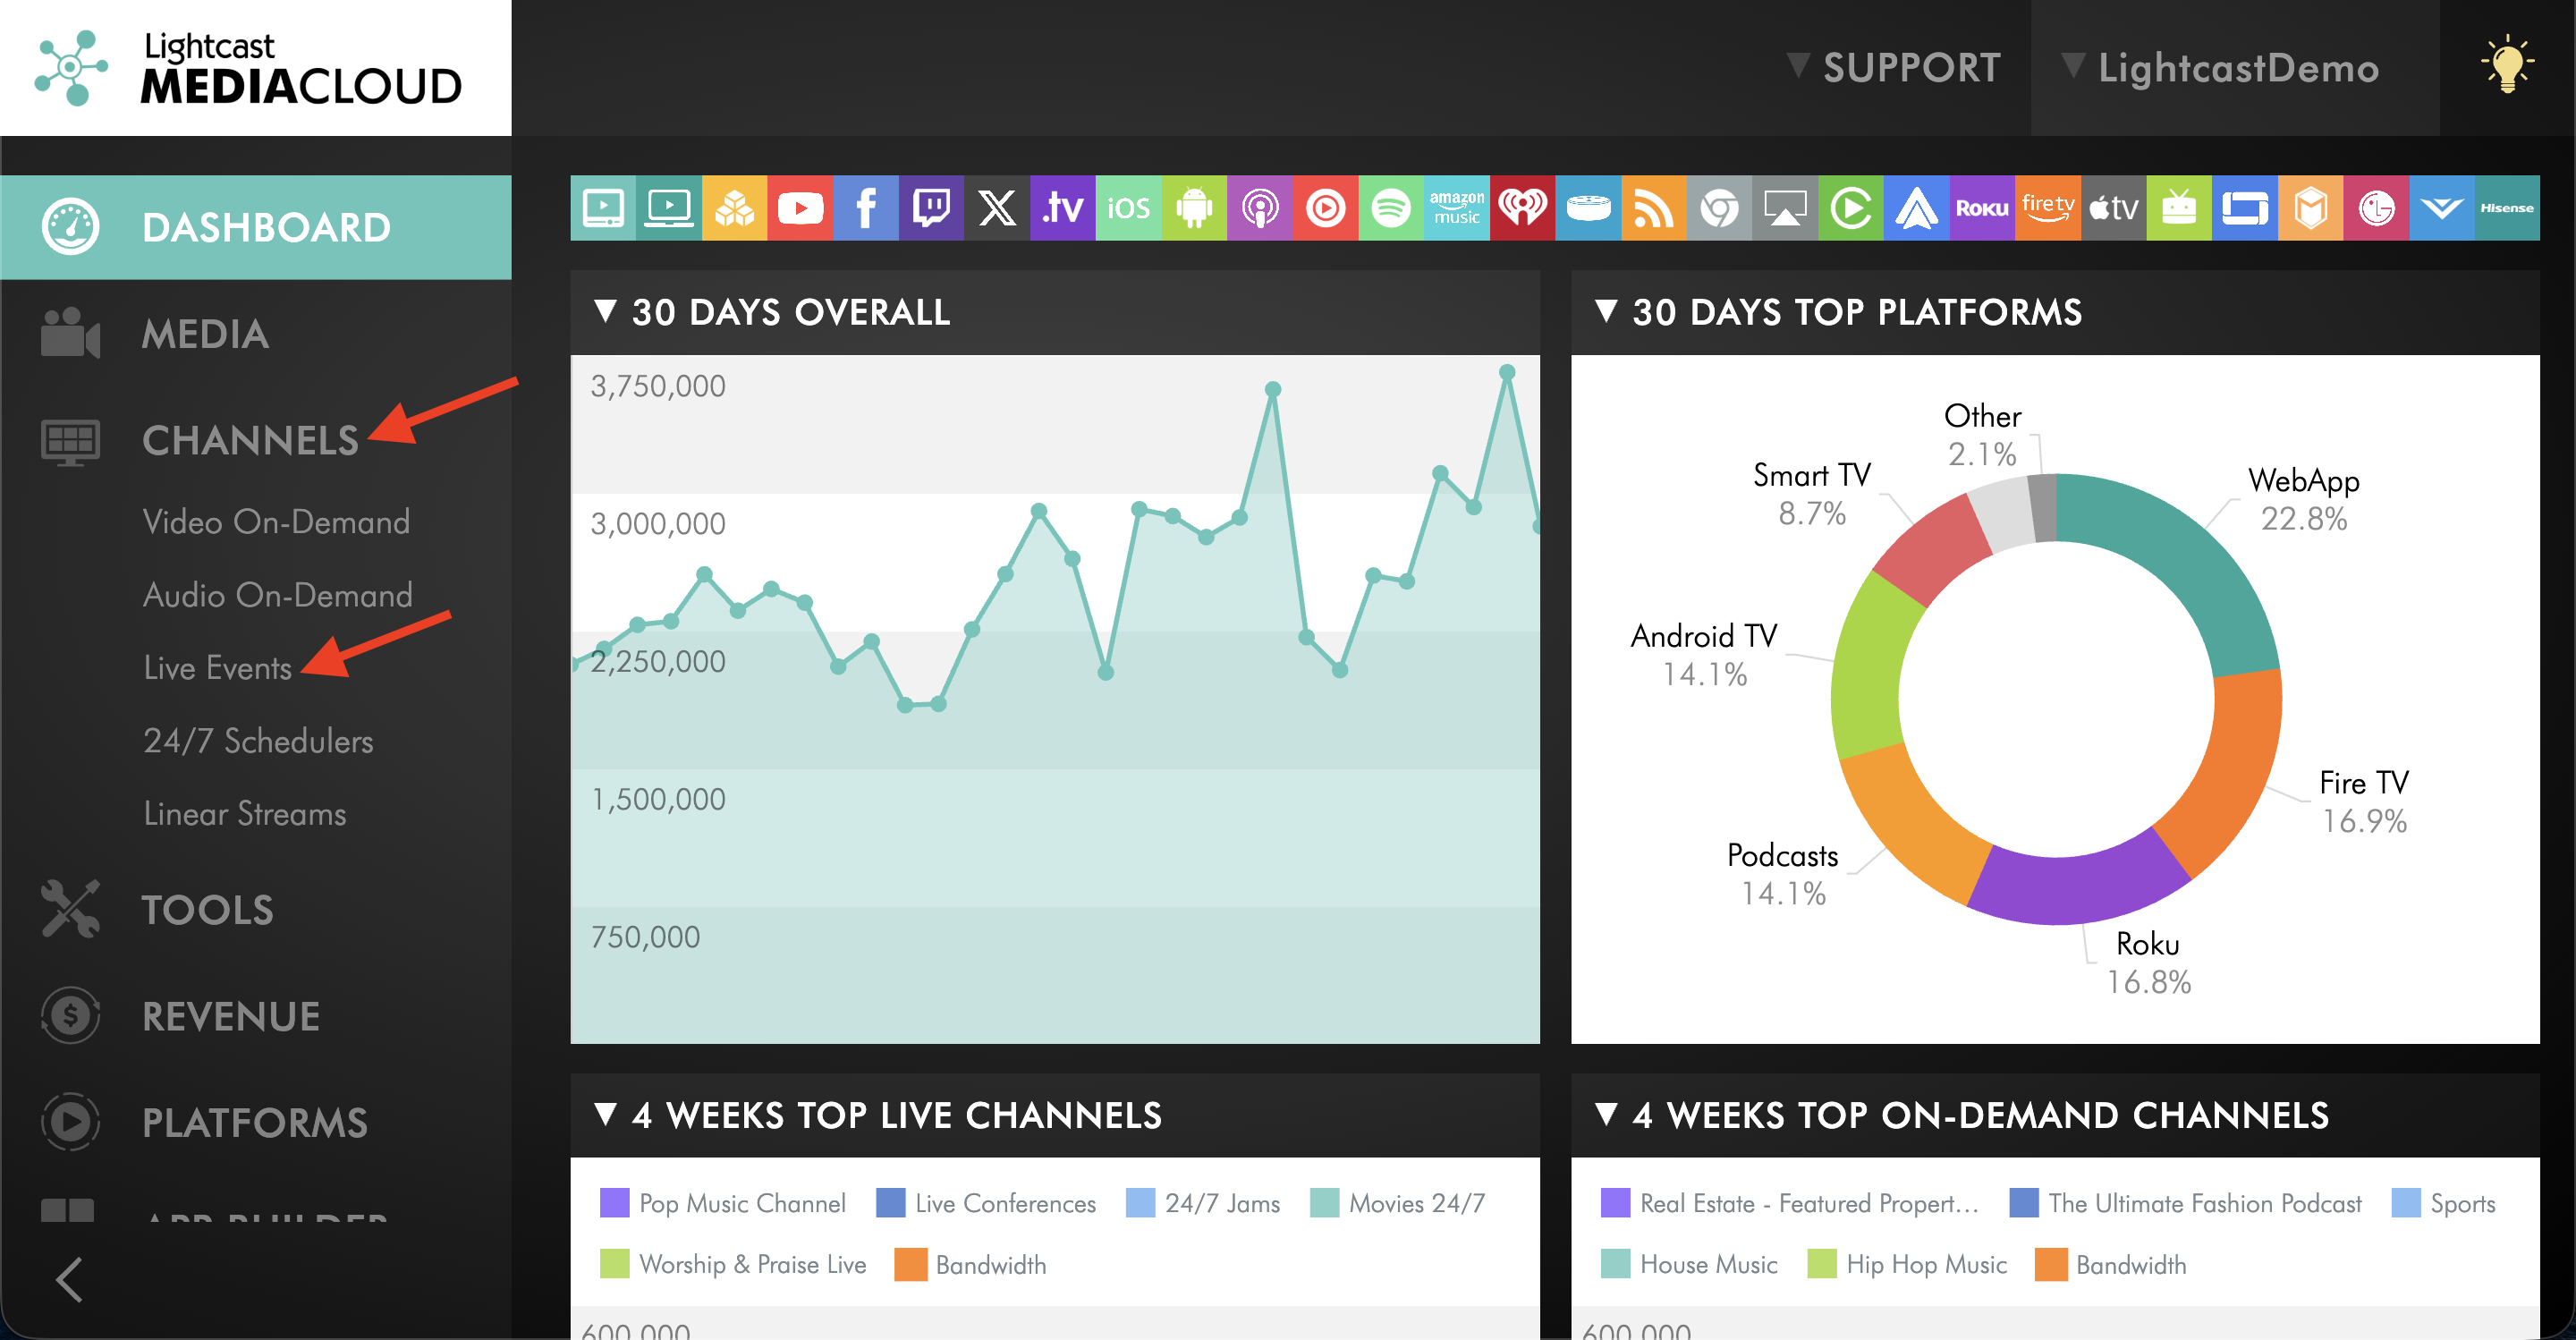
Go to CHANNELS, then select Live Events.
Step 3
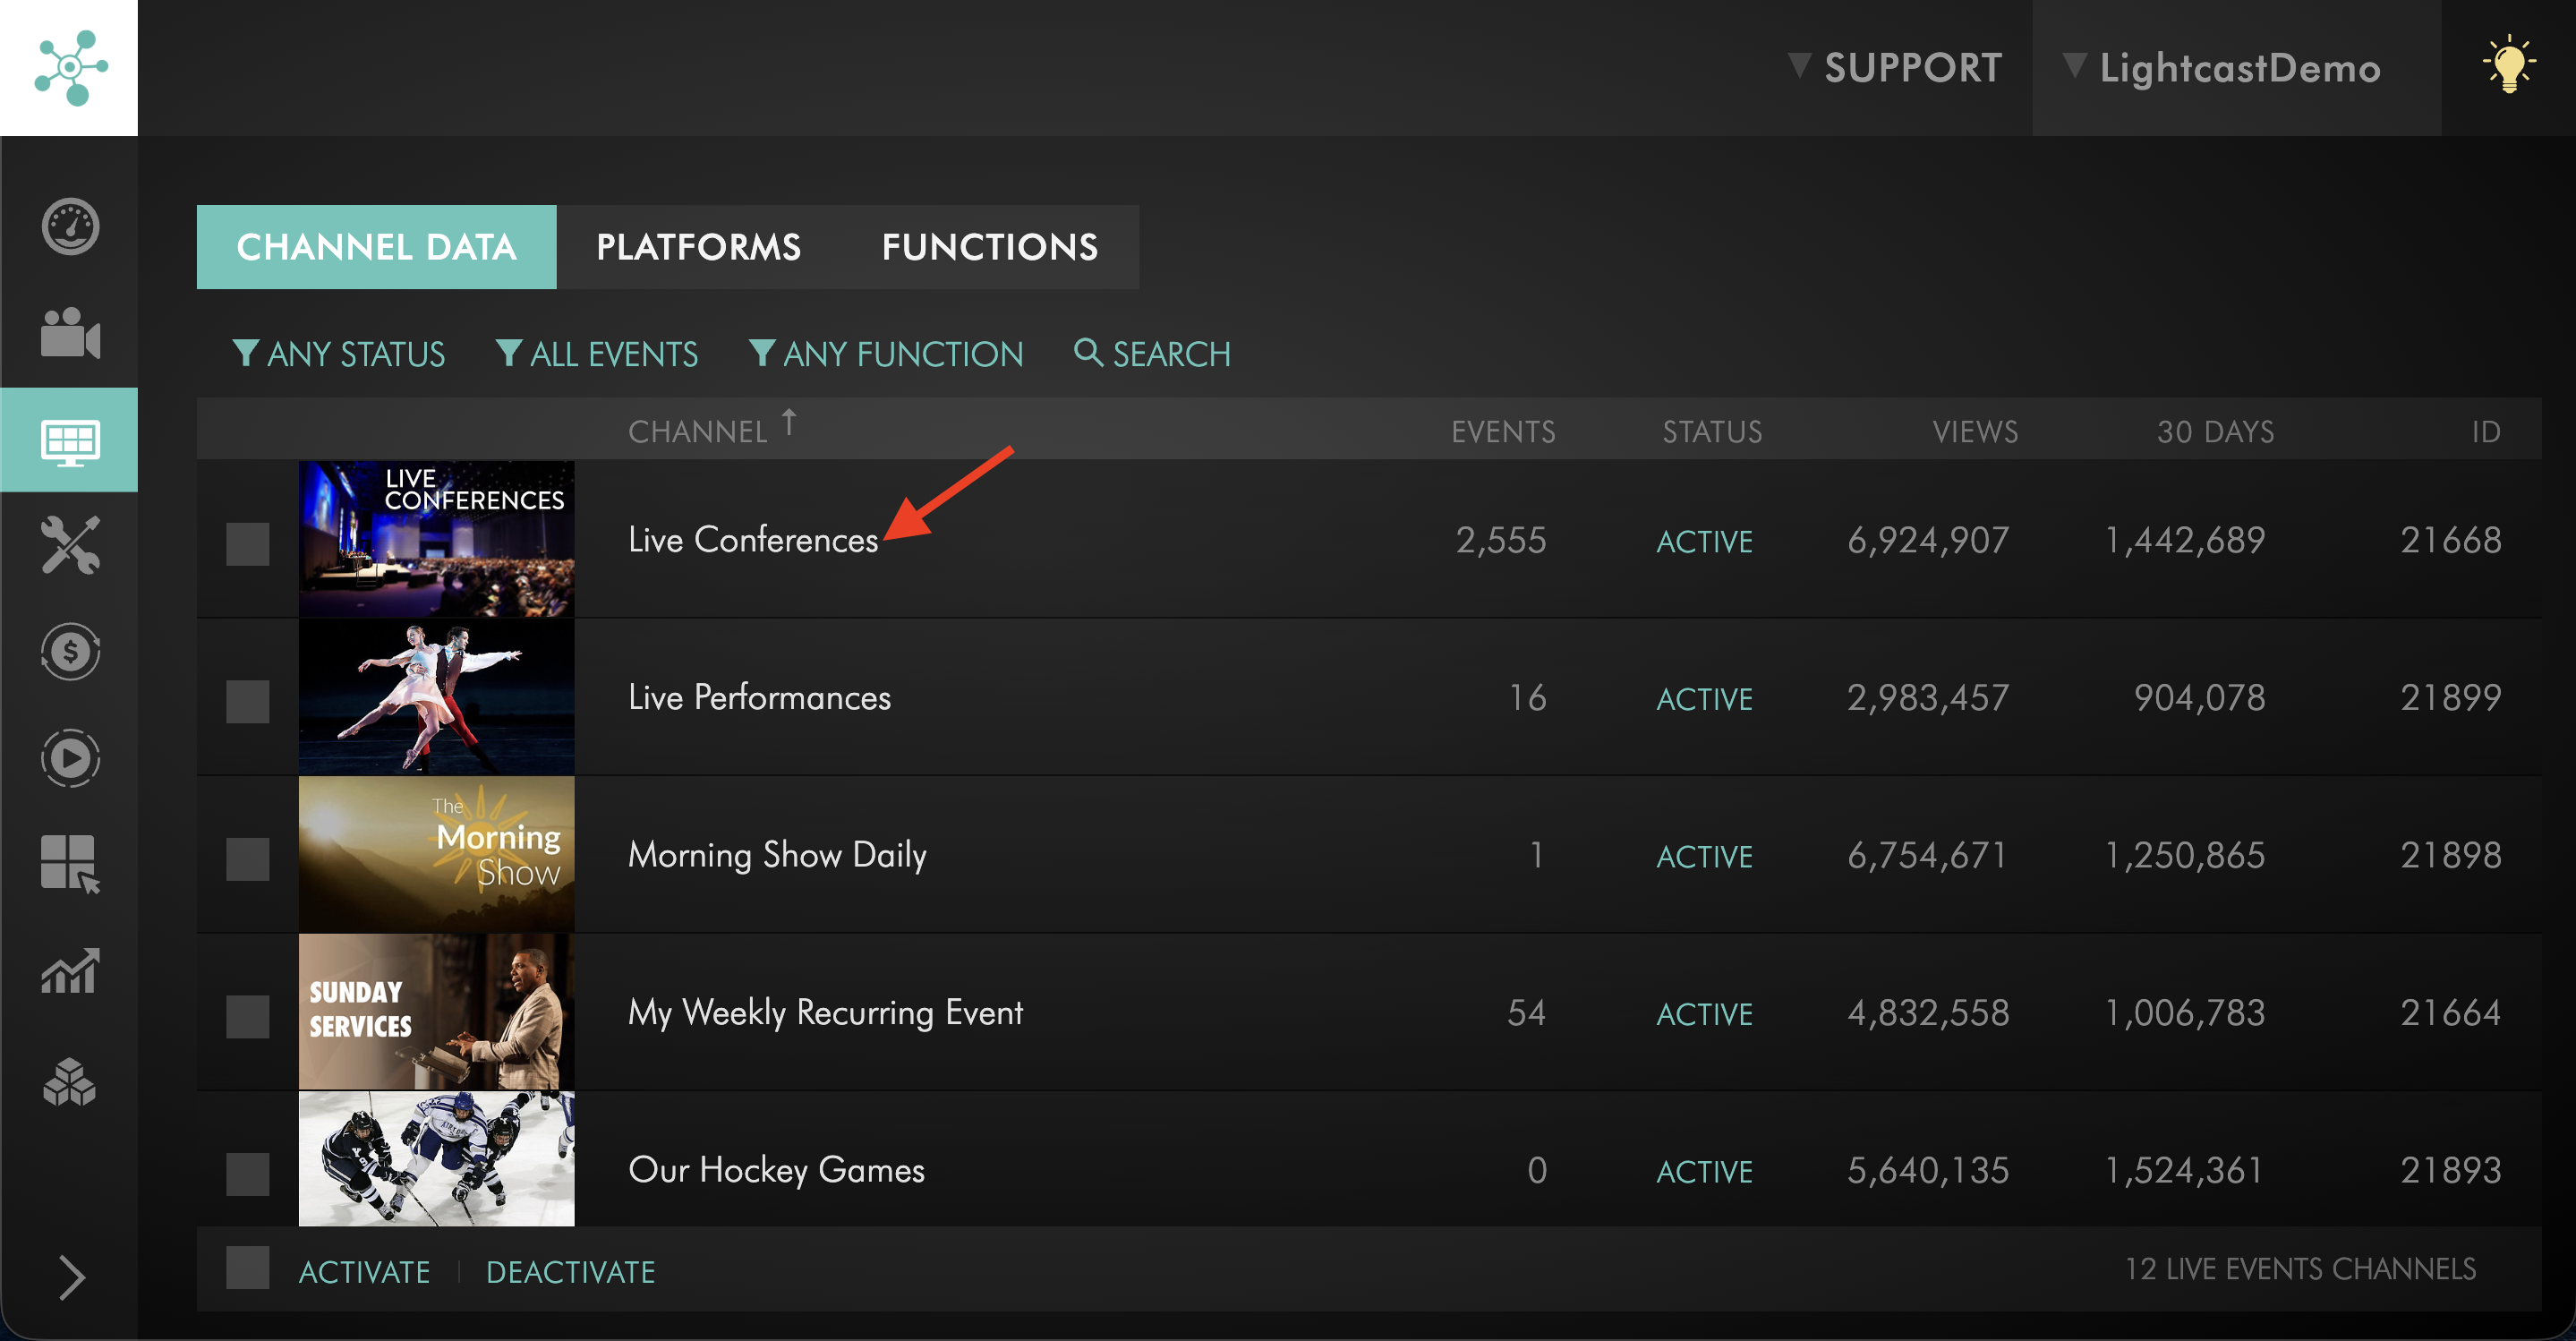
Select the Live Events Channel with the Twitch account you want to change.
Step 4
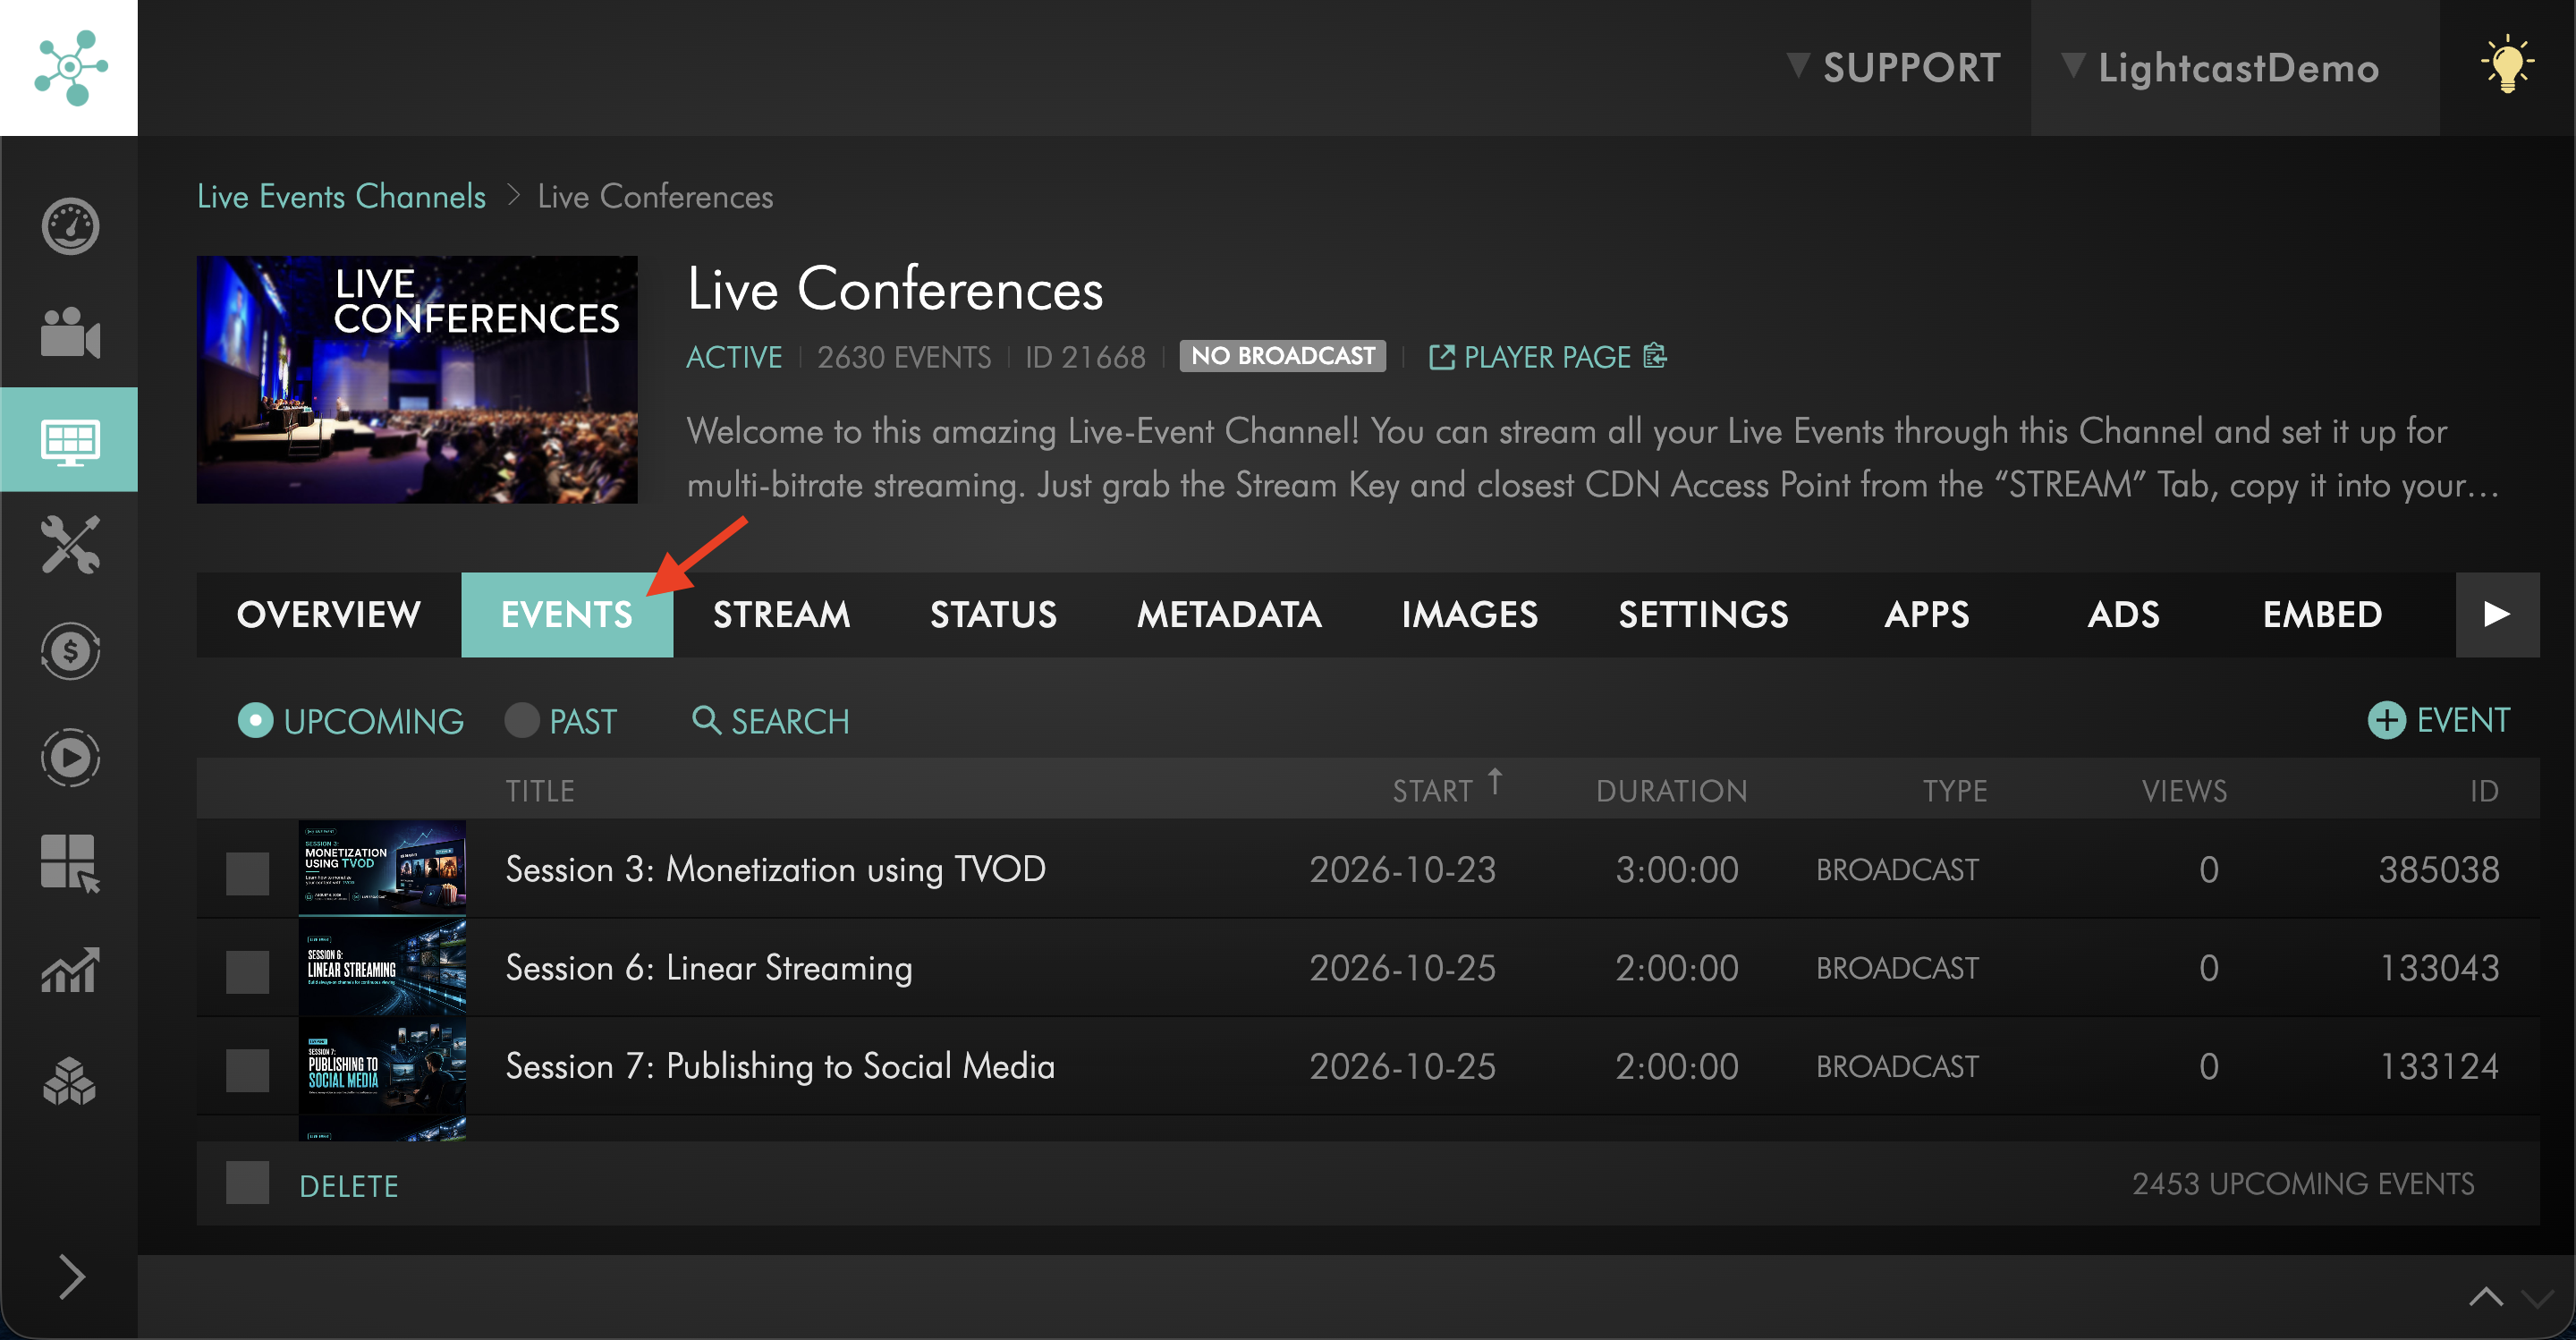
Go to the EVENTS tab.
Step 5
Create or open a scheduled Live Event whose settings are still editable.
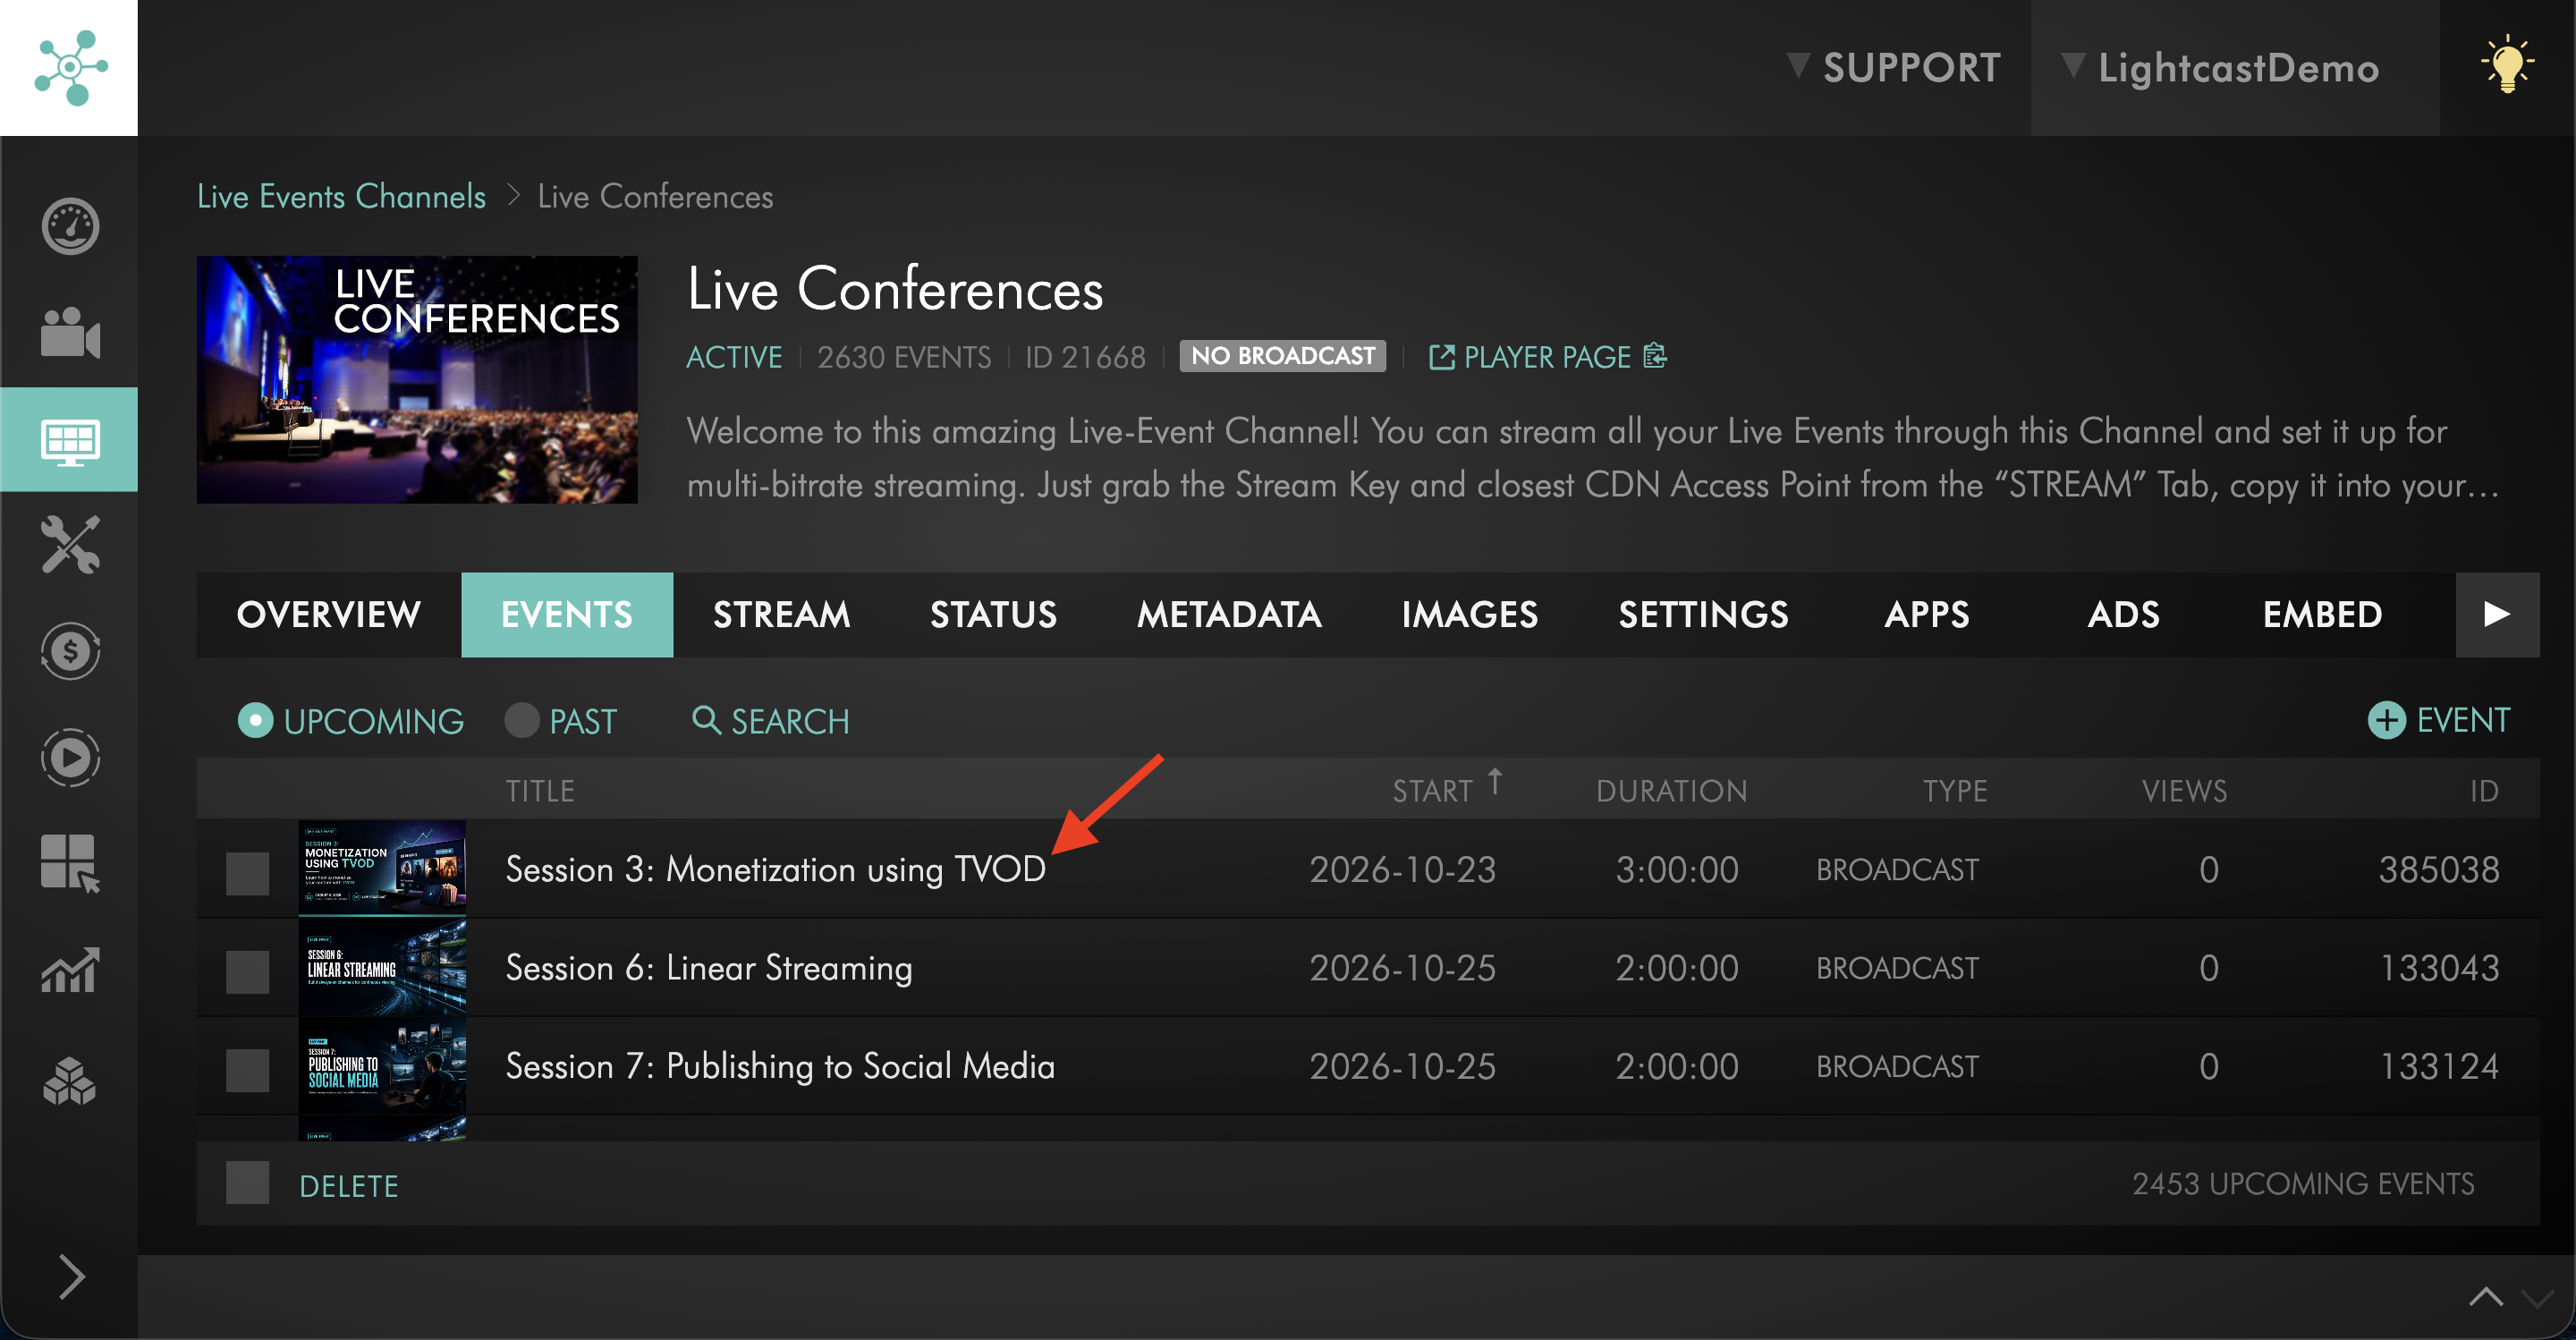
Step 6
Locate the Twitch publishing option.
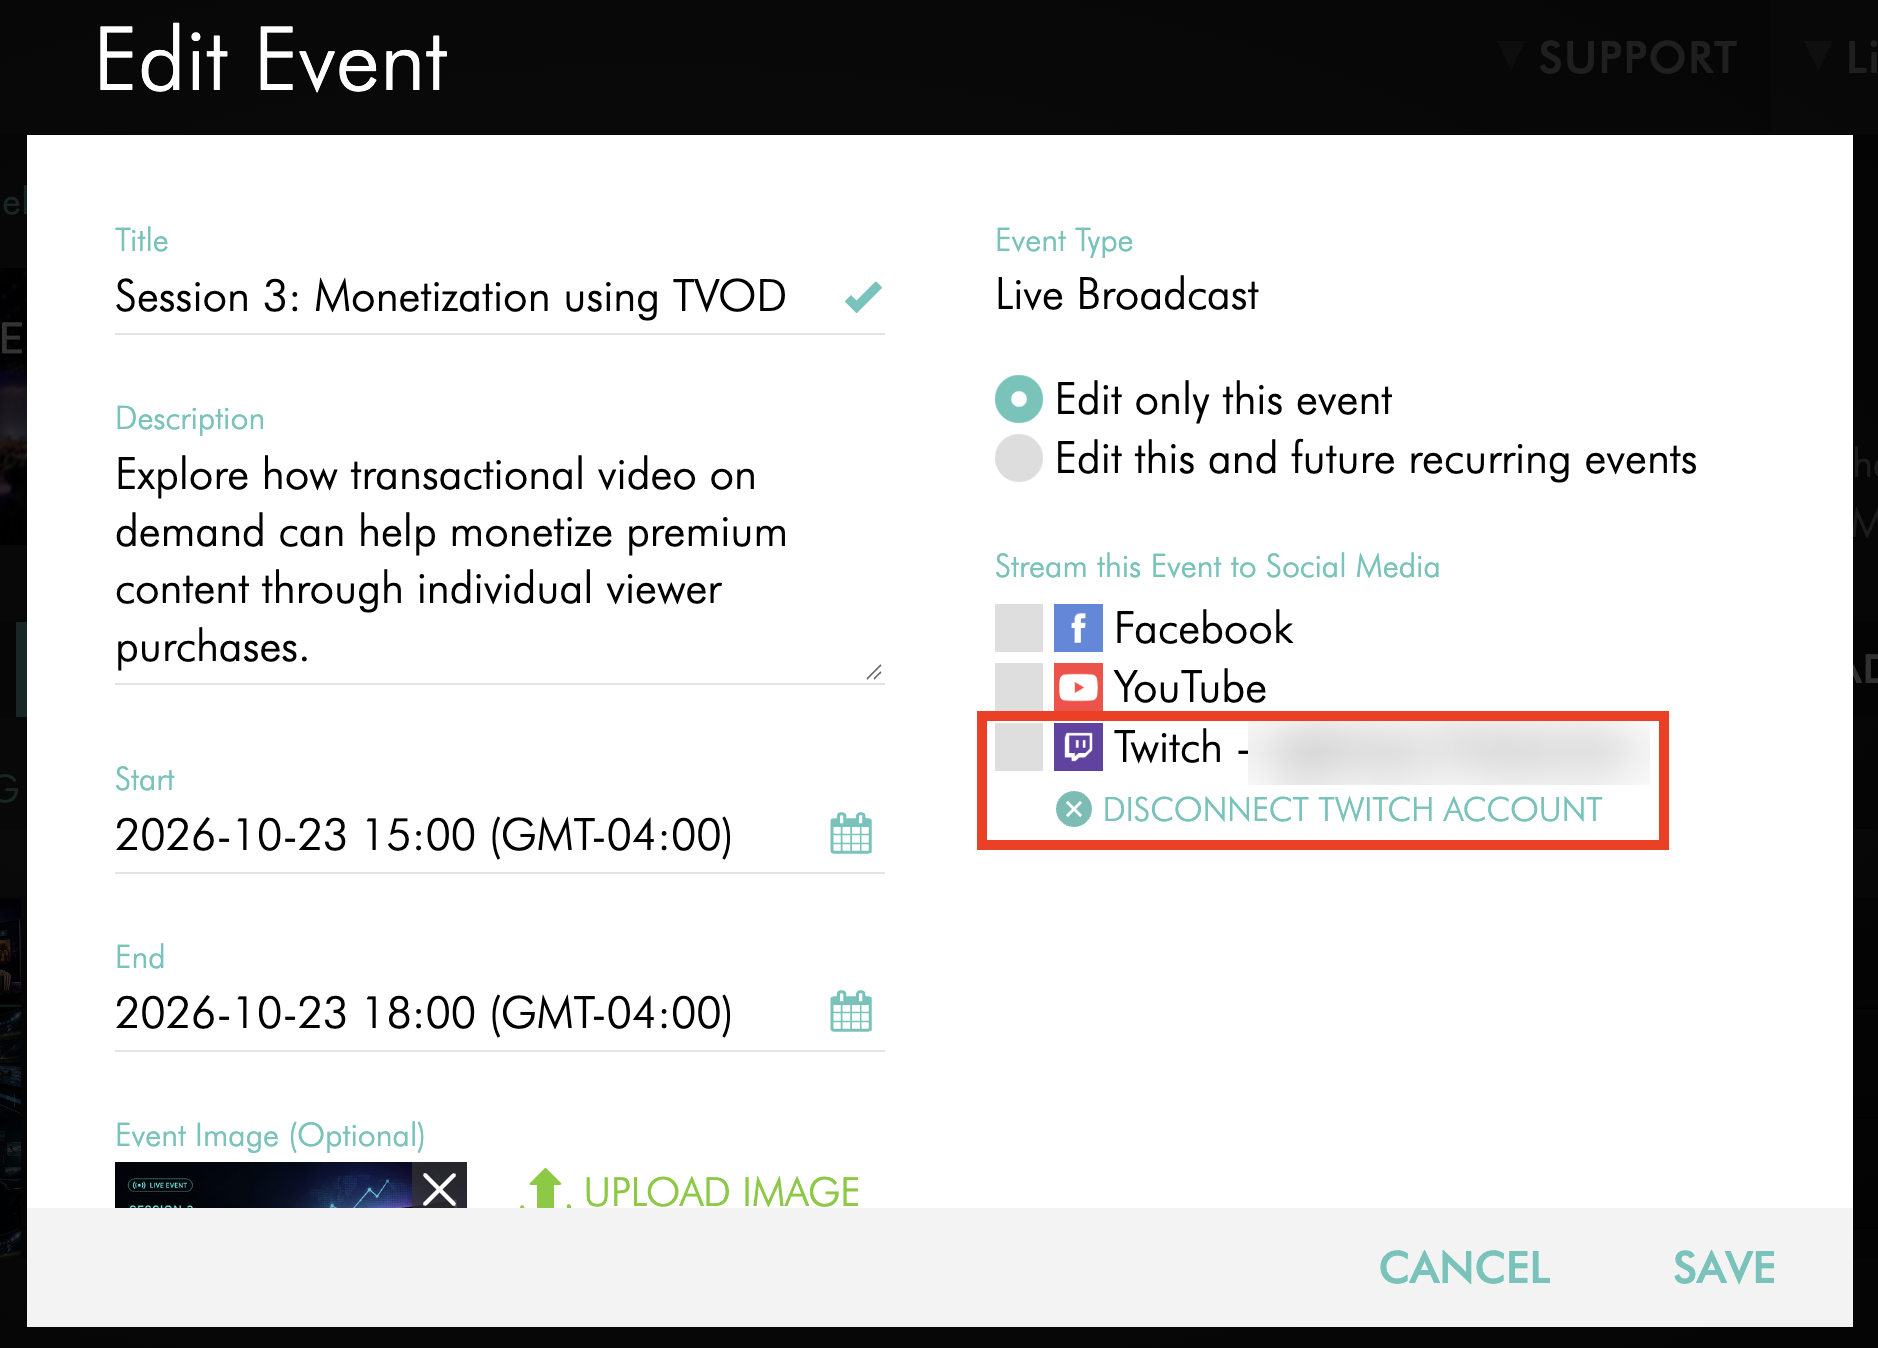
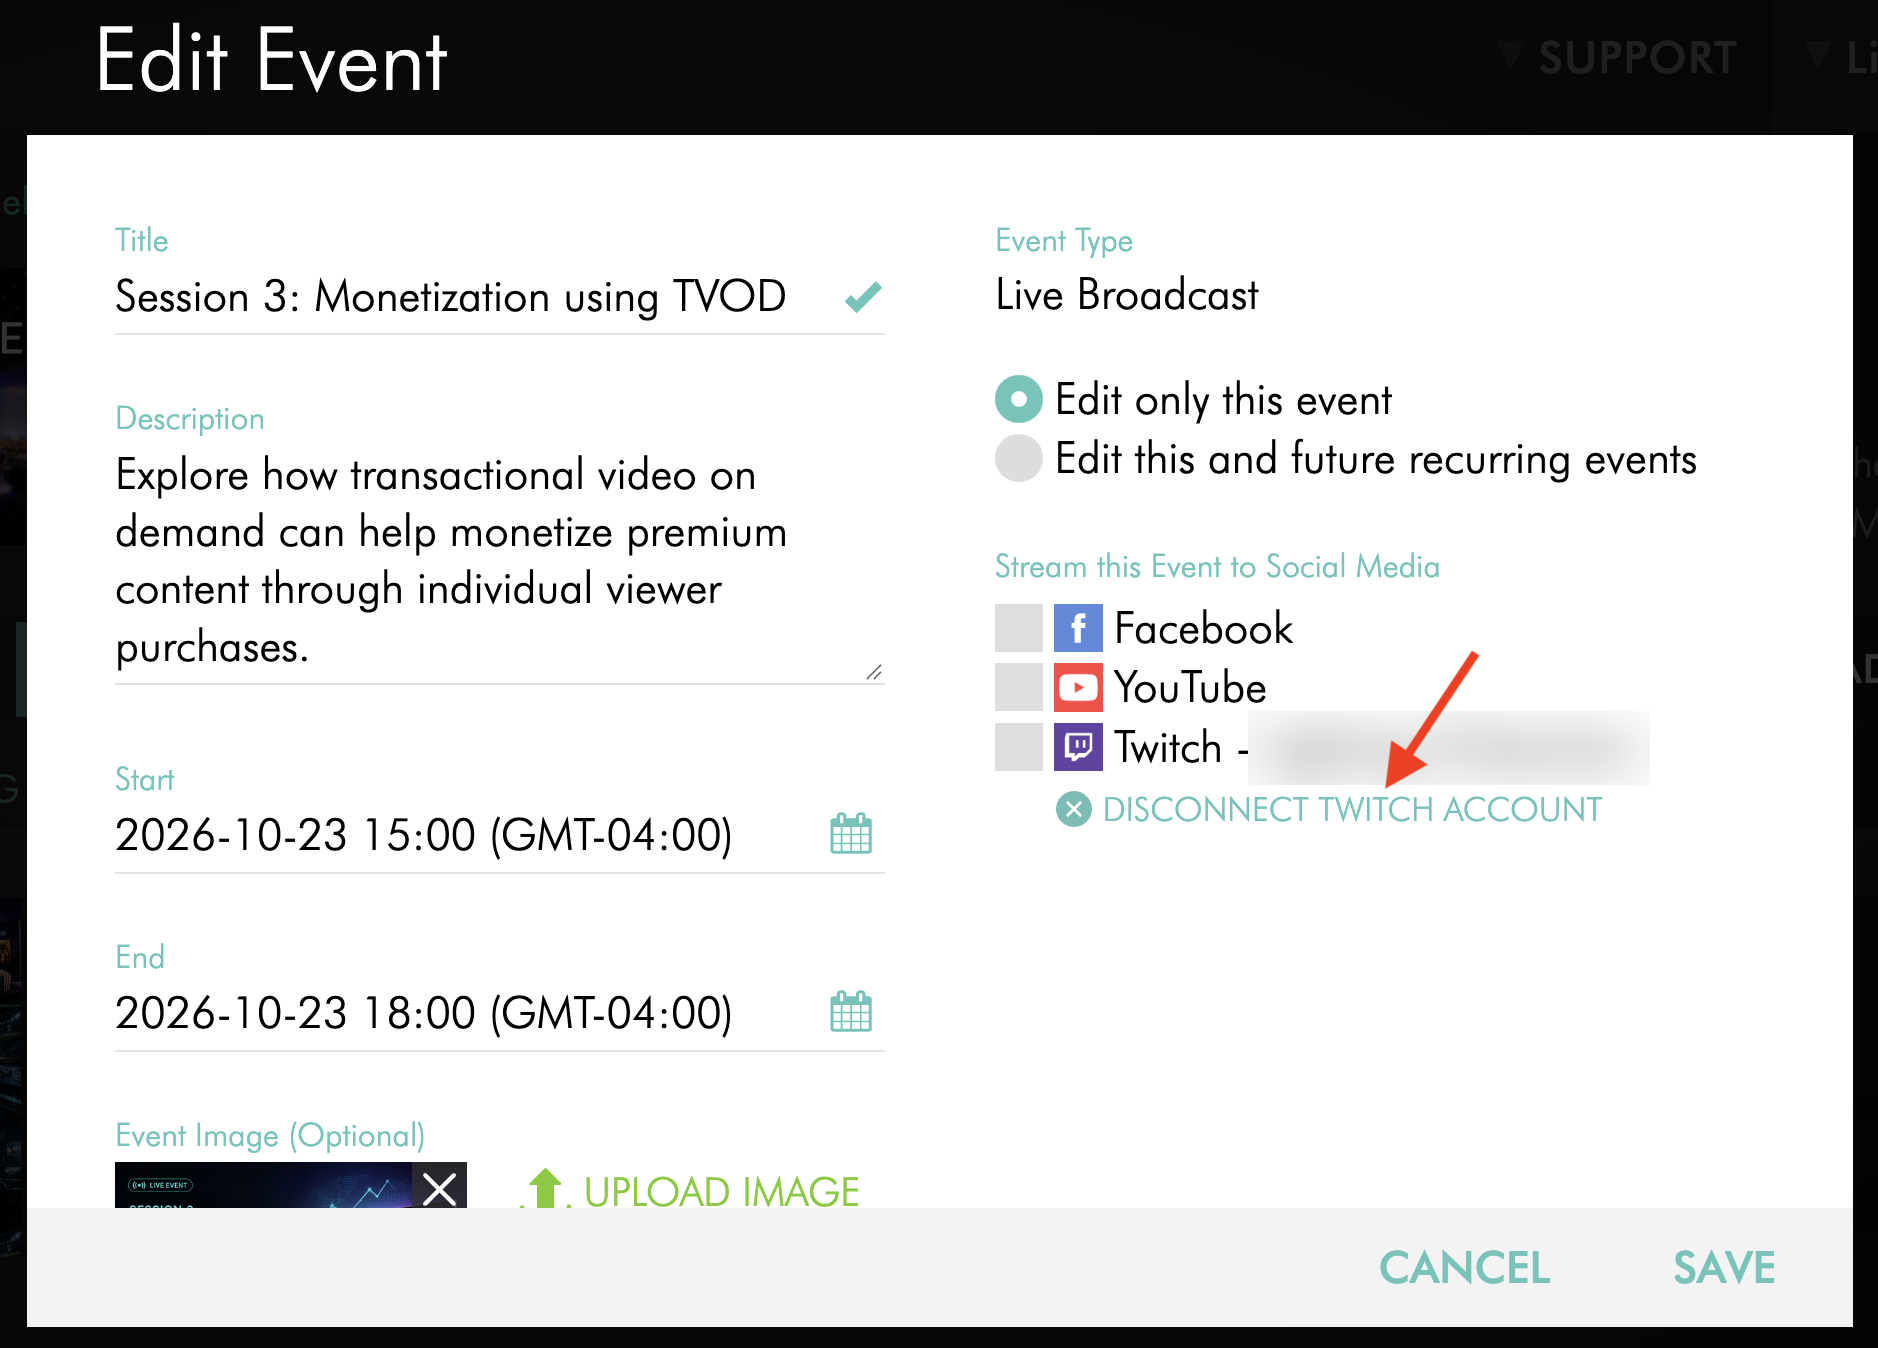
Step 7
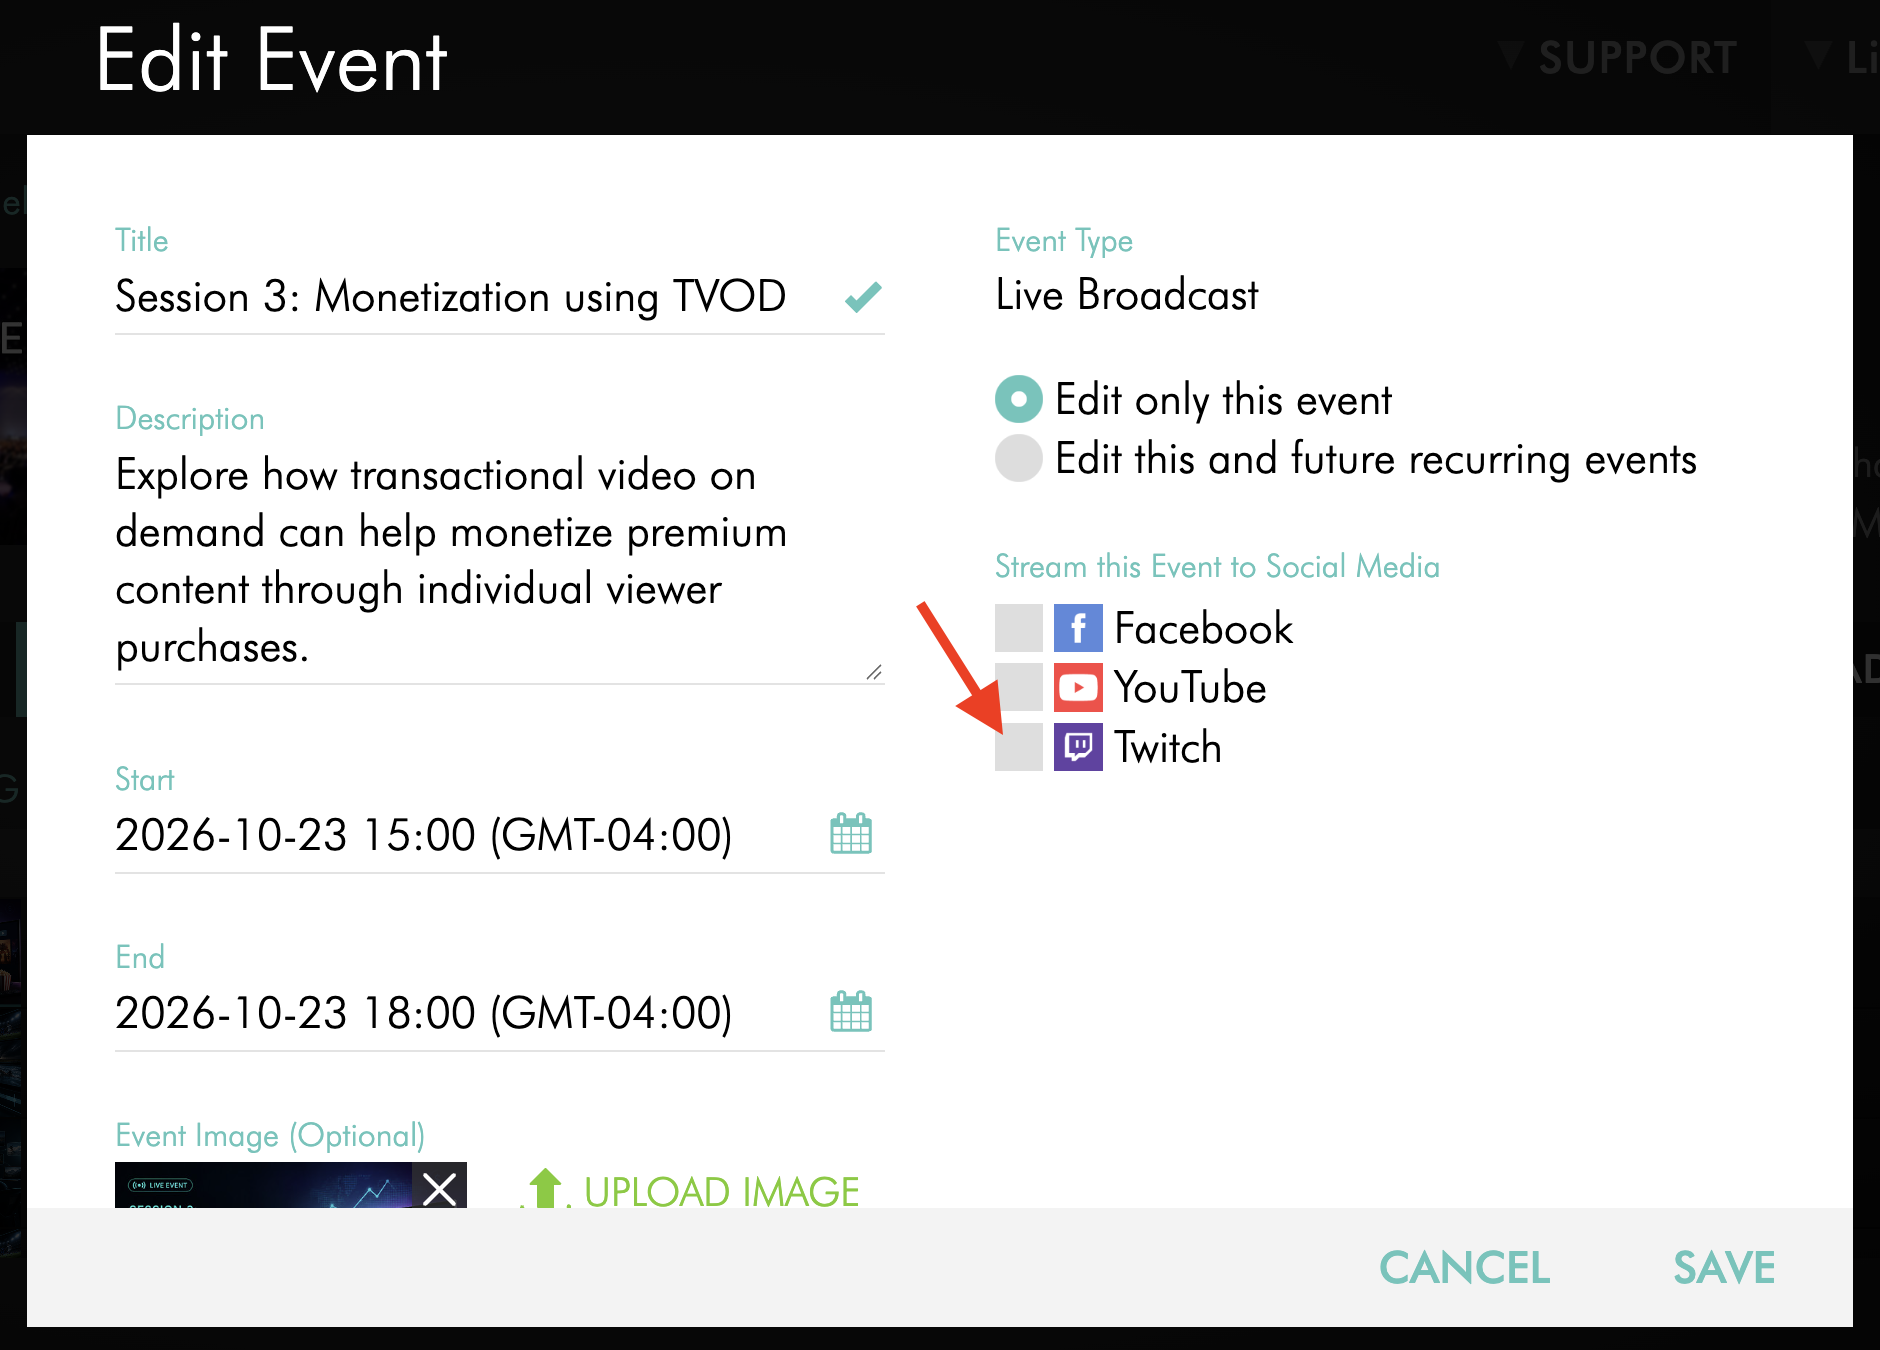
Click DISCONNECT TWITCH ACCOUNT.
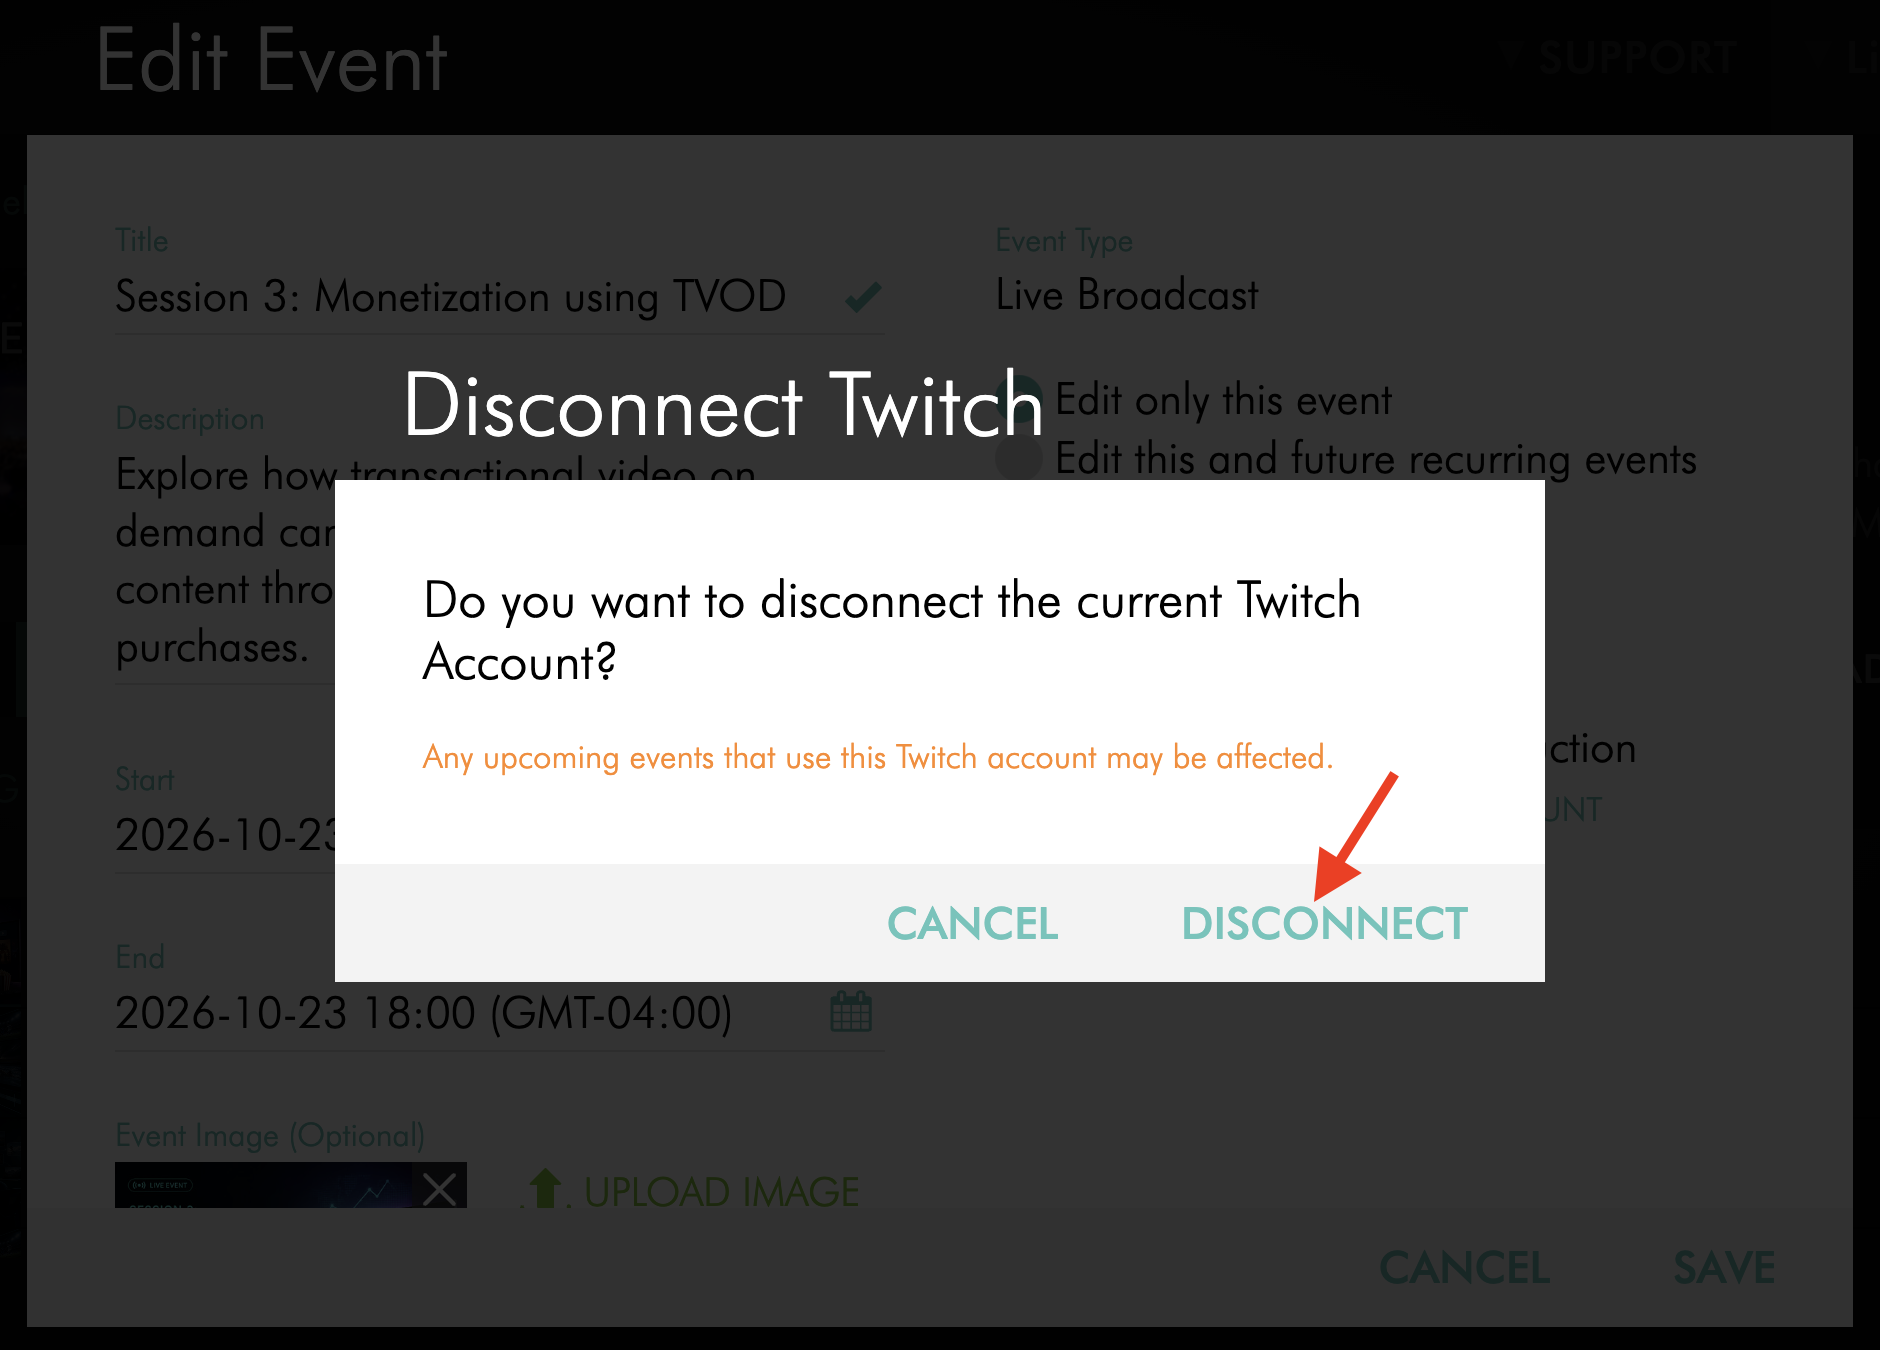
Step 8
When the confirmation window appears, click DISCONNECT.
Step 9
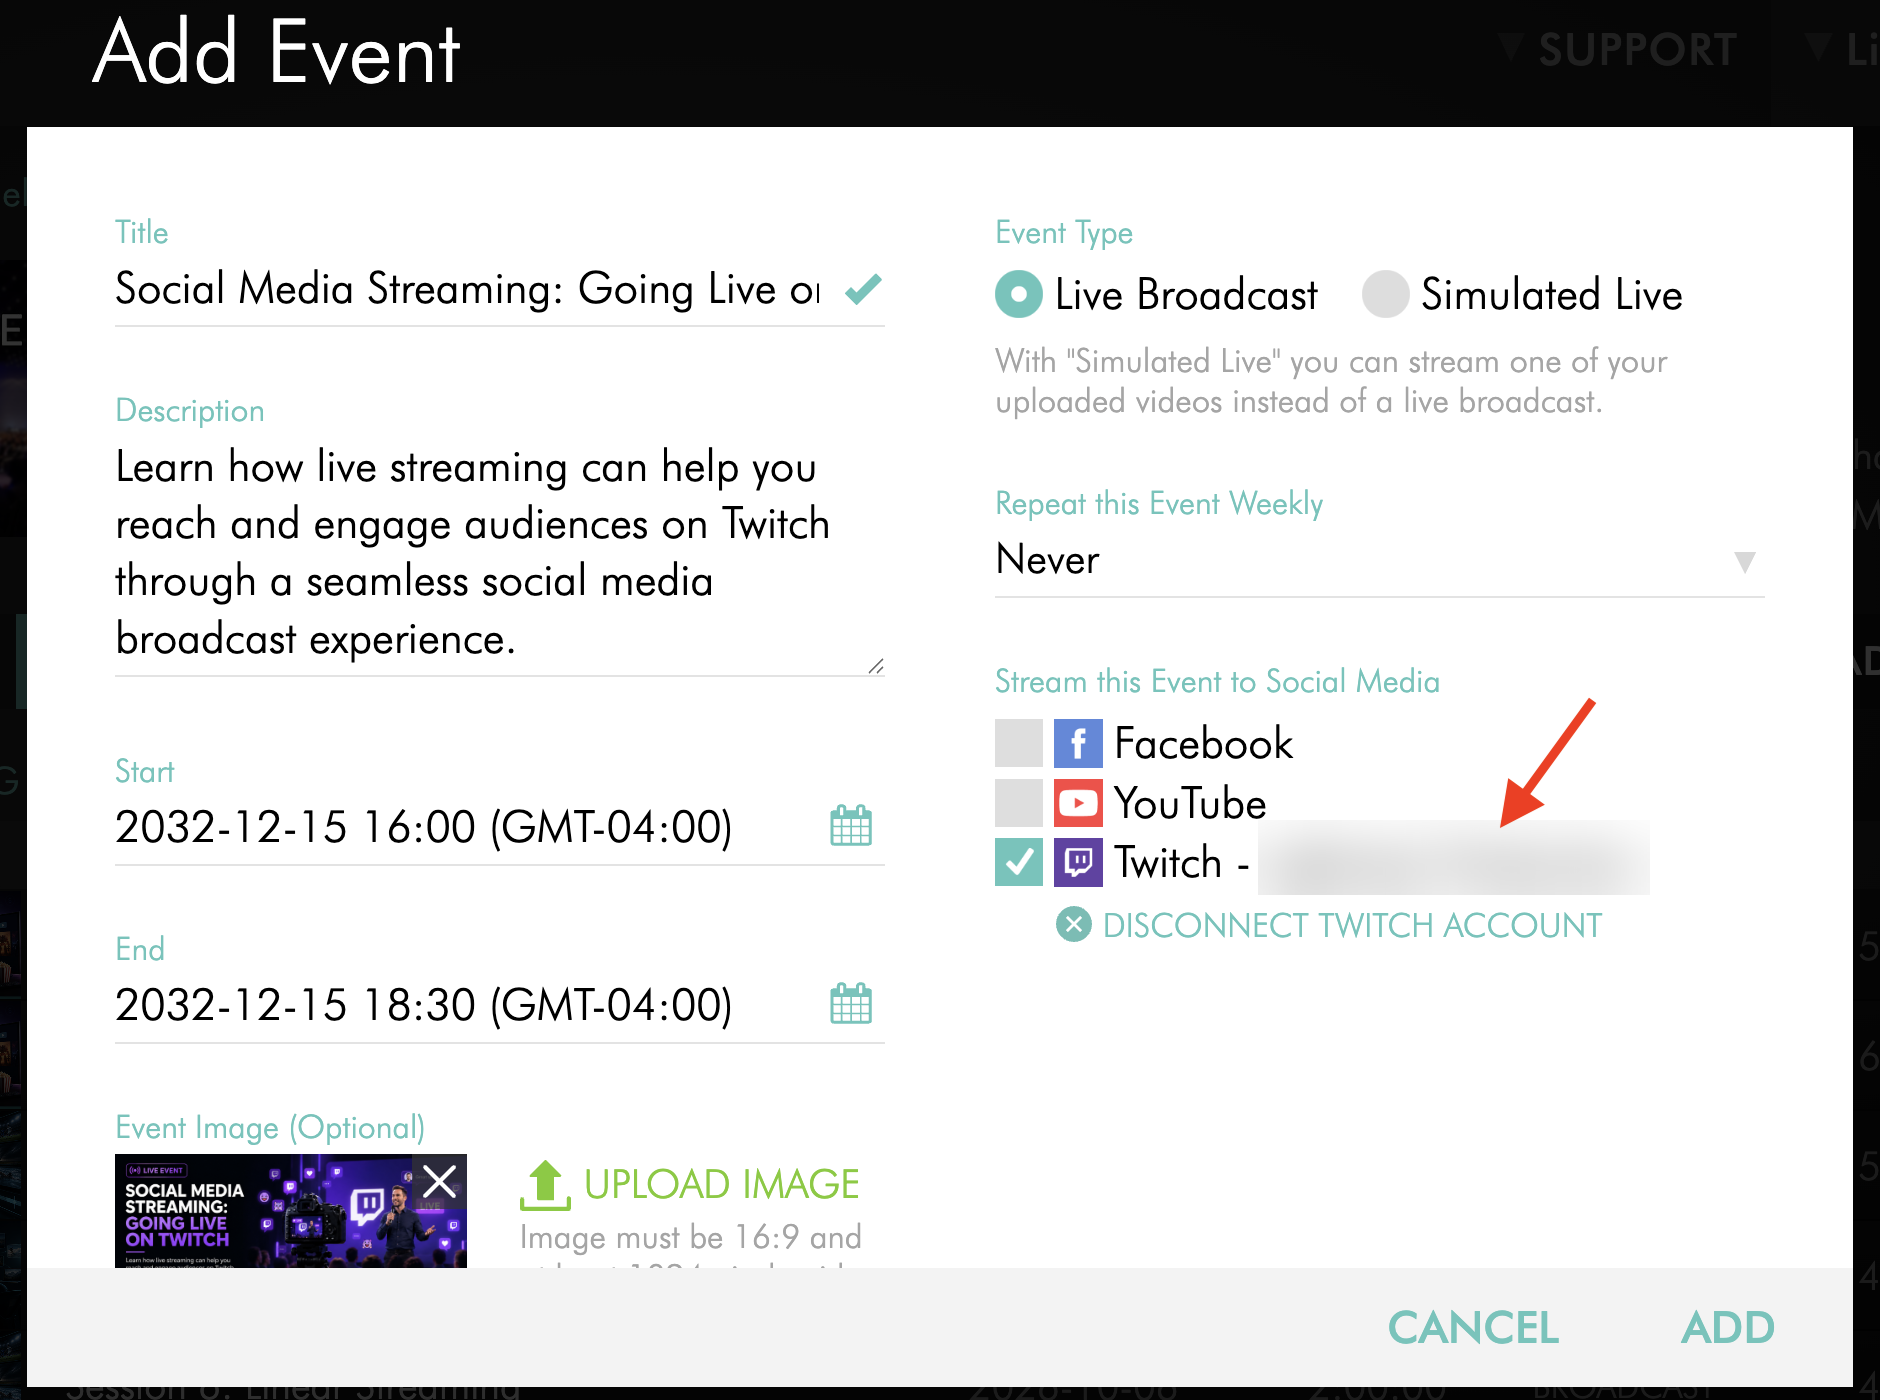
Select Twitch again and sign in with the Twitch account you want to connect.
If Twitch automatically signs you back in with the previous account, sign out of Twitch in your browser before reconnecting.
Step 10
Follow the Twitch authorization prompts and click Authorize when requested.
Step 11
Verify that the intended Twitch account is connected.
Step 12
Click ADD or SAVE to save your changes.
Stop Twitch publishing before the Live Event begins
Important: Live Event settings cannot be edited once the event has started. Editing also becomes unavailable less than 5 minutes before the scheduled start time.
If the event is more than 5 minutes away from its scheduled start time, you can remove Twitch from the scheduled event.
Step 1
Log in to your Media Cloud account.
Step 2
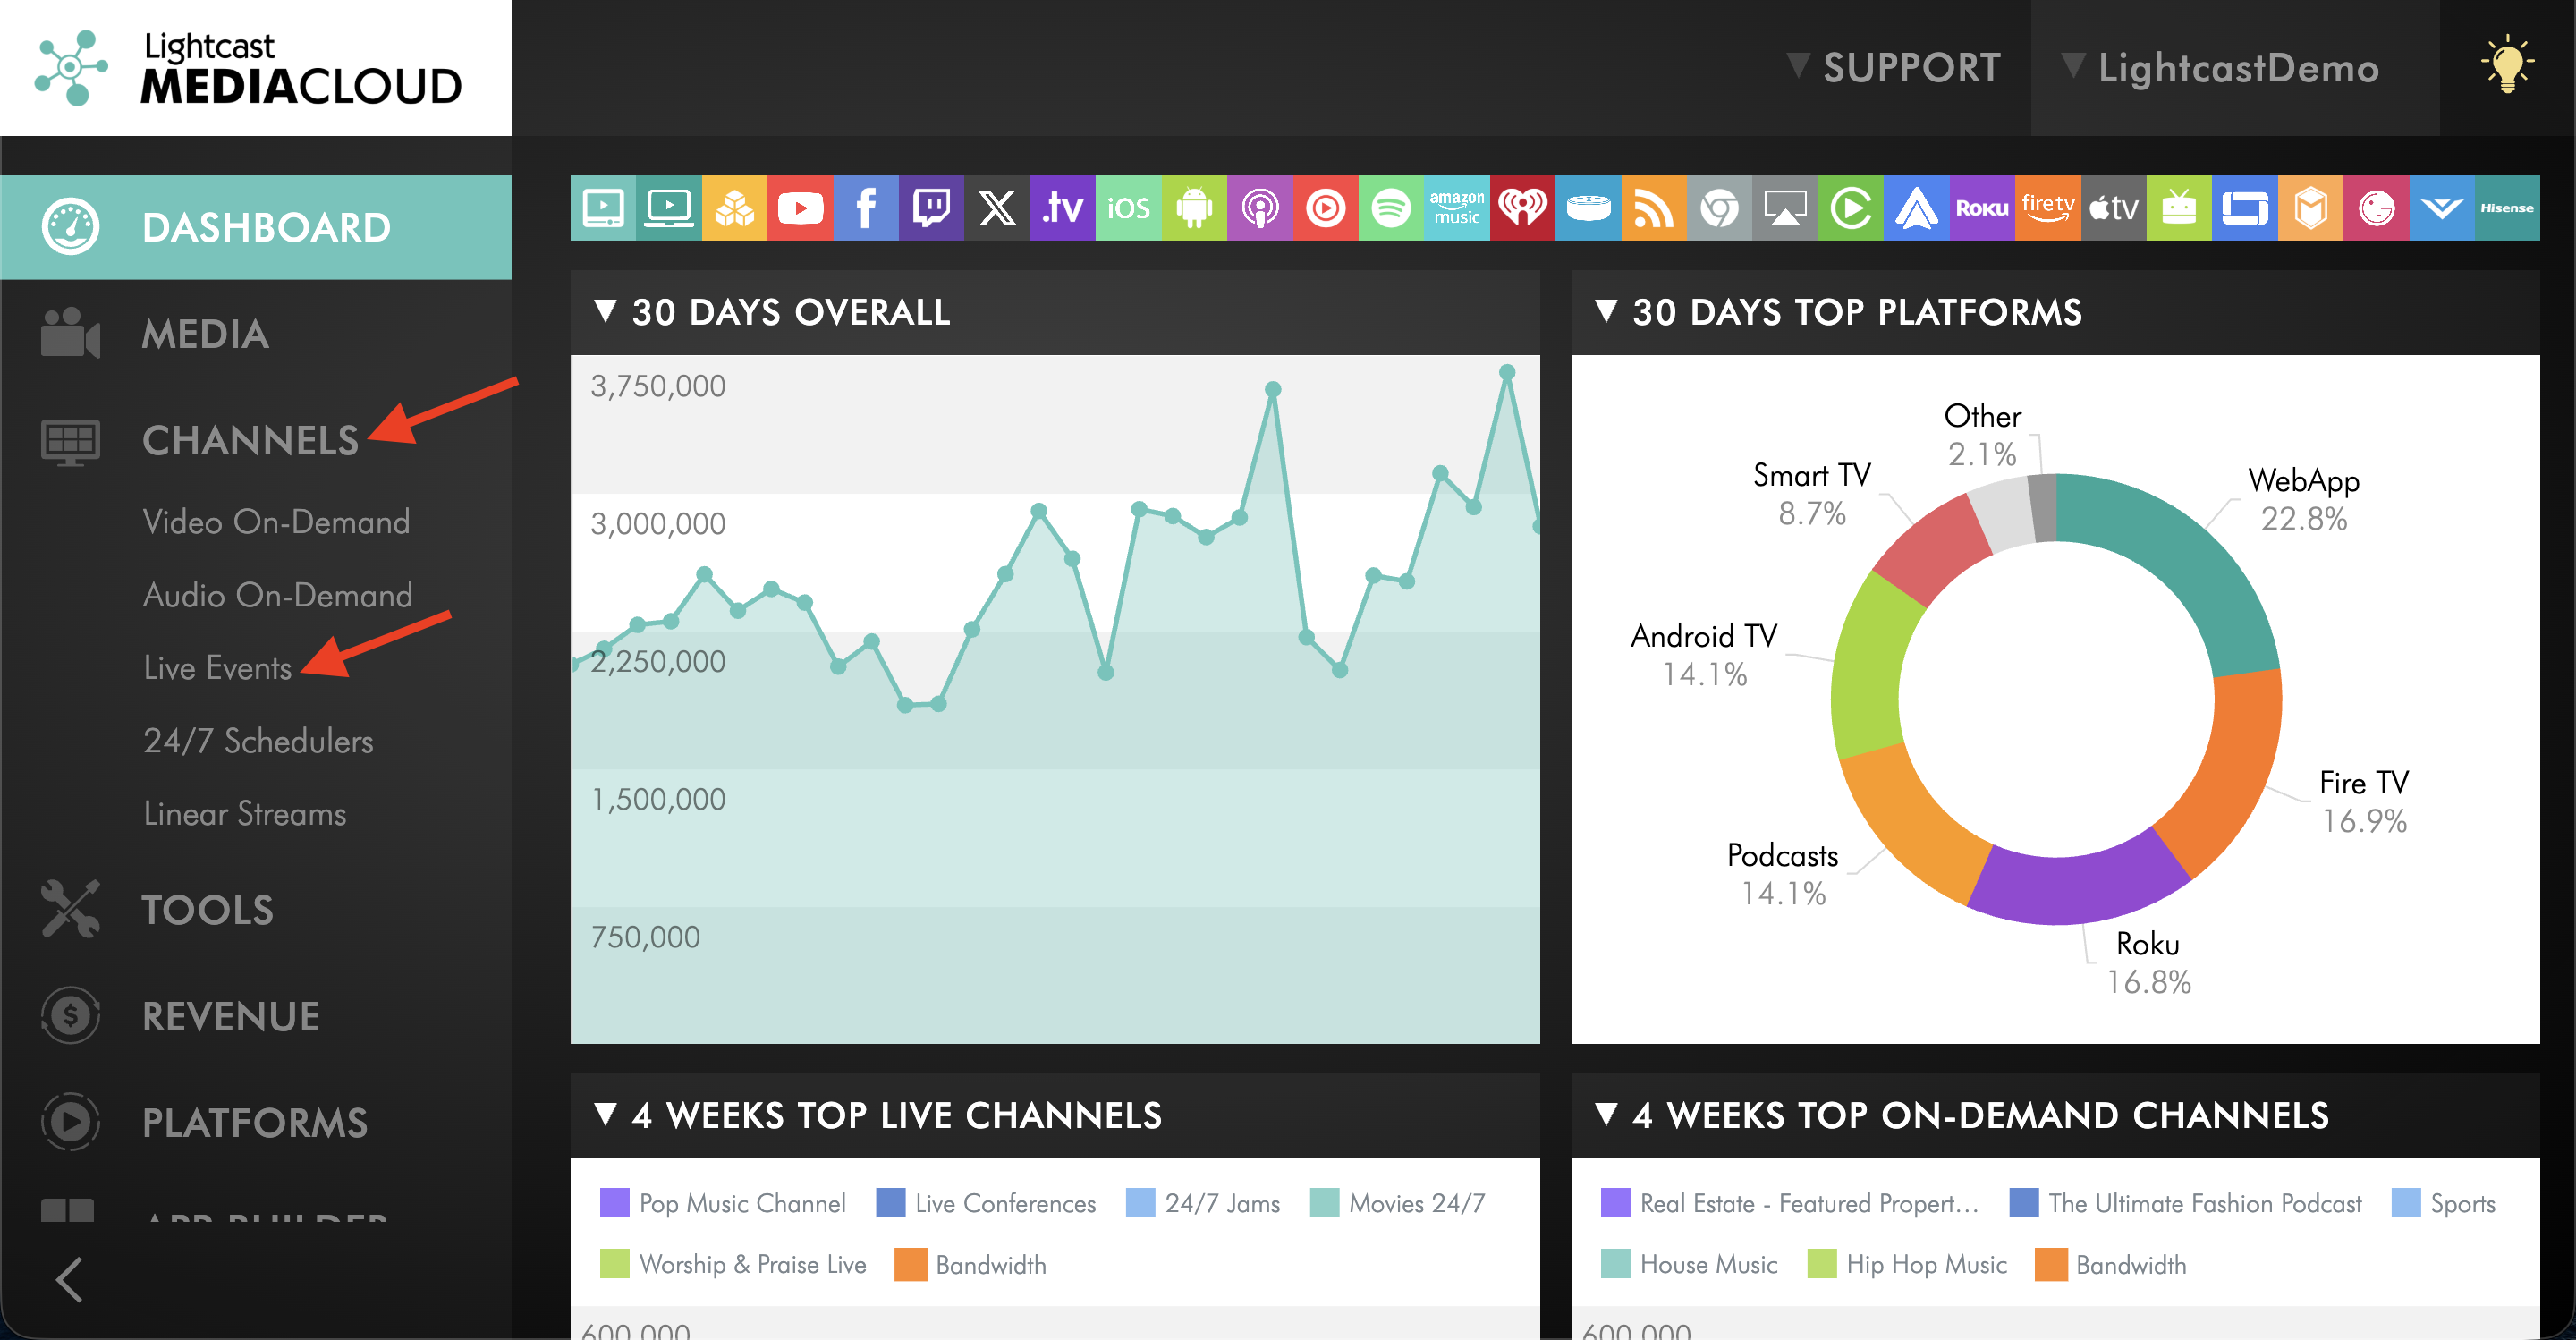
Go to CHANNELS, then select Live Events.
Step 3
Select the Live Events Channel that contains the scheduled Live Event.
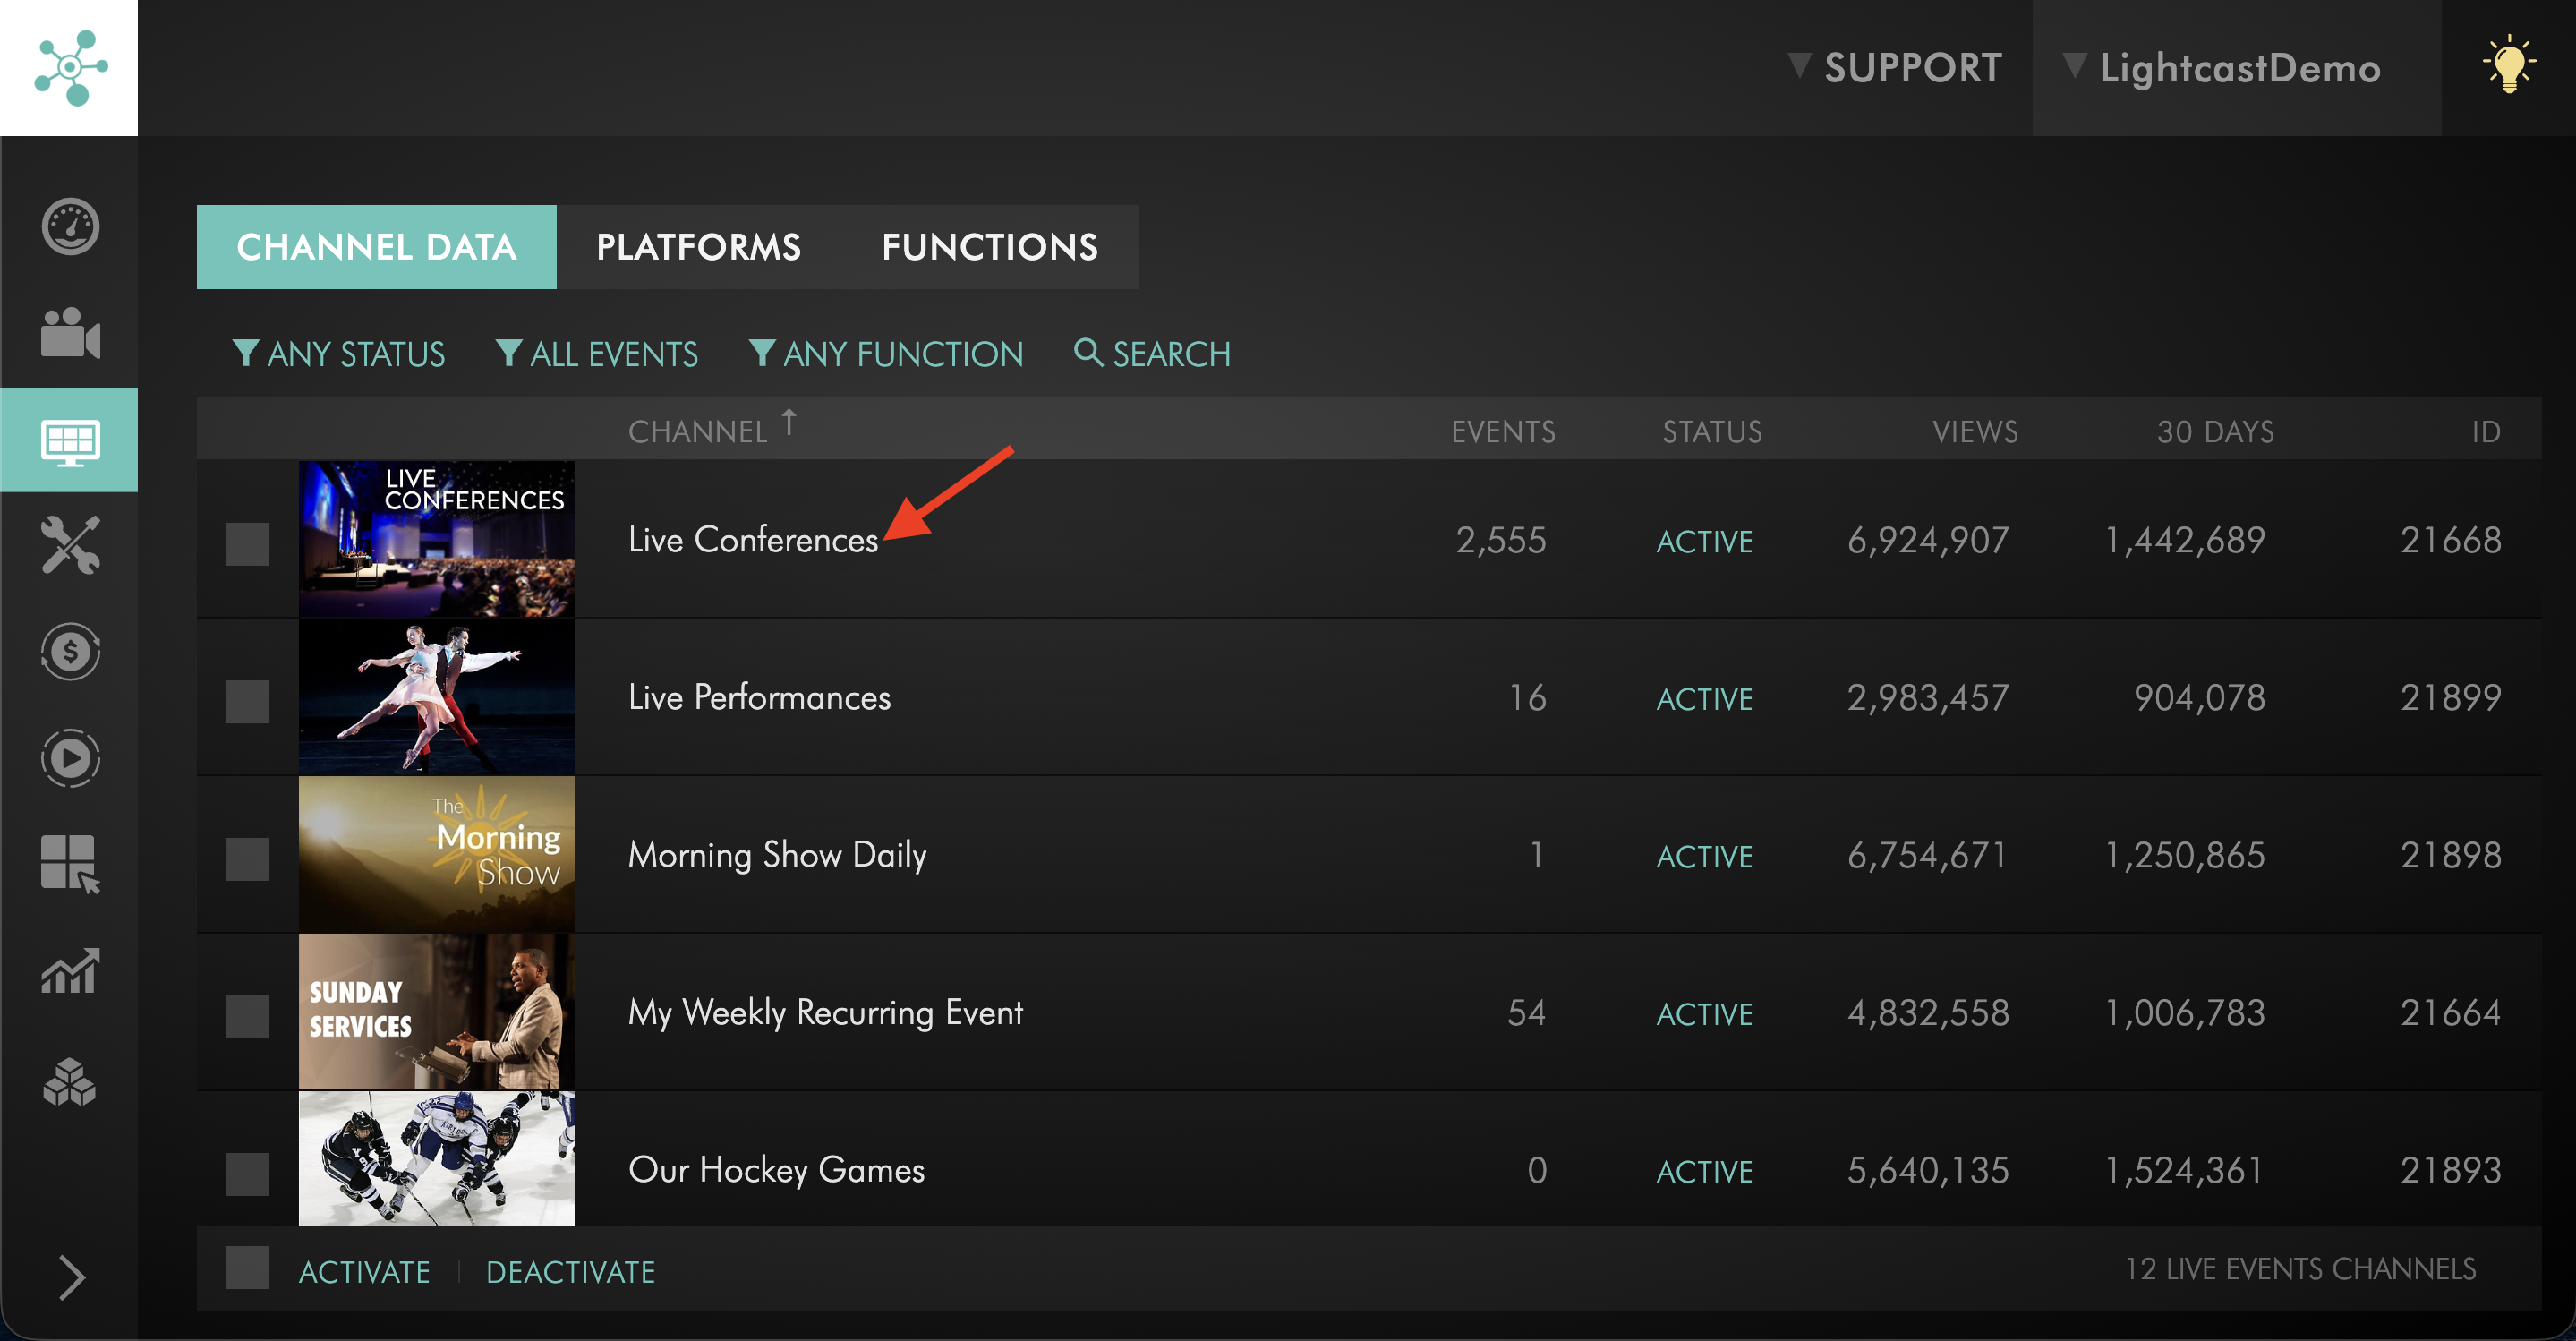
Step 4
Go to the EVENTS tab.
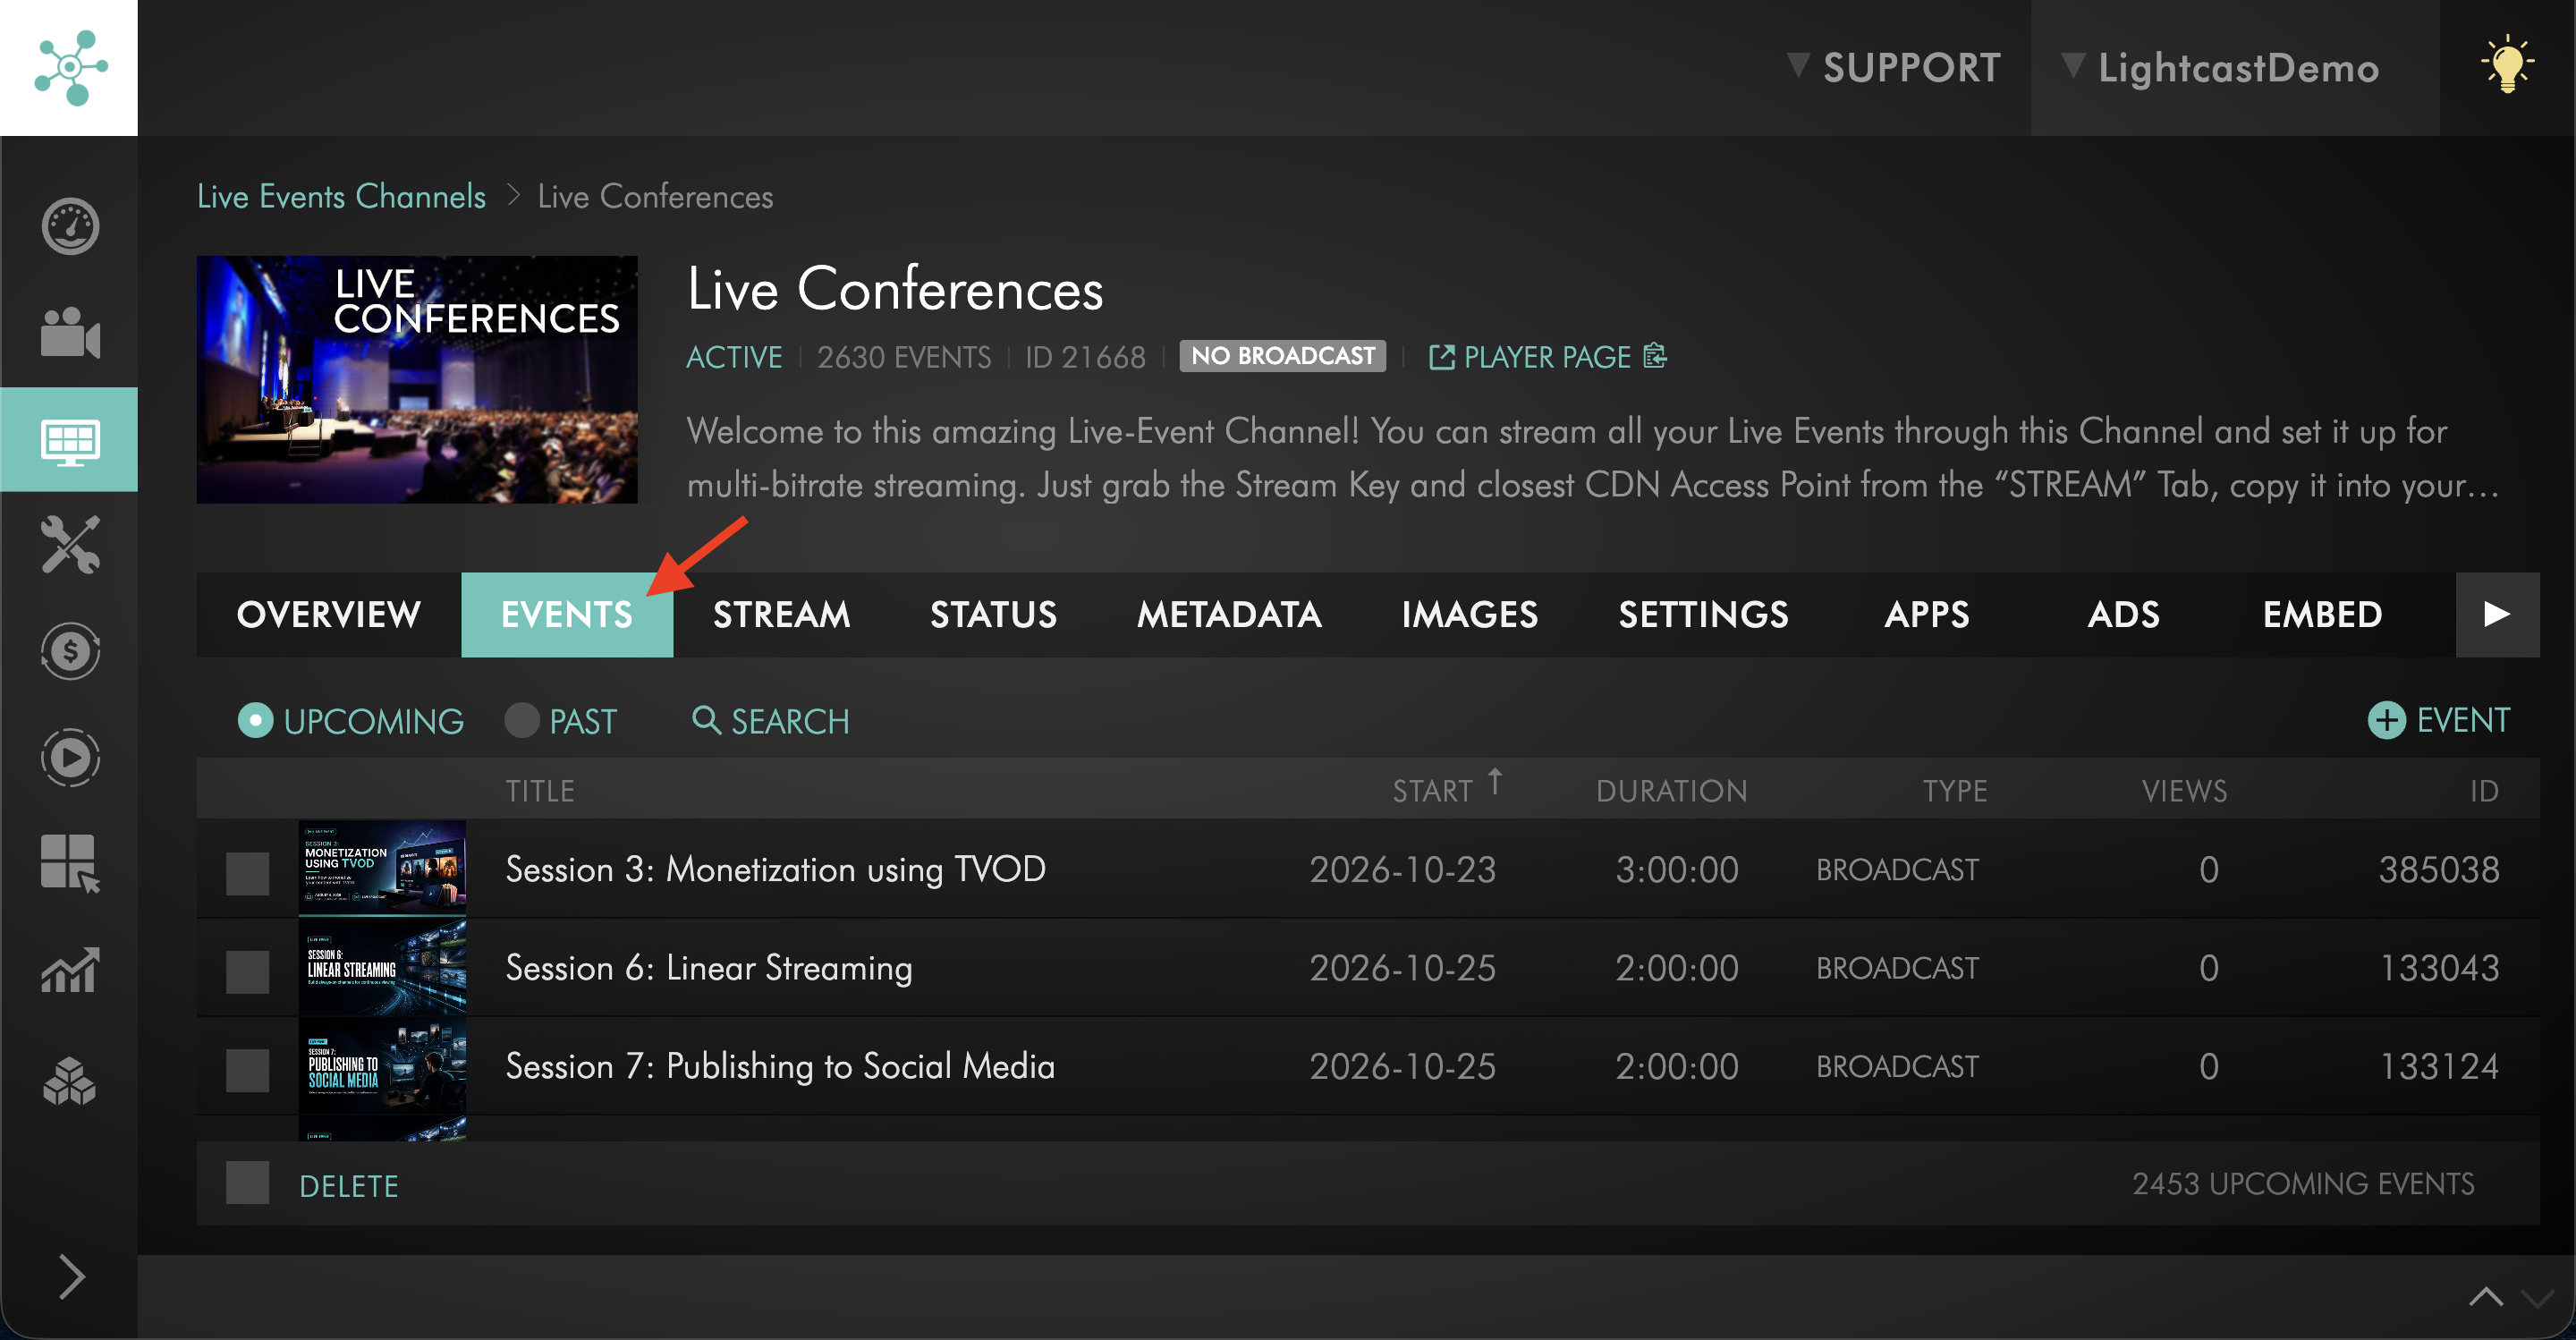
Step 5
Open the scheduled Live Event.
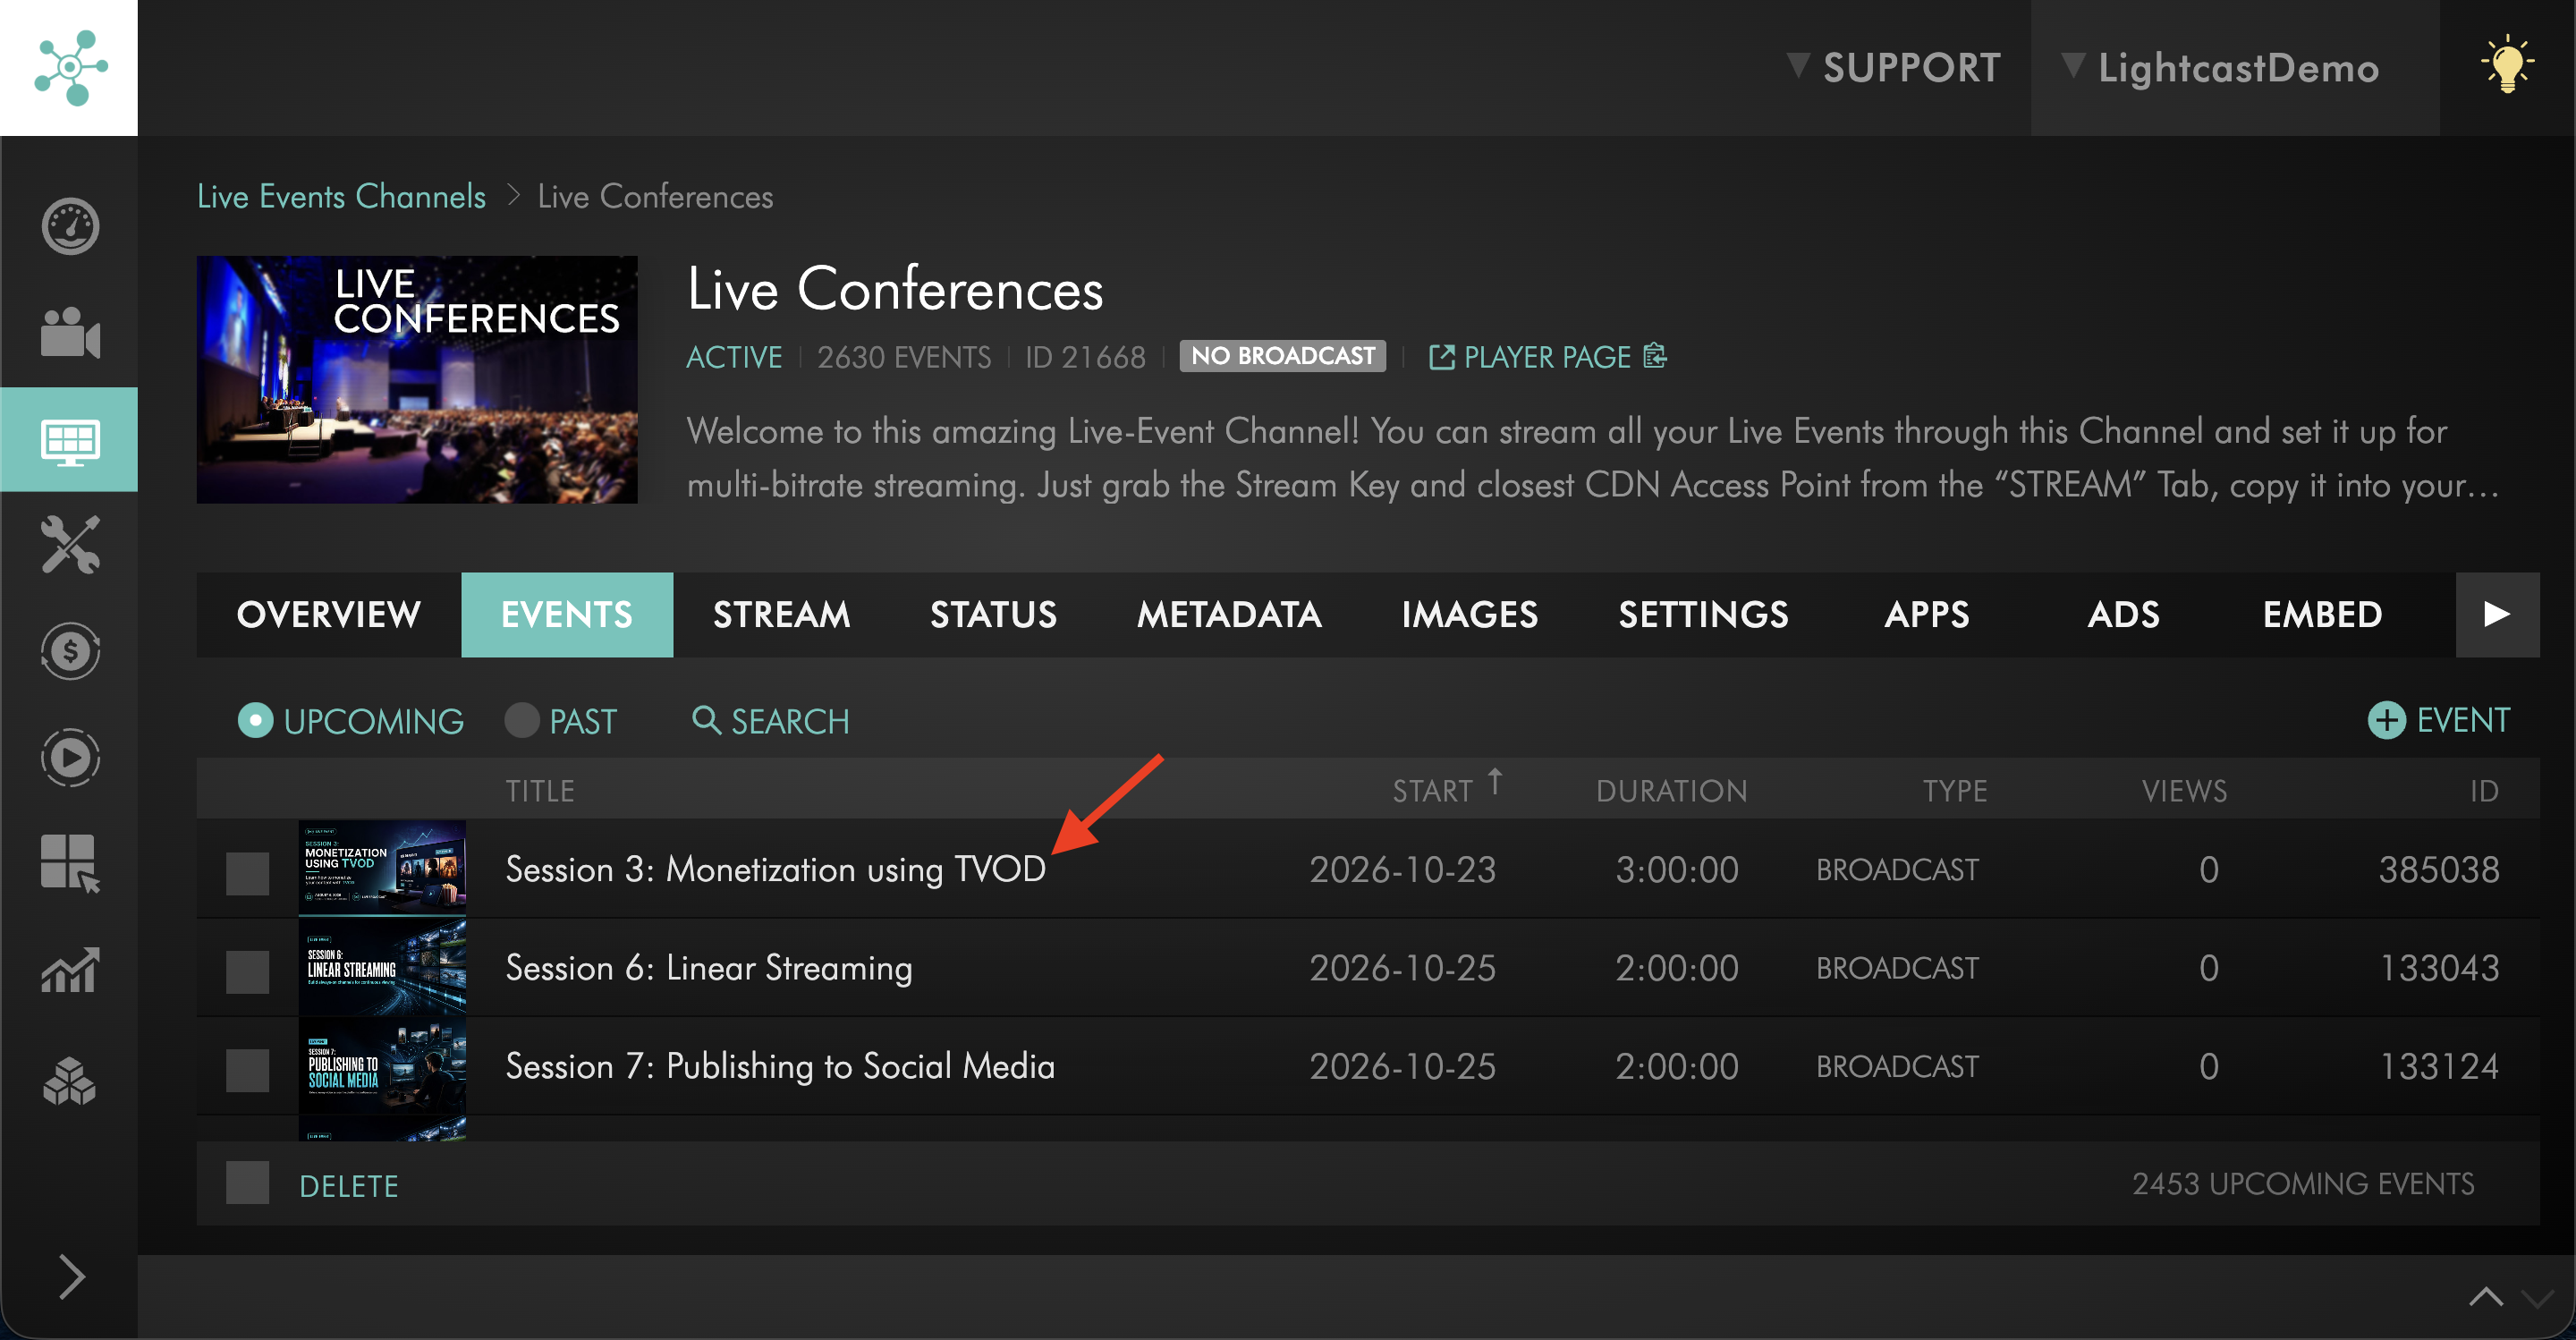
Step 6
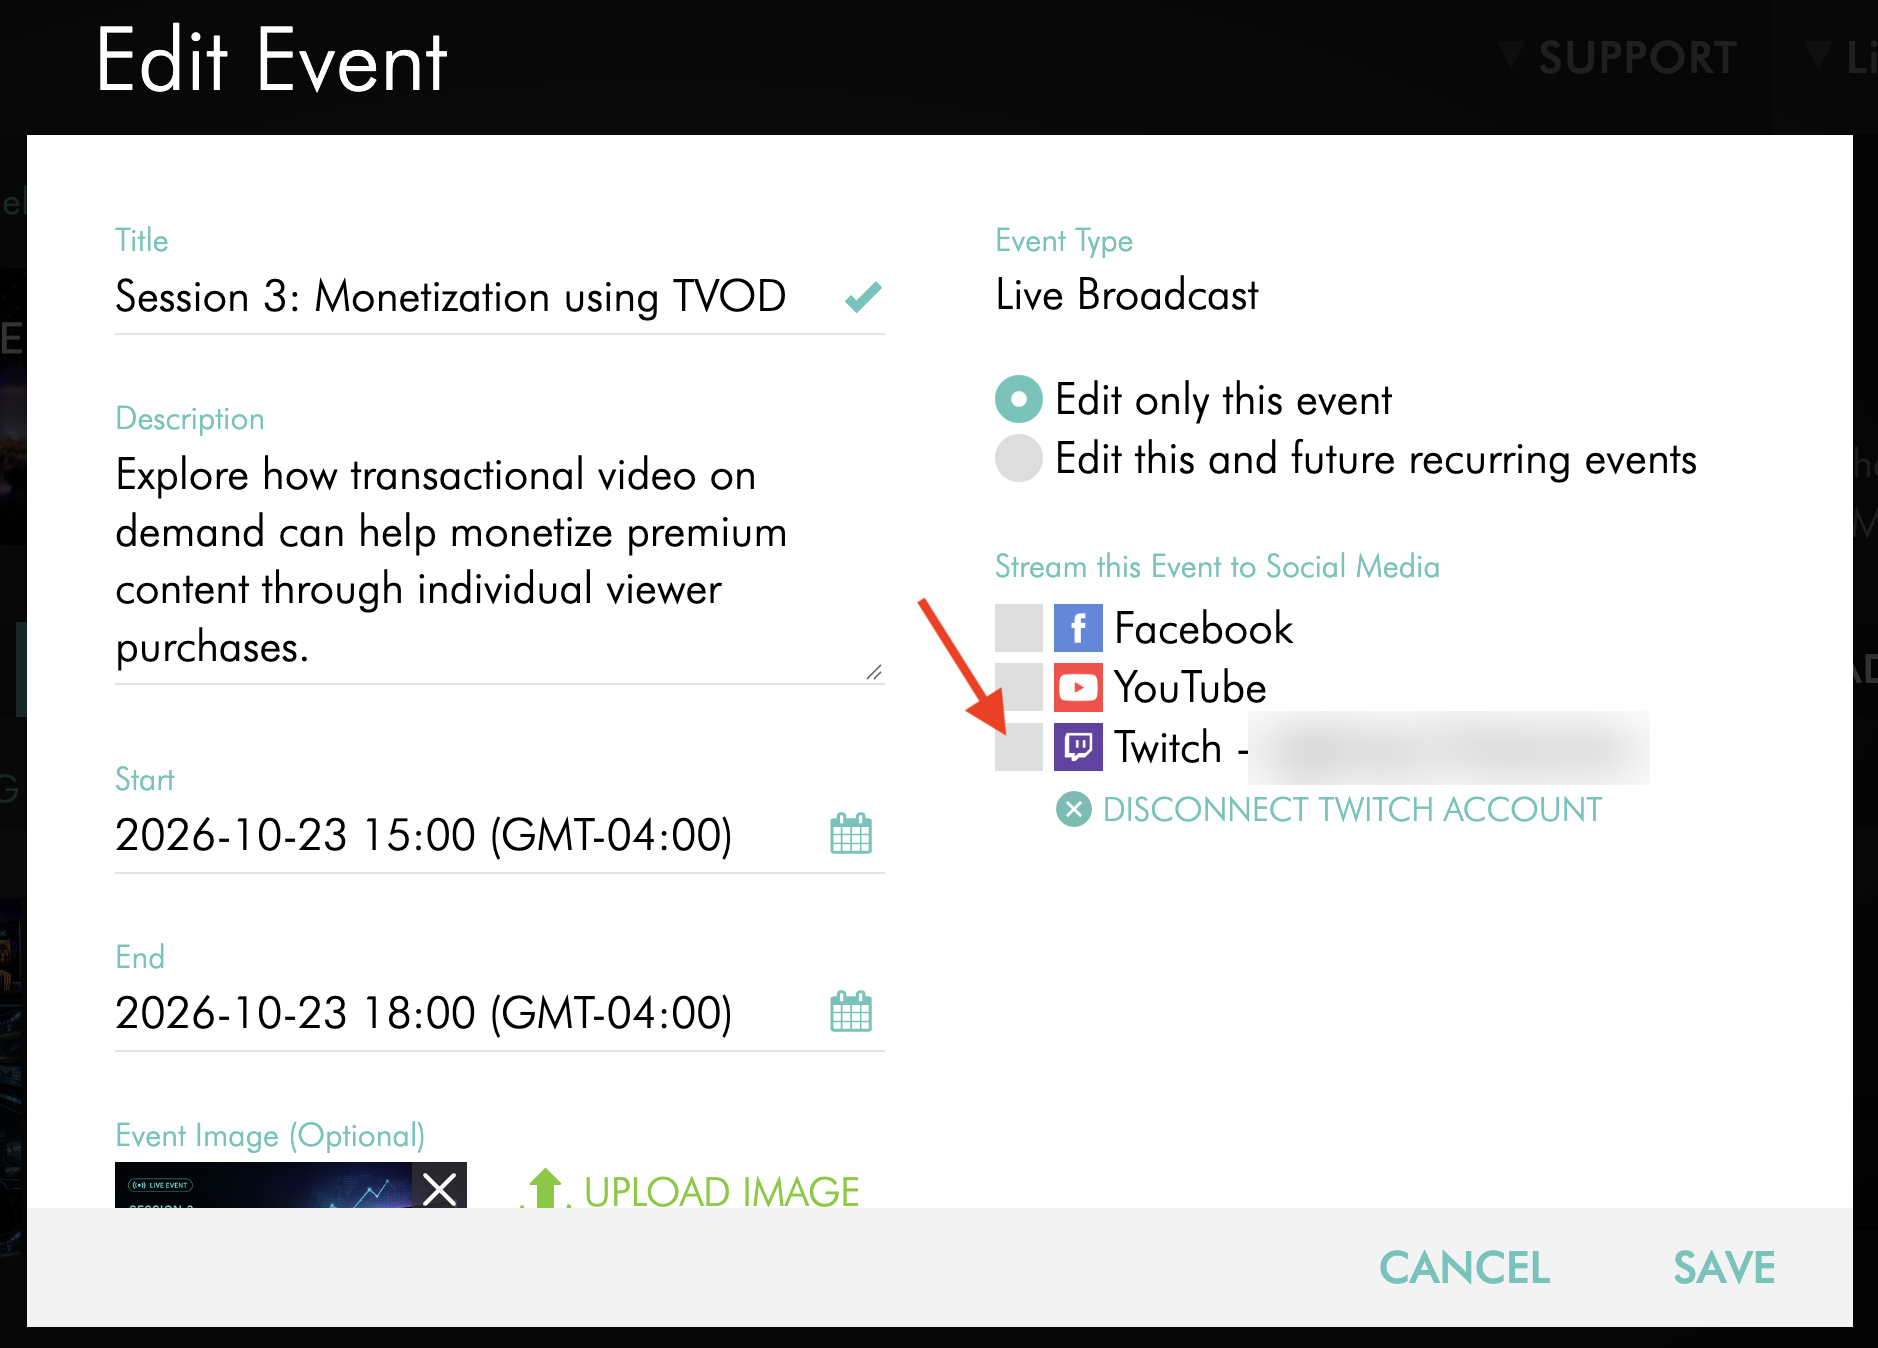
Locate the Twitch publishing option.
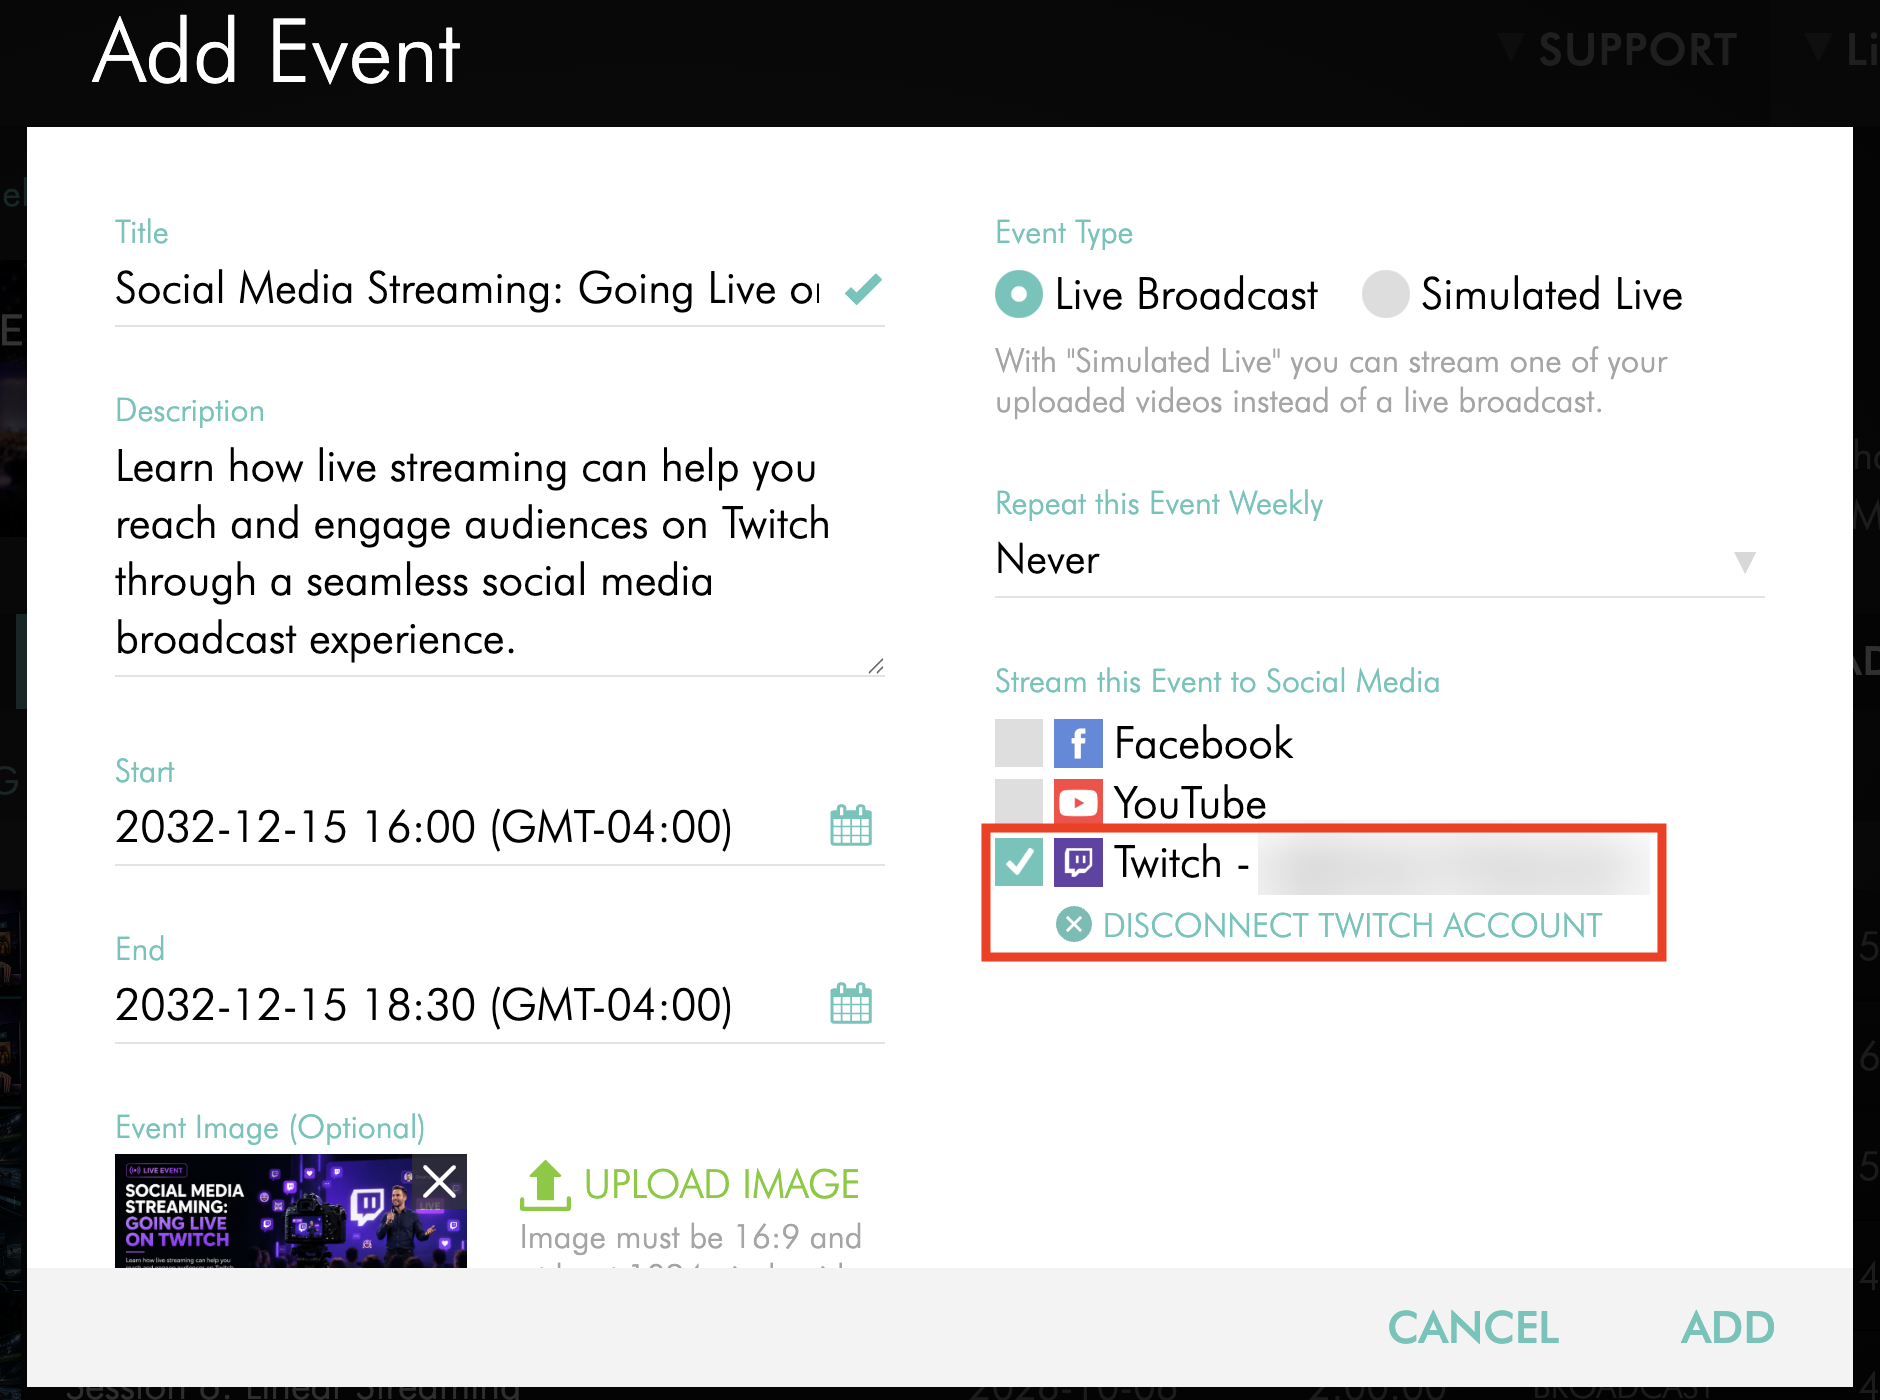
Step 7
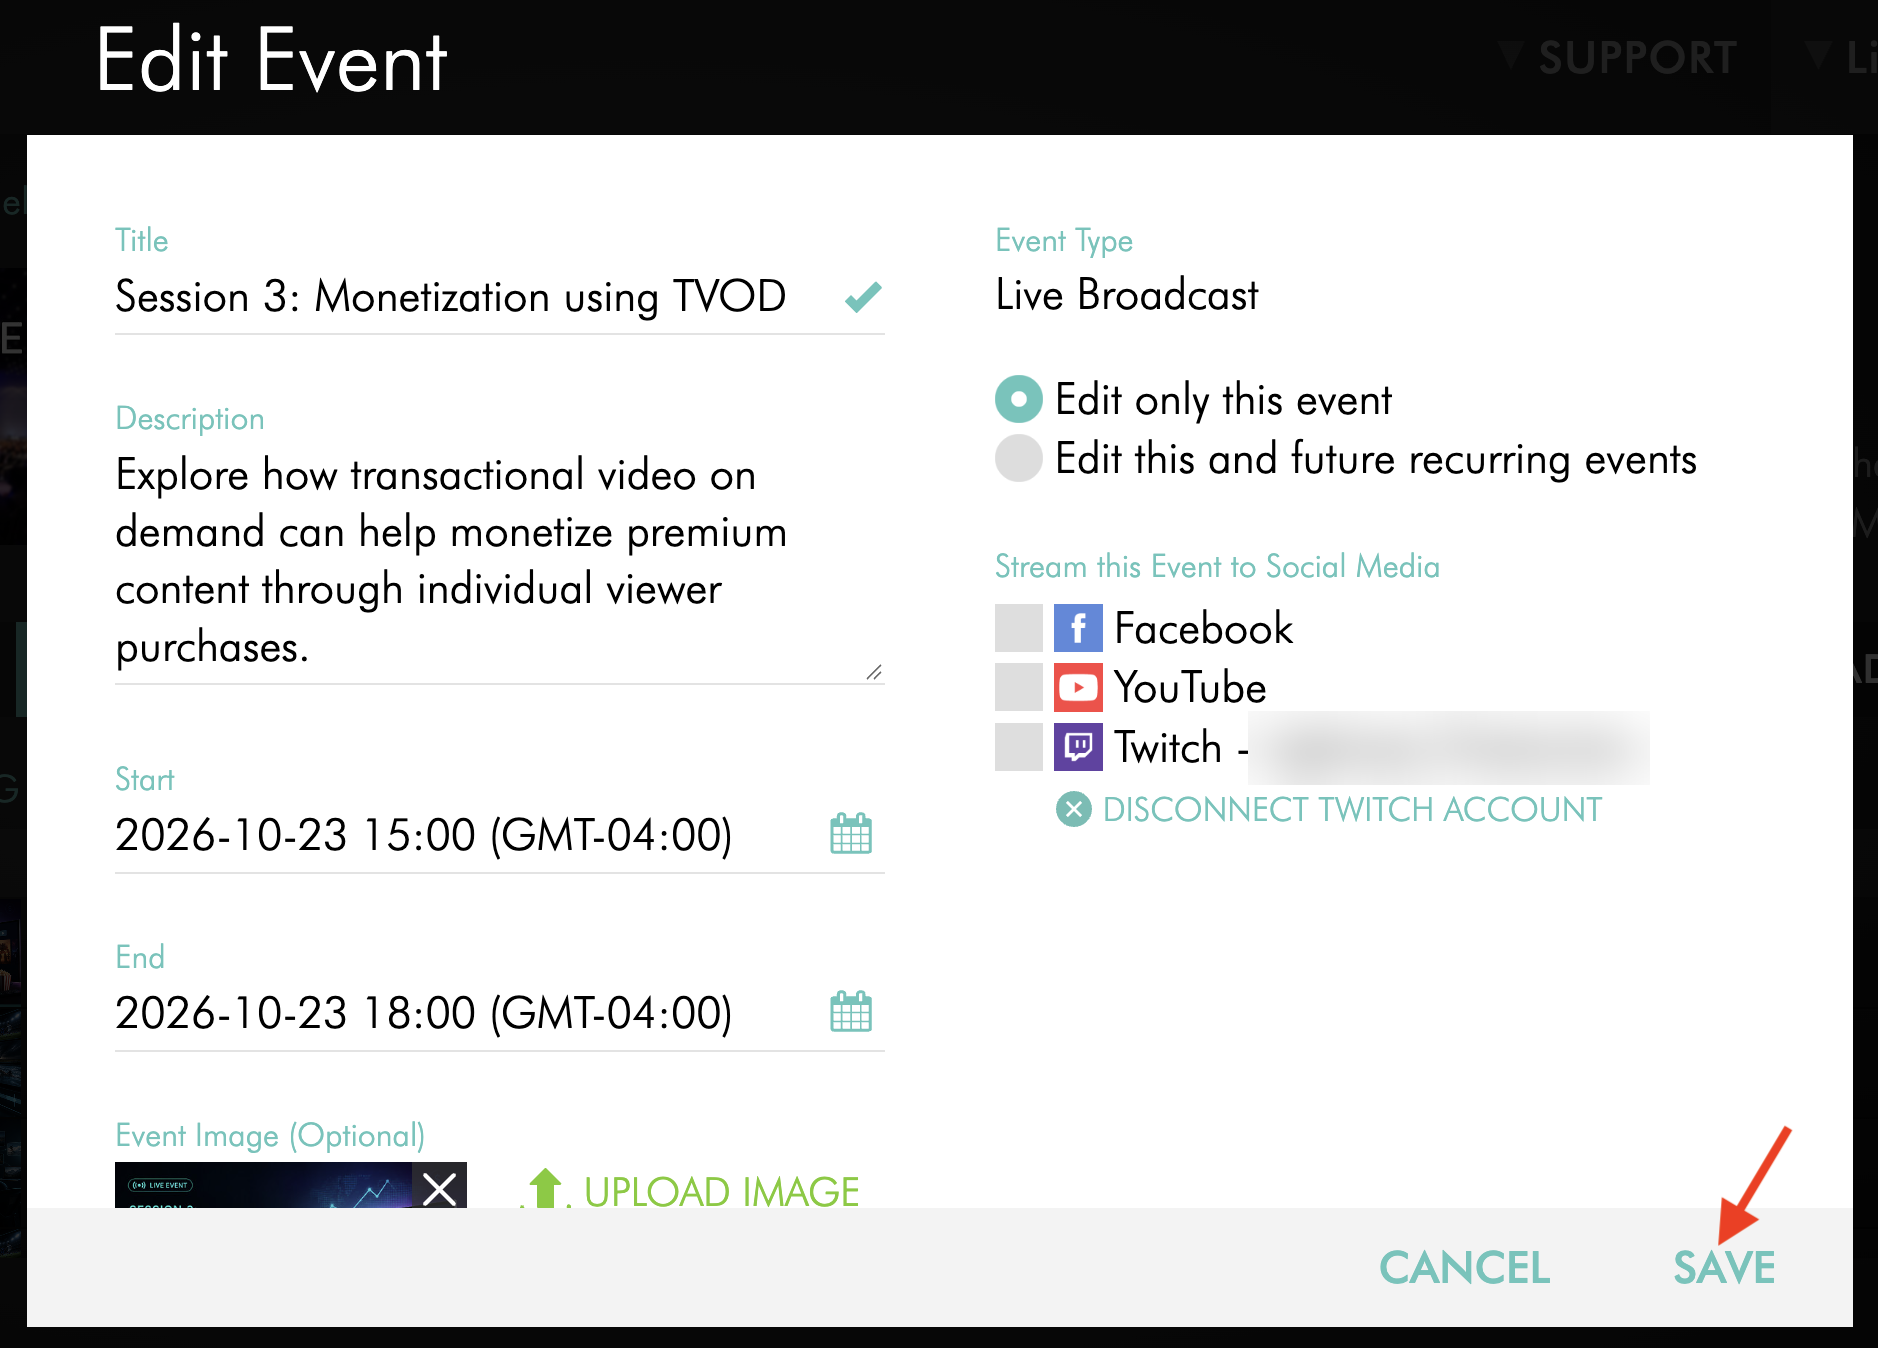
Deselect the Twitch publishing option.
Step 8
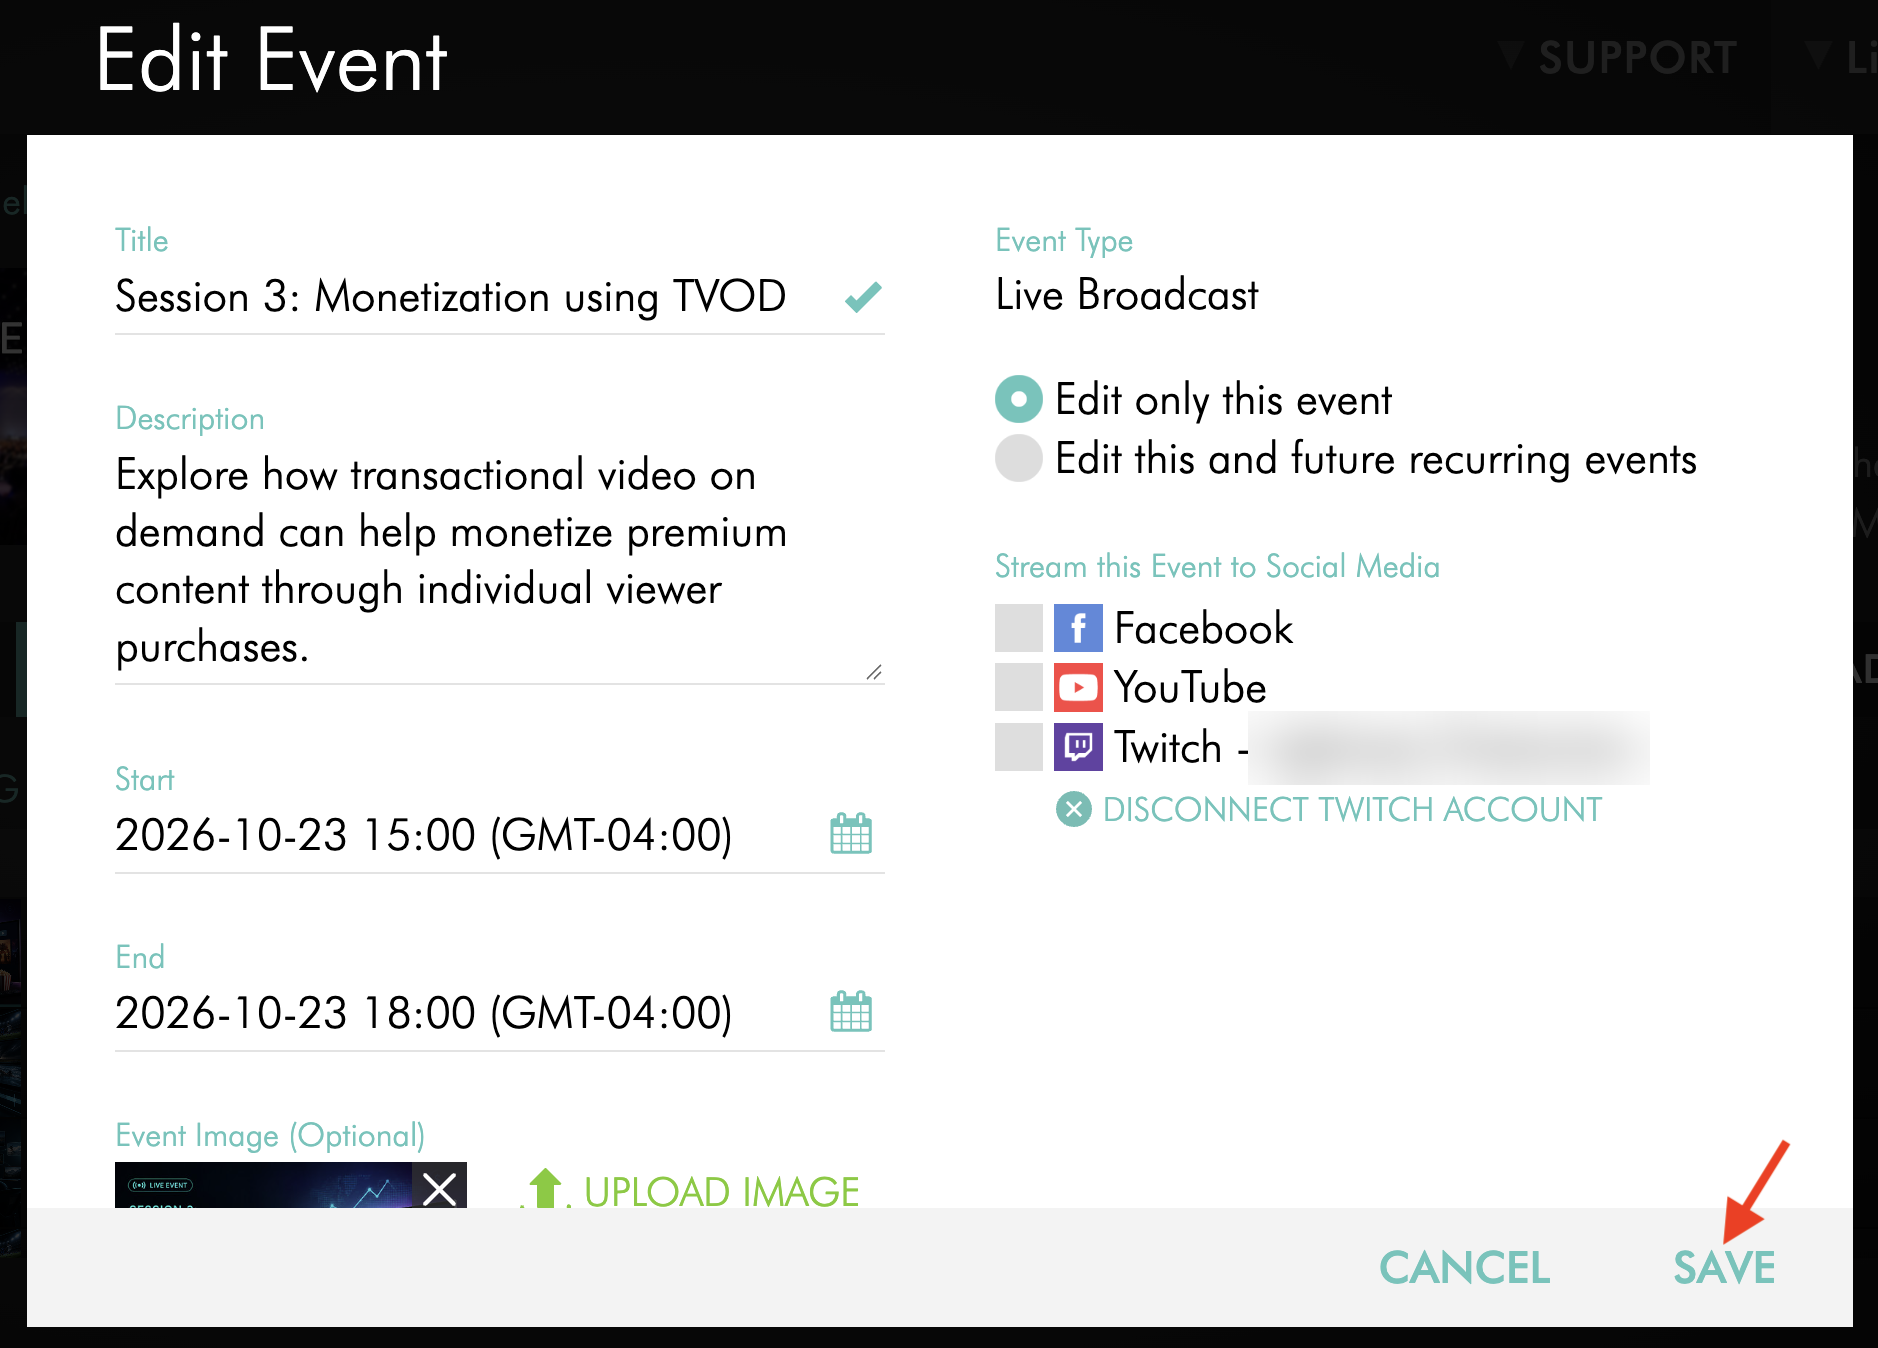
Click SAVE to save the changes.
After the event is saved, the Live Event remains scheduled in the Media Cloud but will no longer be configured to publish to Twitch.
Stop Twitch publishing after the Live Event begins
If you are broadcasting an encoder-based Live Event, stop sending the source stream from your encoder when you are ready to end the broadcast.
Stopping your encoder ends the source stream sent to the Media Cloud and may also interrupt other destinations receiving that same stream.
If you need to end the scheduled Live Event before its configured end time, deleting the Live Event from the Media Cloud may stop the outgoing stream to Twitch.
Important: Deleting a Live Event removes it from the Media Cloud and may interrupt broadcasting to other connected destinations. Only use this option if you intend to stop or remove the entire scheduled event.
If you are unsure how to stop Twitch publishing without affecting other destinations, contact Customer Support before stopping your encoder or deleting the scheduled Live Event.
Troubleshooting
This section covers common setup and authorization issues that may happen while connecting Twitch or configuring Twitch as a publishing destination.
The Twitch authorization window does not open
Make sure your browser allows pop-ups from the Media Cloud.
If the authorization window still does not open, try refreshing the page, using another supported browser, or checking whether a browser extension is blocking the Twitch pop-up.
The wrong Twitch account keeps reconnecting
Twitch may automatically reconnect the account already signed in through your browser.
If the wrong account keeps reconnecting, sign out of Twitch in your browser, then return to the Media Cloud and connect Twitch again.
The Twitch connection is no longer authorized
If the Twitch connection is no longer authorized, the Media Cloud may be unable to publish your Live Event to Twitch.
Disconnect the Twitch account from the Live Events Channel and reconnect it through the Twitch publishing workflow.
Review the authorization prompts and make sure the intended Twitch account is connected.
Keep in mind that changing the account connection may affect other scheduled Live Events within the same Live Events Channel.
The Live Event does not appear on Twitch
Confirm that:
The Live Event was saved with Twitch selected as a publishing destination.
The intended Twitch account is connected and authorized.
The Twitch account is eligible to broadcast and is not subject to a streaming suspension.
The scheduled Live Event has begun.
For encoder-based Live Events, the Media Cloud is receiving the source stream.
You can also use Twitch Inspector to review streaming activity and connection health information reported by Twitch.
If the Media Cloud is not receiving the source stream, see Troubleshooting encoder connection and buffering issues.
If the stream works through your Lightcast destinations but does not appear on Twitch, contact Customer Support for assistance.
FAQs
What Twitch requirements must be met before I can go live?
You need an active Twitch account that is permitted to broadcast live and meets Twitch's current account and streaming requirements.
Twitch may restrict live streaming based on account status, content policies, or other platform requirements.
For more information, see Twitch Help: Why Can't I Stream?.
Can I connect multiple Twitch accounts to my Media Cloud account?
Yes. You can connect different Twitch accounts to different Live Events Channels within your Media Cloud account.
However, each Live Events Channel can have only one connected Twitch account at a time.
If you want to publish through a different Twitch account using the same Live Events Channel, disconnect the currently connected account and authorize the new one.
Can I connect a different Twitch account to my Live Events Channel?
Yes. Disconnect the currently connected Twitch account and authorize the new account through the Twitch publishing option.
Before reconnecting, sign out of Twitch in your browser if needed so the correct account can be selected.
Changing the connected account may affect other scheduled Live Events within the same Live Events Channel.
Can I publish a 24/7 stream to Twitch from the Media Cloud?
Twitch publishing through the Media Cloud is designed for scheduled Live Events and Simulated Live Events, rather than continuous 24/7 streaming.
For continuous 24/7 programming, you can use a 24/7 Scheduler or Linear Stream to deliver content to supported Lightcast destinations, such as your website and apps.
Is there a duration limit for Twitch live broadcasts?
Yes. Twitch currently limits individual live broadcasts to 48 hours.
This limit is set by Twitch and may change.
For more information, see Twitch Help: Broadcasting Guidelines.
Can I test Twitch publishing from a trial account?
No. Trial accounts cannot be connected to Twitch for automatic social media publishing.
Twitch publishing is available for contracted Media Cloud accounts with access to the feature.
How does a Live Broadcast reach Twitch?
For a Live Broadcast, your encoder sends the source stream to the Media Cloud.
The Media Cloud then distributes the stream to Twitch for the scheduled Live Event.
Twitch controls playback and delivery to viewers after receiving the stream.
How does a Simulated Live Event reach Twitch?
A Simulated Live Event uses an existing video from your Media Archive instead of a live encoder source.
At the scheduled event time, the Media Cloud sends the selected video to Twitch as a live broadcast.
No encoder is required.
Twitch recommends clearly identifying prerecorded content as a Rerun so viewers understand what they are watching.
Can I stop a Live Event from publishing to Twitch before it begins?
Yes, while the event settings are still editable.
Open the scheduled Live Event, deselect the Twitch publishing option, and save the event.
Editing becomes unavailable less than 5 minutes before the scheduled start time or once the event has started.
What happens if I stop my encoder during a Twitch Live Event?
Stopping the encoder ends the source stream sent to the Media Cloud.
This may stop the broadcast on Twitch and affect any other destinations receiving the same source stream.
Only stop the encoder if you intend to stop the source stream for all destinations using it.
Can Lightcast subscriber authentication or paywalls be used for viewers watching directly on Twitch?
No. Lightcast subscriber authentication and subscription paywalls do not carry over to standard Twitch live playback.
Twitch manages viewer access and monetization according to its own platform settings and requirements.
If you want to maintain exclusive viewing access through Lightcast, only publish the event to destinations where your Lightcast access restrictions are enforced.
Why did my Twitch stream not go live?
Twitch may prevent a stream from going live if the account, authorization, content, or stream configuration does not meet its requirements.
Confirm that the correct Twitch account is connected, the scheduled event is configured correctly, and the Media Cloud is receiving the source stream if you are using an encoder.
For additional troubleshooting, review Twitch's Creator Dashboard or contact Customer Support.
Pricing
Live Streaming to Social Media is available on POWER packages and up.
If you don't have access to this feature, you can upgrade to one of our latest plans or contact your account manager.