
Troubleshooting poor video playback quality
Overview
This article explains how to troubleshoot poor video playback quality for videos uploaded to the Media Cloud, including videos that appear blurry, pixelated, or lower quality than expected when streamed through your players, apps, or other publishing properties.
It covers how the quality of your original video file, encoding, adaptive playback, and viewing conditions can affect the quality of your streamed content, as well as steps to identify and resolve common video quality issues.
When to use this article
Use this article if:
Your video appears blurry, pixelated, or lower quality than expected.
Your video looks clear when played locally but appears lower quality when streamed.
Video quality changes during playback.
Your video appears lower quality on certain devices, apps, or players.
You want to identify whether the issue is related to the original video file, encoding, or playback conditions.
For recommended video export settings, see Recommended export settings for VOD uploads.
How it works
Original video quality
The quality of a video streamed through Lightcast depends partly on the quality of the original file uploaded to the Media Cloud.
If the original video has a low resolution, insufficient bitrate, visible compression artifacts, or other quality limitations, those issues may also be visible during playback.
Encoding prepares videos for streaming across supported devices and platforms, but it cannot restore detail or improve the underlying quality of a low-quality original file.
For the best results, prepare and export your original video using appropriate settings before uploading it to the Media Cloud.
Encoding and adaptive playback
When you upload a video to the Media Cloud, Lightcast encodes the video into streaming versions at different resolutions and bitrates, depending on the original file and the applicable encoding configuration.
These streaming versions support Adaptive Bitrate Streaming (ABR), which allows compatible players to automatically adjust video quality based on the viewer's device, internet connection, and playback conditions.
For example, a video may initially start at a lower quality and switch to a higher-quality version as playback continues and the player's assessment of the available bandwidth improves.
If the viewer's internet connection slows down or becomes unstable, the player may switch to a lower-bitrate version to reduce buffering and maintain smoother playback.
As a result, the quality of a streamed video may vary during playback and may differ from the quality of the original video file played directly on your computer.
For more information, see Understanding media encoding in the Media Cloud.
Video resolution and image quality
A higher video resolution does not automatically guarantee better image quality.
For example, a video with a resolution of 1920 × 1080 (Full HD) may still appear blurry or pixelated if it was exported with an insufficient bitrate, excessive compression, or from a low-quality source.
Video quality is influenced by several factors, including:
The quality of the original recording.
Video resolution.
Video bitrate.
Video codec and compression.
The amount of movement and visual detail in the video.
Increasing the resolution of a low-quality video does not restore missing image detail. For the best results, use a high-quality original recording and the recommended export settings before uploading your video to the Media Cloud.
Viewing conditions
Video quality can also vary depending on the device, screen resolution, internet connection, and playback settings.
A video may appear sharper on one device than another, even when both devices are playing the same content.
When a player supports manual quality selection, choosing a higher playback resolution may improve image quality if the viewer's internet connection can support it.
Instructions
Check the original video file
Step 1
Locate the original video file that was uploaded to the Media Cloud.
Step 2
Open the file directly on your computer using a media player, such as VLC.
Step 3
Play the video and review its image quality, including resolution, sharpness, and any visible pixelation or compression artifacts.
Check whether the quality issue occurs throughout the video or only in certain sections.
Step 4
Compare the original file with the streamed version.
If the original file already appears blurry, pixelated, or low quality, the issue may be related to the original recording or its export settings.
If the original file looks clear but the streamed version appears lower quality, continue with the following checks.
Confirm that video encoding is complete
Step 1
Log in to your Media Cloud account.
Step 2
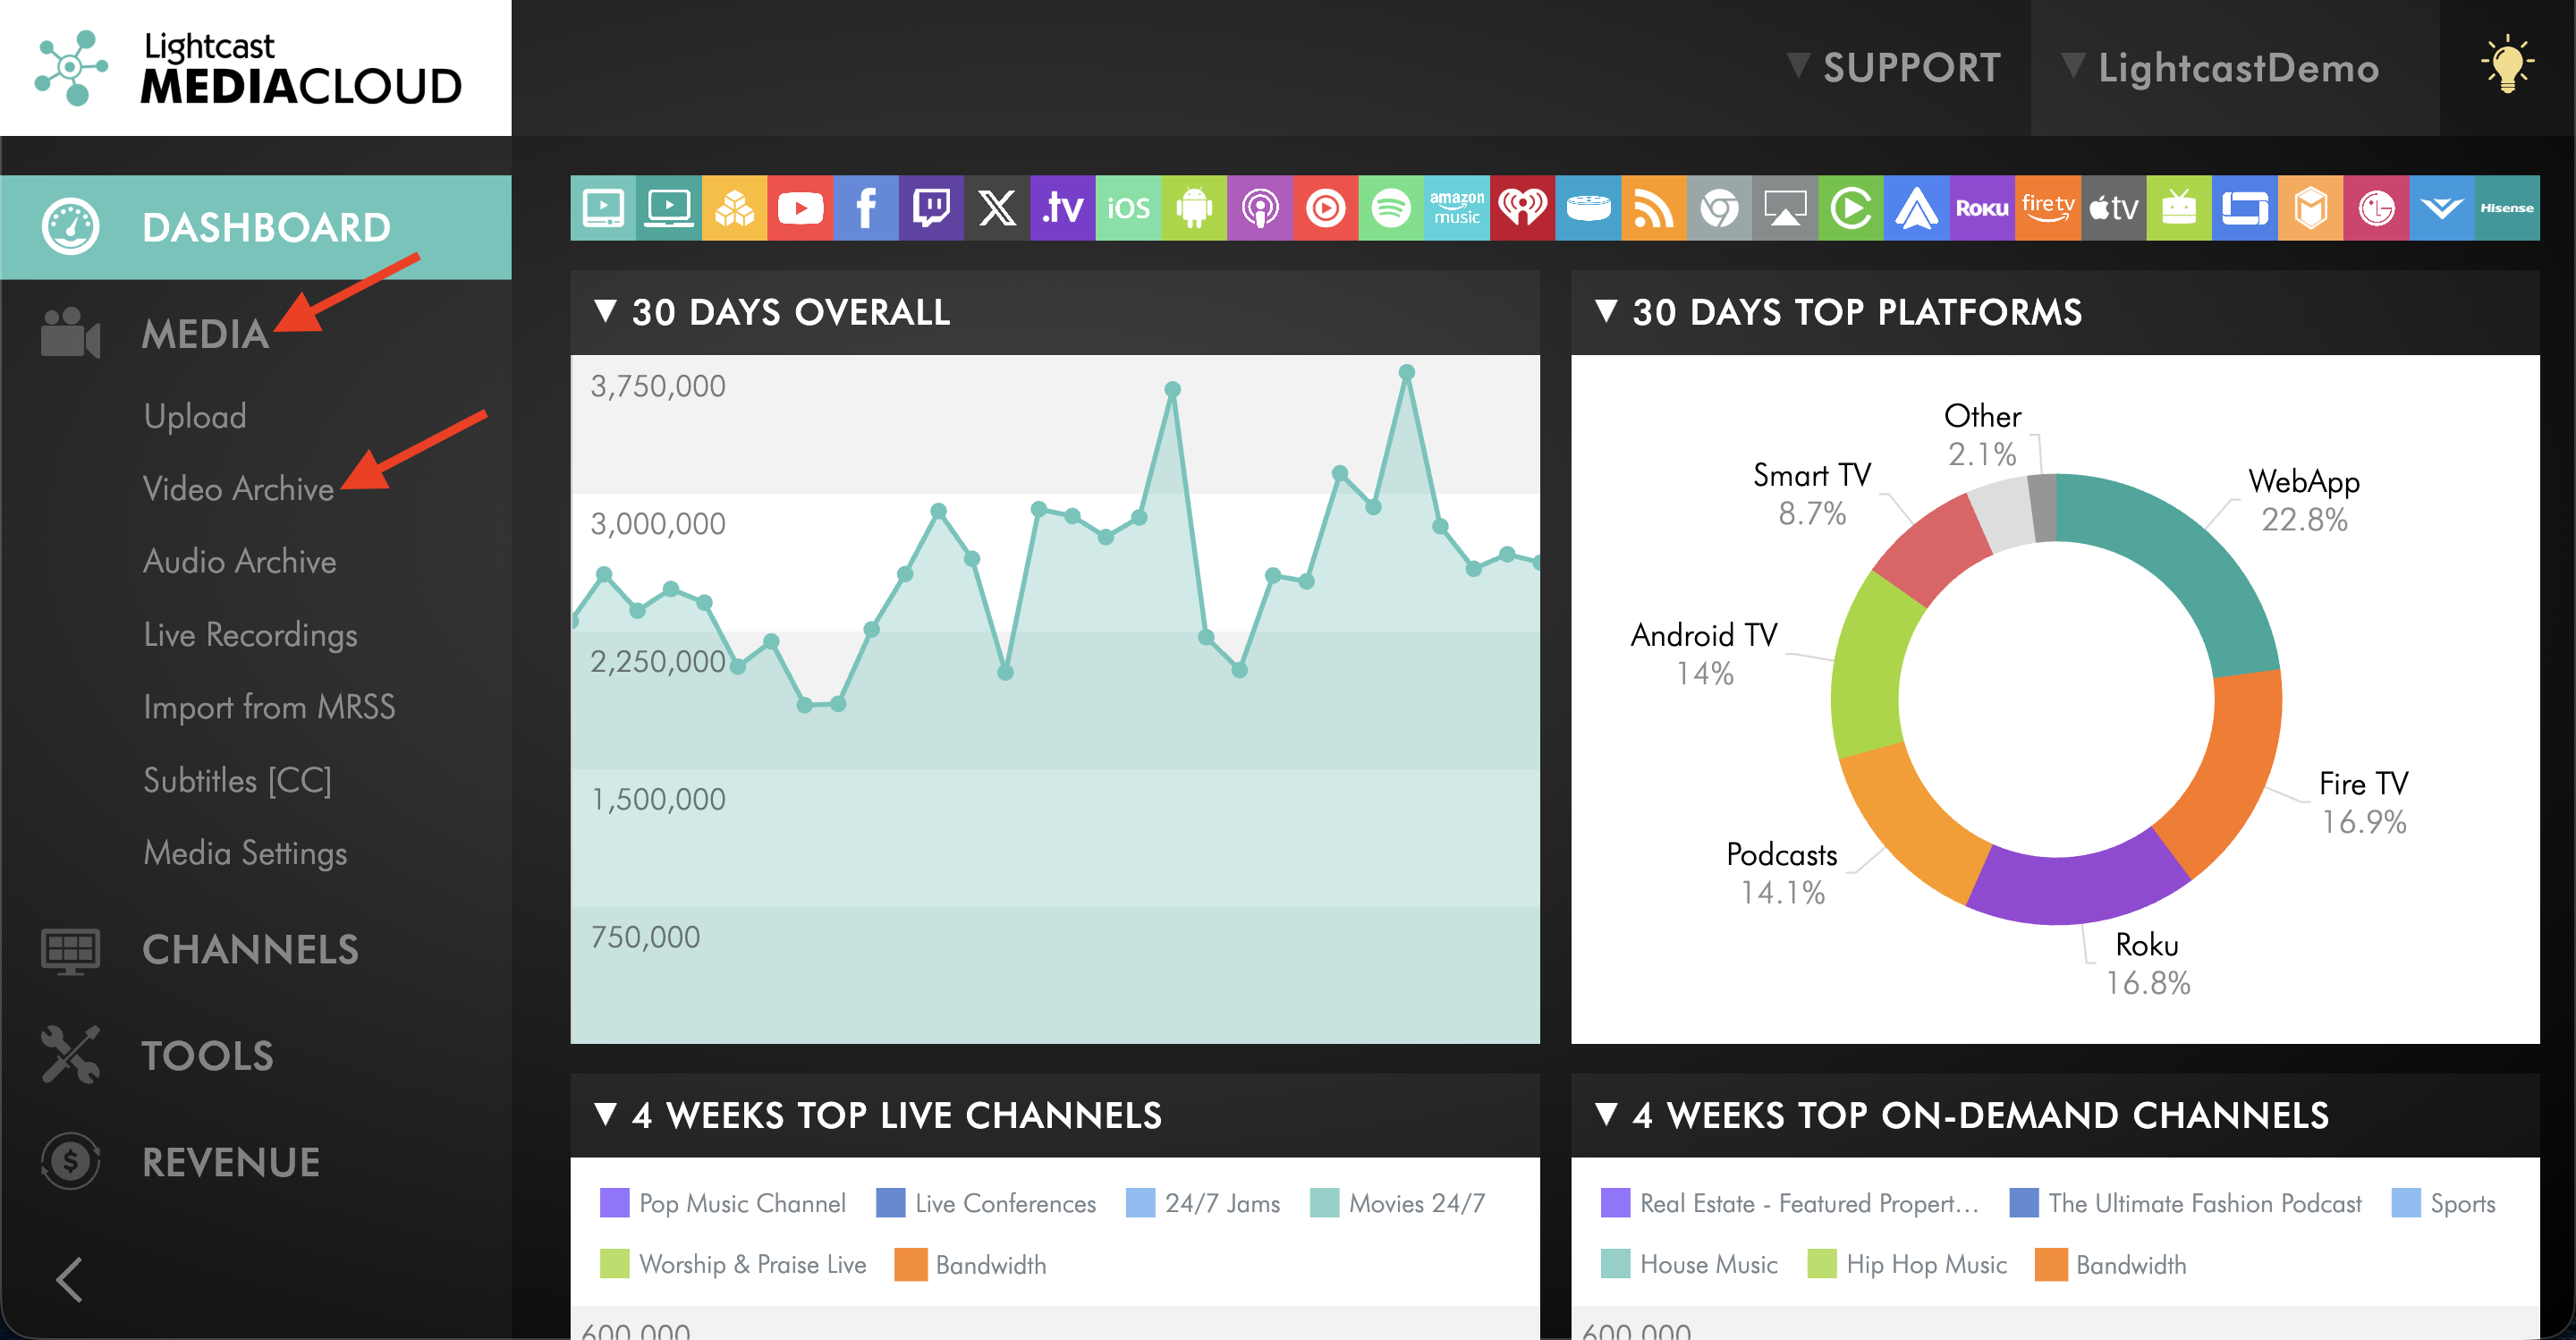
Go to MEDIA → Video Archive and locate the video you are experiencing quality issues with.
Step 3
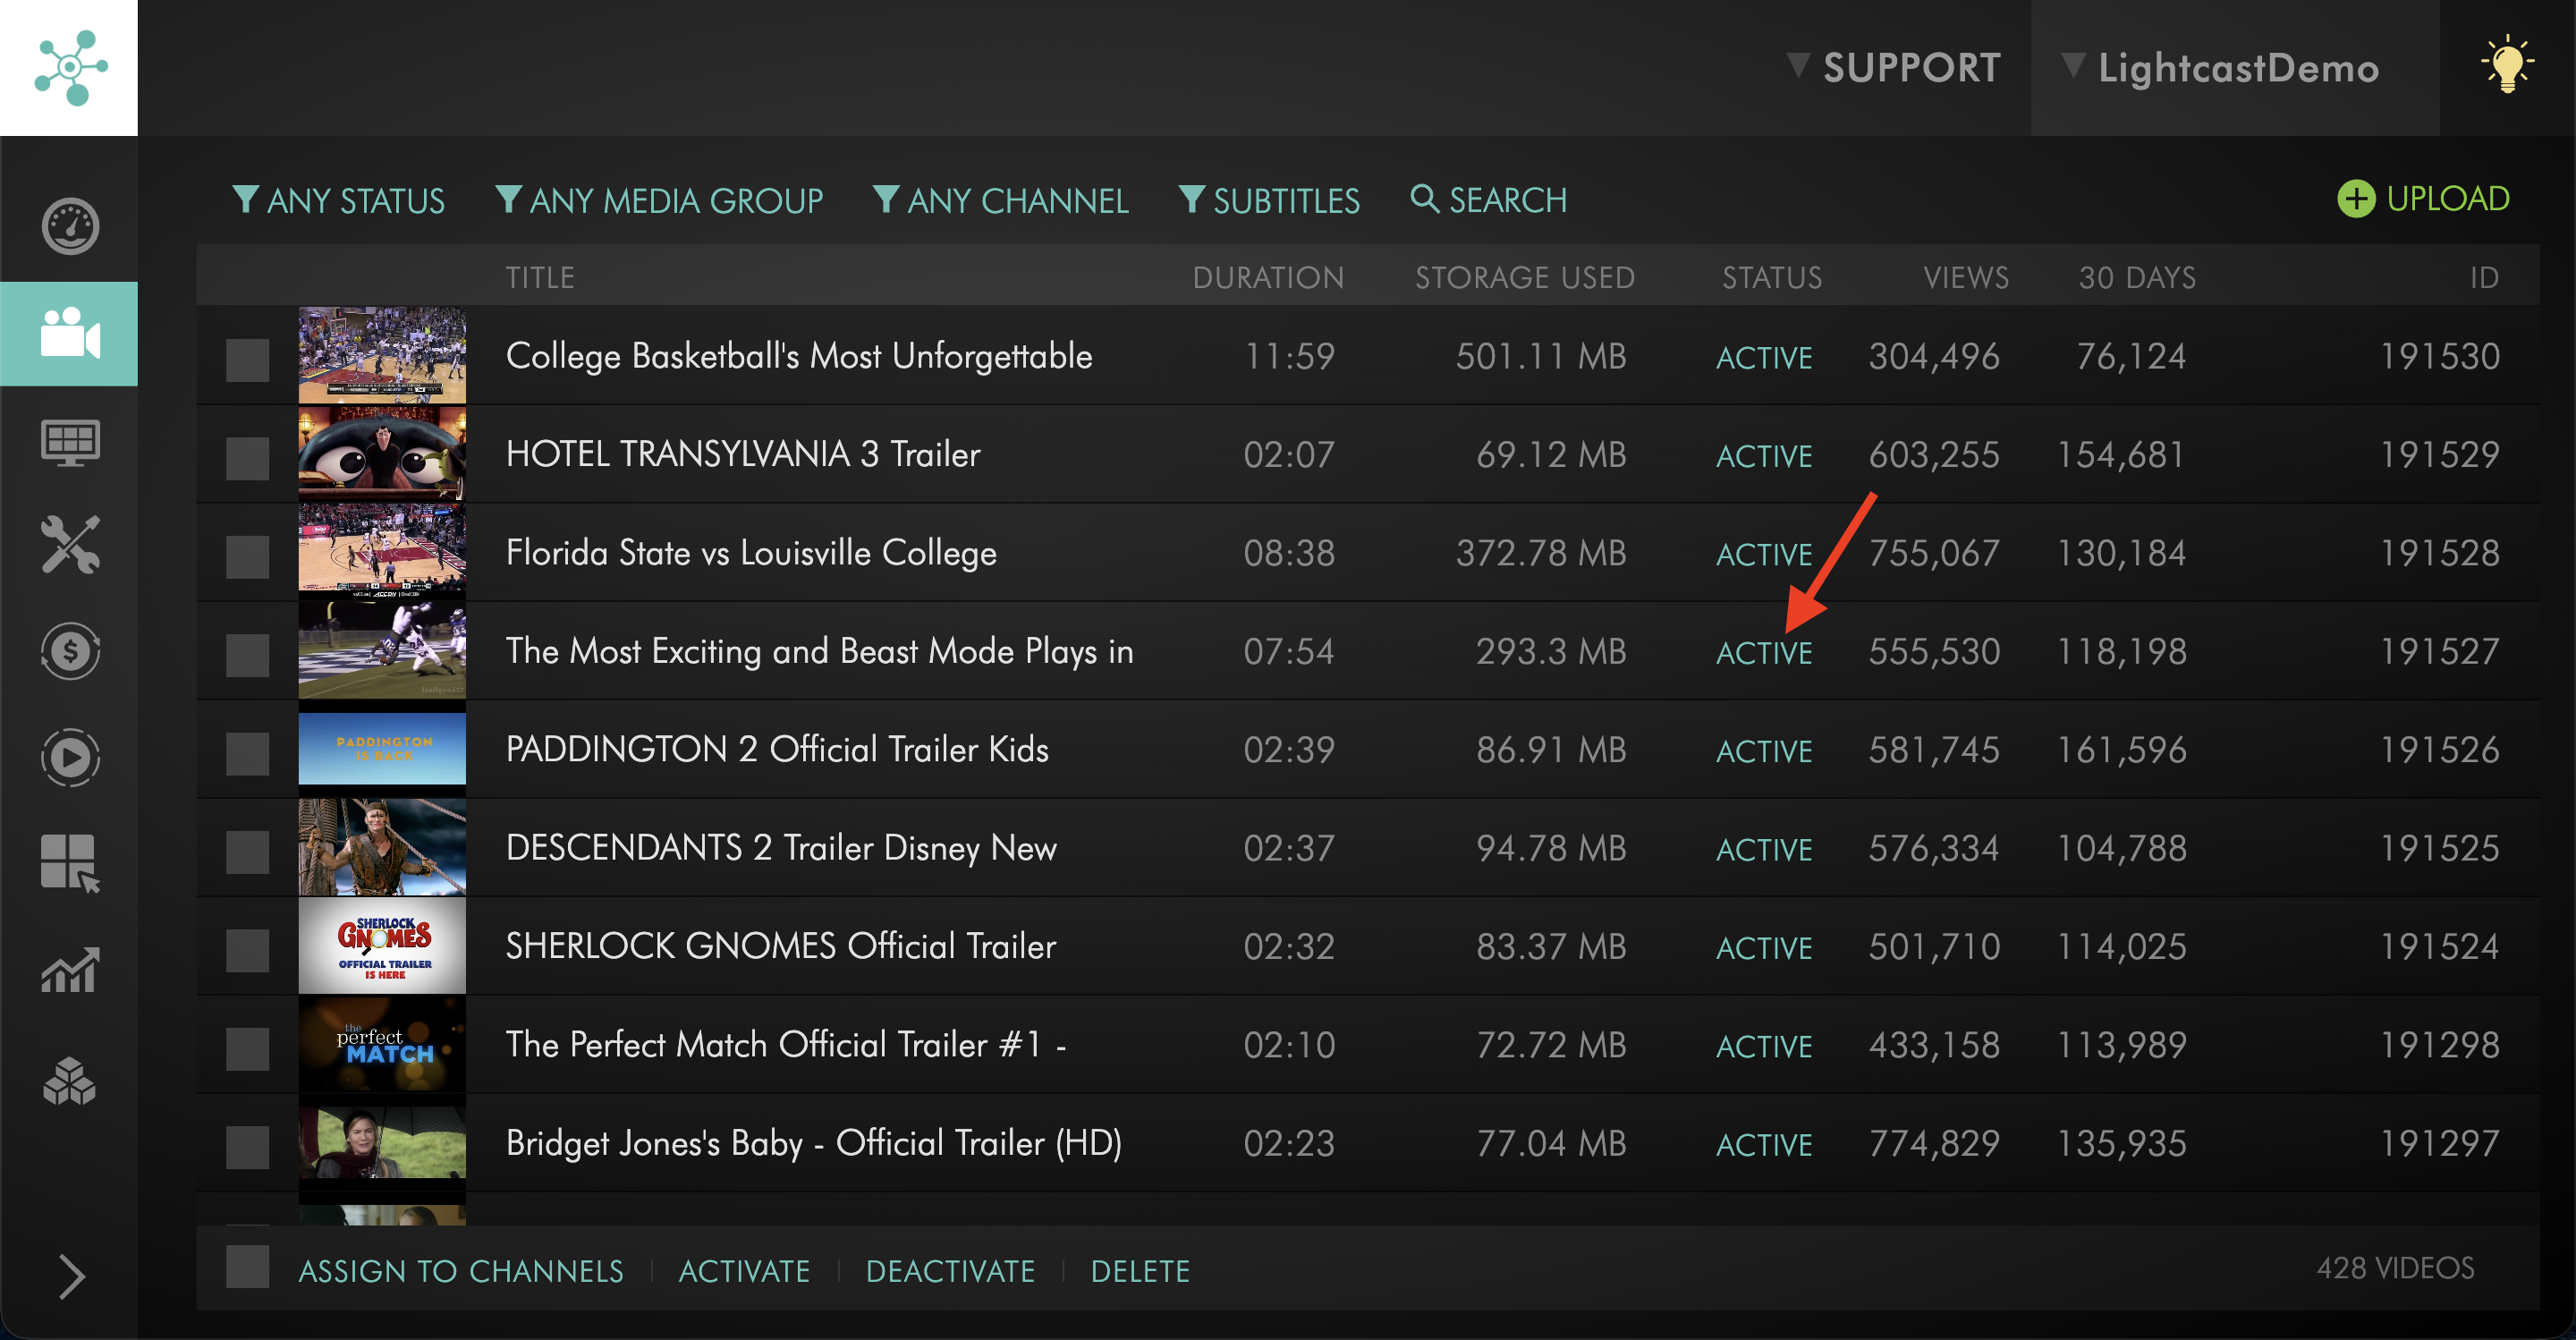
Check the media item's status to confirm that encoding is complete.
If the video is still ENCODING, wait until processing is finished and the media item becomes ACTIVE before evaluating its playback quality.
Step 4
Once encoding is complete, open the video in the applicable player or app and review the playback quality again.
If the video continues to appear blurry, pixelated, or lower quality than expected, continue with the following troubleshooting steps.
Check playback quality settings
Step 1
Open the video in the player or app where the quality issue occurs.
Step 2
Allow the video to play for a short time to determine whether the playback quality improves automatically.
Adaptive Bitrate Streaming (ABR) may initially deliver a lower-quality version before switching to a higher-quality version as playback continues.
Step 3
If the player supports manual quality selection, open the available playback quality settings and check which resolutions are available.
Step 4
Select the highest available resolution that your internet connection can support.
Step 5
Review the video quality again.
If the video appears clear at a higher resolution, the lower playback quality may have been related to adaptive playback or the available internet bandwidth.
If playback becomes unstable or starts buffering after selecting a higher resolution, return to automatic quality selection or choose a lower resolution.
If the video still appears blurry or pixelated at the highest available resolution, continue with the following troubleshooting steps.
Test playback on another device or connection
Step 1
Open the same video on another supported device or browser.
Step 2
Compare the playback quality with the original viewing environment.
Step 3
If possible, test the video using a different internet connection.
Step 4
Check whether the quality issue occurs consistently across different devices, browsers, and internet connections.
If the video appears clear in one environment but lower quality in another, the difference may be related to the device, display, internet connection, or player settings.
If the quality issue occurs consistently across multiple viewing environments, continue with the following steps.
Review video export settings
If the previous checks indicate a problem with the original video file or its export settings, review the settings used to prepare the file.
Step 1
Open the original video project in your video editing or encoding software.
Step 2
Review the export settings, including:
Video resolution
Video codec
Frame rate
Video bitrate
File format
Step 3
Compare your settings with the recommendations in Recommended export settings for VOD uploads.
Step 4
If the original file or its export settings are contributing to the quality issue, export a new version using the recommended settings.
Step 5
If you exported a new version, upload it to the Media Cloud and review the playback quality after encoding is complete.
If the original video already looks clear and its export settings are appropriate, you may not need to re-export it. Continue to the next section if the streaming quality issue persists.
Contact Customer Support
If your original video file looks clear but the streamed version continues to appear blurry, pixelated, or lower quality than expected after completing the troubleshooting steps above, contact Customer Support.
To help our team investigate the issue, please provide the following information:
The title of the affected video and its Media ID, if available.
A link to the player, app, or publishing property where the issue occurs.
The device, operating system, and browser or app used for playback.
The playback resolution selected, if manual quality selection is available.
Whether the issue affects one video or multiple videos.
Whether the issue occurs throughout the video or only at specific timestamps.
The original video file's resolution, bitrate, codec, and frame rate, if available.
Screenshots or a screen recording demonstrating the issue, if possible.
Please also let us know which troubleshooting steps you have already completed.
FAQs
Can Lightcast improve the quality of a low-quality original video file?
Encoding prepares the original video for streaming but cannot restore image detail that is missing from the uploaded file.
For better results, review the original video quality and export settings before uploading a new version.
Why does my HD video look blurry or pixelated?
HD resolution alone does not guarantee high image quality.
A video may appear blurry or pixelated because of limitations in the original recording, insufficient bitrate, excessive compression, or the quality being delivered during playback.
Even when an HD streaming version is available, the displayed quality may vary depending on the viewer's device, internet connection, and playback conditions.
Why does my video quality change during playback?
Adaptive Bitrate Streaming (ABR) allows compatible players to automatically adjust video quality based on the viewer's internet connection and playback conditions.
A video may initially start at a lower resolution and improve as playback continues.
If the internet connection slows down or becomes unstable, the player may switch to a lower-bitrate version to reduce buffering and maintain smoother playback.
Why is a higher playback resolution not available for my video?
The available playback resolutions depend on the resolution of your original video file, the applicable encoding configuration, and the capabilities of the player or publishing platform.
Uploading a video in a higher resolution does not necessarily mean that every resolution will be available for playback on every device or platform.
If you believe a higher playback resolution should be available for your video, contact Customer Support for assistance.
What should I do if the original video looks clear but the streamed version does not?
First, confirm that video encoding is complete and allow the video to play for a short time to see whether its quality improves automatically.
If the player supports manual quality selection, try a higher available resolution. You can also test the video on another device, browser, or internet connection.
If the quality issue continues across multiple viewing environments after completing these checks, contact Customer Support and provide the affected video's details and the troubleshooting steps you have already completed.